> ## Documentation Index
> Fetch the complete documentation index at: https://docs.xpander.ai/llms.txt
> Use this file to discover all available pages before exploring further.
# Visual Agent Builder to Code
> Build an AI agent visually in the workbench, test it, then download the code to your IDE for custom development.
**Time to complete:** 5 minutes\
**What you'll get:** A working AI agent built visually + full source code in your IDE ready for customization
Start with zero code using the visual Agent Workbench, then seamlessly transition to full development control with downloadable source code.
 ## Quick Build-to-Code Process
Go to [app.xpander.ai](https://app.xpander.ai) and click **+ New Agent**.
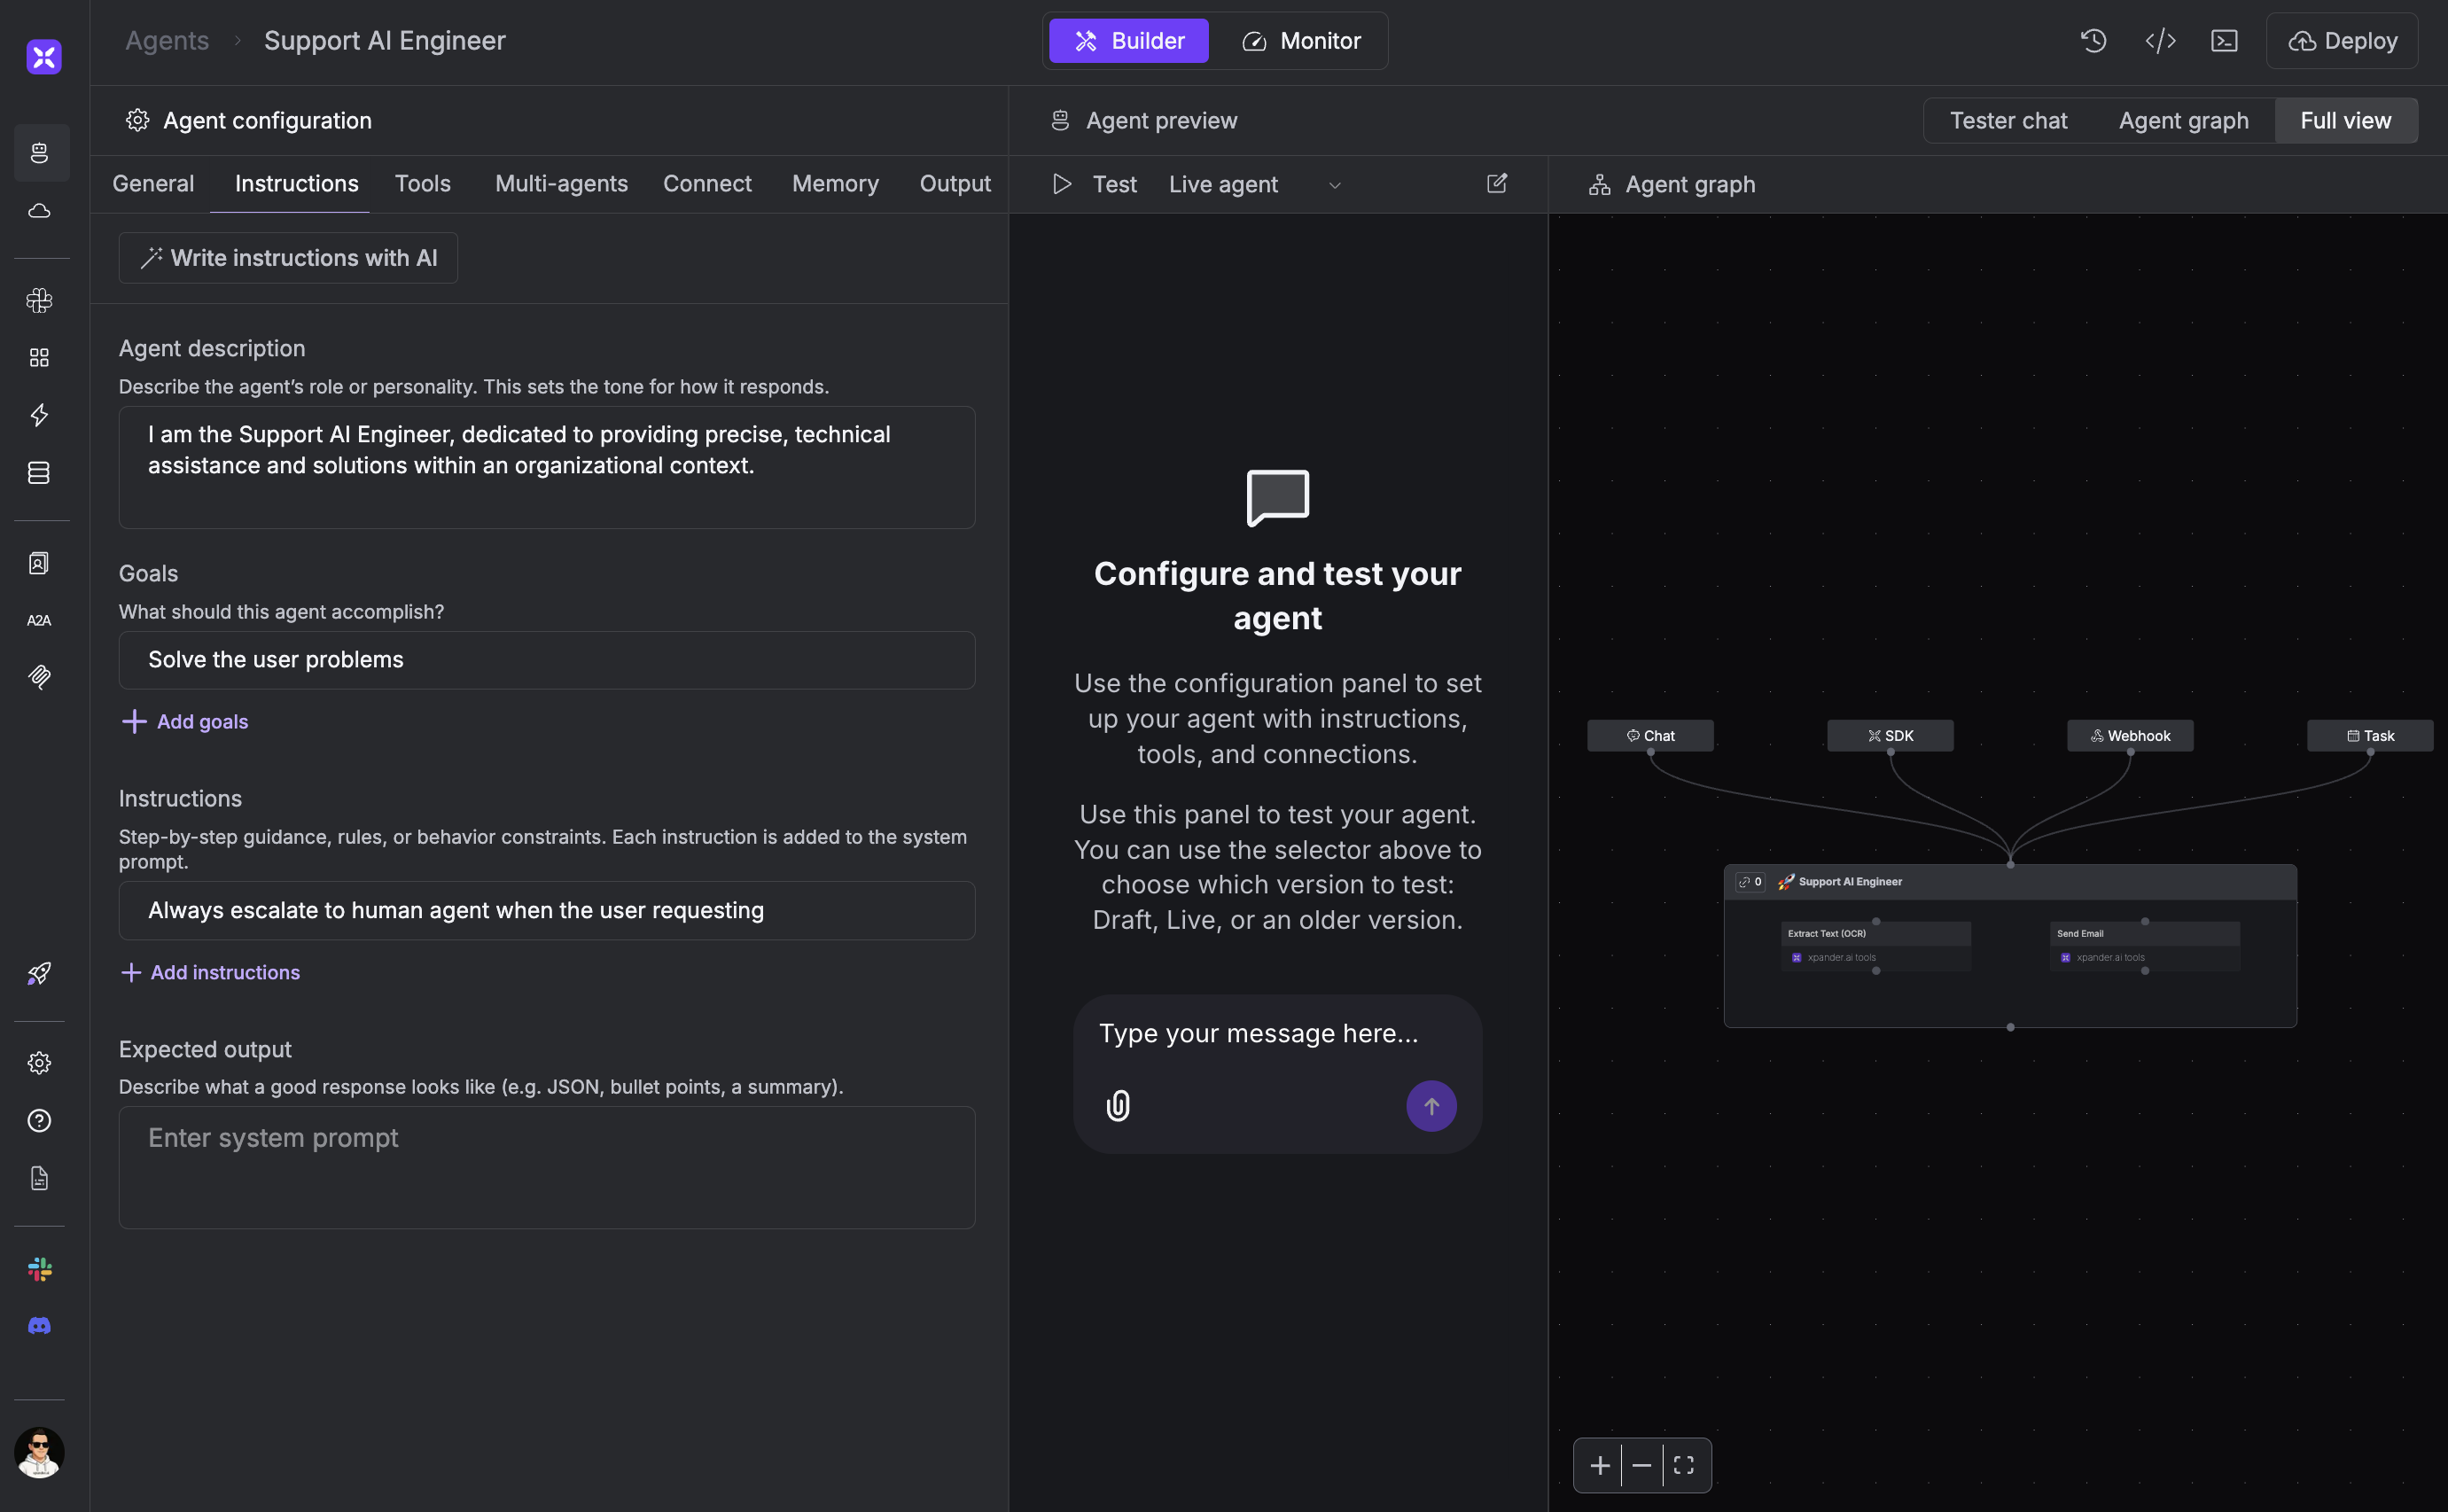
The workbench has two main sections:
* **Left**: Agent configuration (tools, instructions, settings)
* **Right**: Agent preview (chat testing and visual graph)
No coding required - build everything through the UI!
In the **Instructions** tab:
1. Click **"Write instructions with AI"**
2. Enter a simple prompt like: `AI Agent that can get the latest news about any topic from Google News, and send those news via email`
3. Watch as the system automatically populates:
* System prompt
* Agent rules
* Goals and behavior guidelines
AI-optimized prompts generated automatically!
In the **Tools** tab, click **+ Add tools** and select:
* **Google News** → Retrieve News Articles By Topic
* **Built-in actions** → Send Email
* Add any other tools you need from the gallery
Use the Chat module in the Agent Preview panel to test your agent.
Test with: `Get the latest news about LLM reasoning models, and send them to me over email`
Ready to add custom logic? Click the **Download code** button in the top right.
Or use the CLI:
```bash theme={"dark"}
# Install CLI
npm install -g xpander-cli
# Download your agent code
xpander agent init "your-agent-name"
```
You'll get a complete project with:
* Pre-configured Python/Node.js code
* All your workbench settings
* Environment variables ready
* Your tools and instructions baked in
## What You Get in Your IDE
🎉 **Complete codebase** with everything from the workbench:
```python Python Agent Structure theme={"dark"}
from xpander_sdk import Backend, on_task, Task, register_tool
from agno.agent import Agent
# Your workbench tools are automatically available
# Add custom tools here:
@register_tool
def my_custom_function(data: str) -> str:
"""Your custom business logic"""
# Add your own logic here
return f"Processed: {data}"
@on_task
def handle_request(task: Task):
backend = Backend(task.configuration)
agent = Agent(**backend.get_args())
# Your workbench instructions are already configured
result = agent.arun(message=task.to_message())
task.result = result.content
return task
```
```bash Development Workflow theme={"dark"}
# Test locally (routes all requests to your machine)
xpander dev
# Deploy when ready
xpander deploy
```
## Key Benefits of This Approach
Build and test ideas quickly without writing code
Get optimized prompts and configurations automatically
Download includes all your visual configurations
Add custom functions, APIs, and business logic
## Advanced Customization Ideas
```python theme={"dark"}
@register_tool
def validate_customer(email: str) -> dict:
"""Check customer status in your CRM"""
# Connect to your database/CRM
return {"status": "premium", "tier": "gold"}
@register_tool
def process_payment(amount: float, customer_id: str) -> str:
"""Process payment via your payment gateway"""
# Custom payment processing logic
return "Payment processed successfully"
```
```python theme={"dark"}
@on_task
def handle_slack_message(task: Task):
# Custom preprocessing of Slack messages
if task.source == "slack":
# Add user context, filter sensitive data, etc.
task.metadata["user_role"] = get_user_role(task.user_id)
# Continue with agent processing
backend = Backend(task.configuration)
agent = Agent(**backend.get_args())
result = agent.arun(message=task.to_message())
return task
```
```python theme={"dark"}
@register_tool
def check_inventory(product_id: str) -> dict:
"""Check real-time inventory from your system"""
import requests
response = requests.get(f"https://api.yourcompany.com/inventory/{product_id}")
return response.json()
```
## Testing Your Custom Code
```bash theme={"dark"}
xpander dev --debug
```
All Slack messages, webhook calls, and UI interactions route to your local machine.
* Test through the workbench chat UI
* Send Slack messages (if connected)
* Trigger webhooks from external systems
* See debug logs in your terminal
```bash theme={"dark"}
xpander deploy
```
Your customizations go live instantly with automatic scaling.
## Next Steps
Now that you have both visual design and code control:
1. **[AI Models](/guides/agents/ai-models-intelligence)** - Advanced agent settings
2. **[API Reference](/api-reference)** - Full SDK documentation
3. **[Examples](/Examples)** - See more complex agent implementations
***
## Quick Build-to-Code Process
Go to [app.xpander.ai](https://app.xpander.ai) and click **+ New Agent**.
The workbench has two main sections:
* **Left**: Agent configuration (tools, instructions, settings)
* **Right**: Agent preview (chat testing and visual graph)
No coding required - build everything through the UI!
In the **Instructions** tab:
1. Click **"Write instructions with AI"**
2. Enter a simple prompt like: `AI Agent that can get the latest news about any topic from Google News, and send those news via email`
3. Watch as the system automatically populates:
* System prompt
* Agent rules
* Goals and behavior guidelines
AI-optimized prompts generated automatically!
In the **Tools** tab, click **+ Add tools** and select:
* **Google News** → Retrieve News Articles By Topic
* **Built-in actions** → Send Email
* Add any other tools you need from the gallery
Use the Chat module in the Agent Preview panel to test your agent.
Test with: `Get the latest news about LLM reasoning models, and send them to me over email`
Ready to add custom logic? Click the **Download code** button in the top right.
Or use the CLI:
```bash theme={"dark"}
# Install CLI
npm install -g xpander-cli
# Download your agent code
xpander agent init "your-agent-name"
```
You'll get a complete project with:
* Pre-configured Python/Node.js code
* All your workbench settings
* Environment variables ready
* Your tools and instructions baked in
## What You Get in Your IDE
🎉 **Complete codebase** with everything from the workbench:
```python Python Agent Structure theme={"dark"}
from xpander_sdk import Backend, on_task, Task, register_tool
from agno.agent import Agent
# Your workbench tools are automatically available
# Add custom tools here:
@register_tool
def my_custom_function(data: str) -> str:
"""Your custom business logic"""
# Add your own logic here
return f"Processed: {data}"
@on_task
def handle_request(task: Task):
backend = Backend(task.configuration)
agent = Agent(**backend.get_args())
# Your workbench instructions are already configured
result = agent.arun(message=task.to_message())
task.result = result.content
return task
```
```bash Development Workflow theme={"dark"}
# Test locally (routes all requests to your machine)
xpander dev
# Deploy when ready
xpander deploy
```
## Key Benefits of This Approach
Build and test ideas quickly without writing code
Get optimized prompts and configurations automatically
Download includes all your visual configurations
Add custom functions, APIs, and business logic
## Advanced Customization Ideas
```python theme={"dark"}
@register_tool
def validate_customer(email: str) -> dict:
"""Check customer status in your CRM"""
# Connect to your database/CRM
return {"status": "premium", "tier": "gold"}
@register_tool
def process_payment(amount: float, customer_id: str) -> str:
"""Process payment via your payment gateway"""
# Custom payment processing logic
return "Payment processed successfully"
```
```python theme={"dark"}
@on_task
def handle_slack_message(task: Task):
# Custom preprocessing of Slack messages
if task.source == "slack":
# Add user context, filter sensitive data, etc.
task.metadata["user_role"] = get_user_role(task.user_id)
# Continue with agent processing
backend = Backend(task.configuration)
agent = Agent(**backend.get_args())
result = agent.arun(message=task.to_message())
return task
```
```python theme={"dark"}
@register_tool
def check_inventory(product_id: str) -> dict:
"""Check real-time inventory from your system"""
import requests
response = requests.get(f"https://api.yourcompany.com/inventory/{product_id}")
return response.json()
```
## Testing Your Custom Code
```bash theme={"dark"}
xpander dev --debug
```
All Slack messages, webhook calls, and UI interactions route to your local machine.
* Test through the workbench chat UI
* Send Slack messages (if connected)
* Trigger webhooks from external systems
* See debug logs in your terminal
```bash theme={"dark"}
xpander deploy
```
Your customizations go live instantly with automatic scaling.
## Next Steps
Now that you have both visual design and code control:
1. **[AI Models](/guides/agents/ai-models-intelligence)** - Advanced agent settings
2. **[API Reference](/api-reference)** - Full SDK documentation
3. **[Examples](/Examples)** - See more complex agent implementations
***