> ## Documentation Index
> Fetch the complete documentation index at: https://docs.xpander.ai/llms.txt
> Use this file to discover all available pages before exploring further.
# Add a skill
> Step by step for each kind of skill: an API connector from the catalog or your own OpenAPI spec, a remote or local MCP connector, a Markdown skill as SKILL.md or a zip bundle, and code as a custom action.
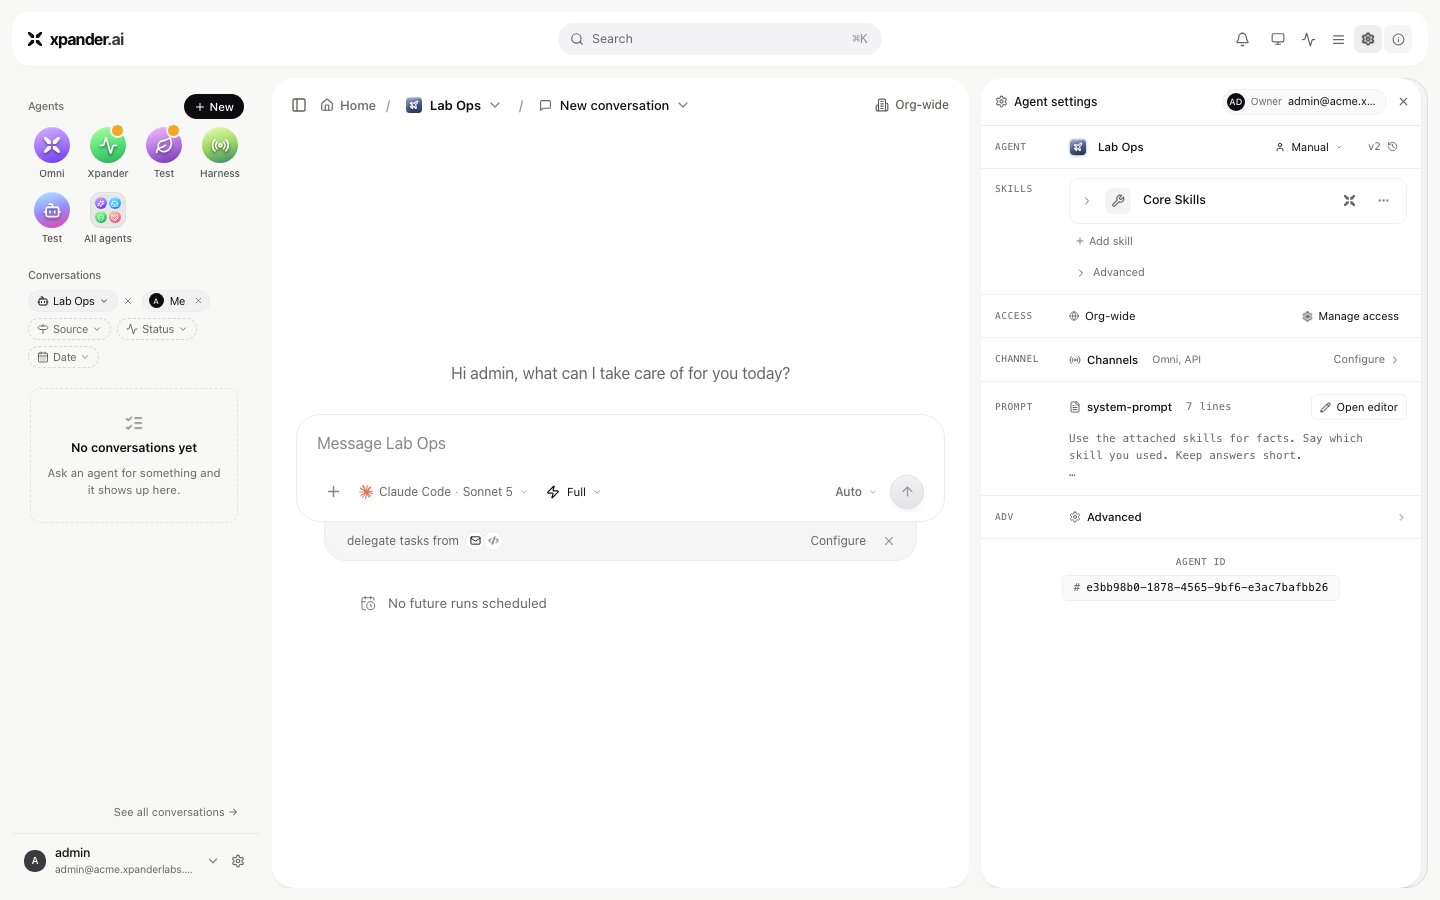
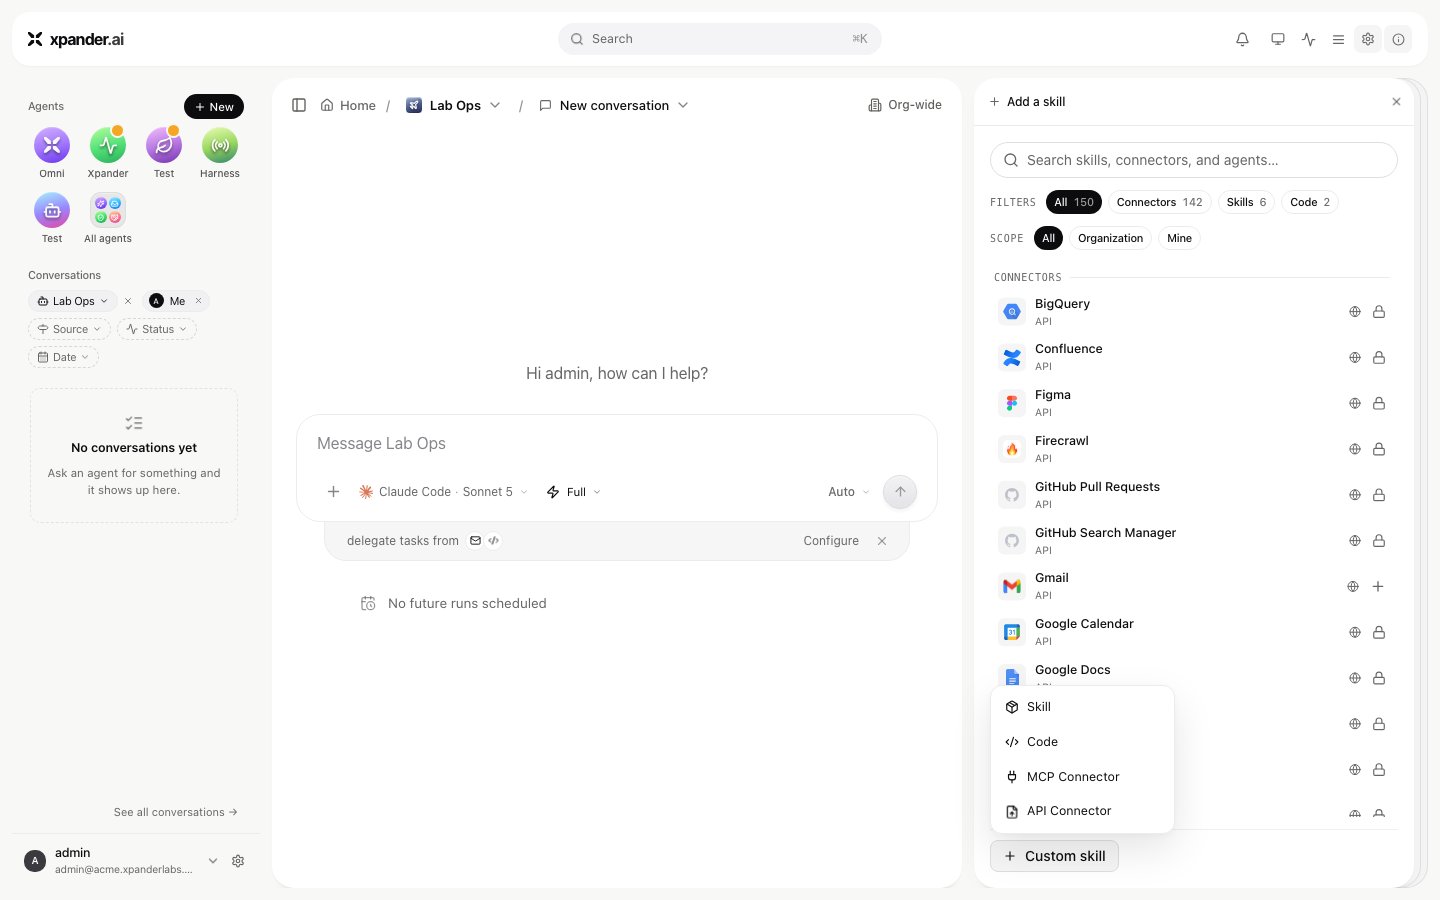
Every kind starts in the same place: open **Agent settings** and click **Add skill** under **Skills**. The panel's filters are its own labels: **All**, **Connectors** (API and MCP connectors), **Skills** (Markdown skills together with the built-in actions the runtime ships with; the built-ins carry a **Powered by Xpander** badge) and **Code** (custom actions). A **Scope** filter (**All**, **Organization**, **Mine**) splits the library into what is shared with you and what you created. **Custom skill** at the bottom of the panel opens a menu with **Skill**, **Code**, **MCP Connector** and **API Connector**. Who may add or manage skills at all is set per user group under **Settings > User groups** with the **Add skills** and **Manage skills** switches.
 ### From the catalog
1. In **Add skill**, choose the **Connectors** filter and search for the system.
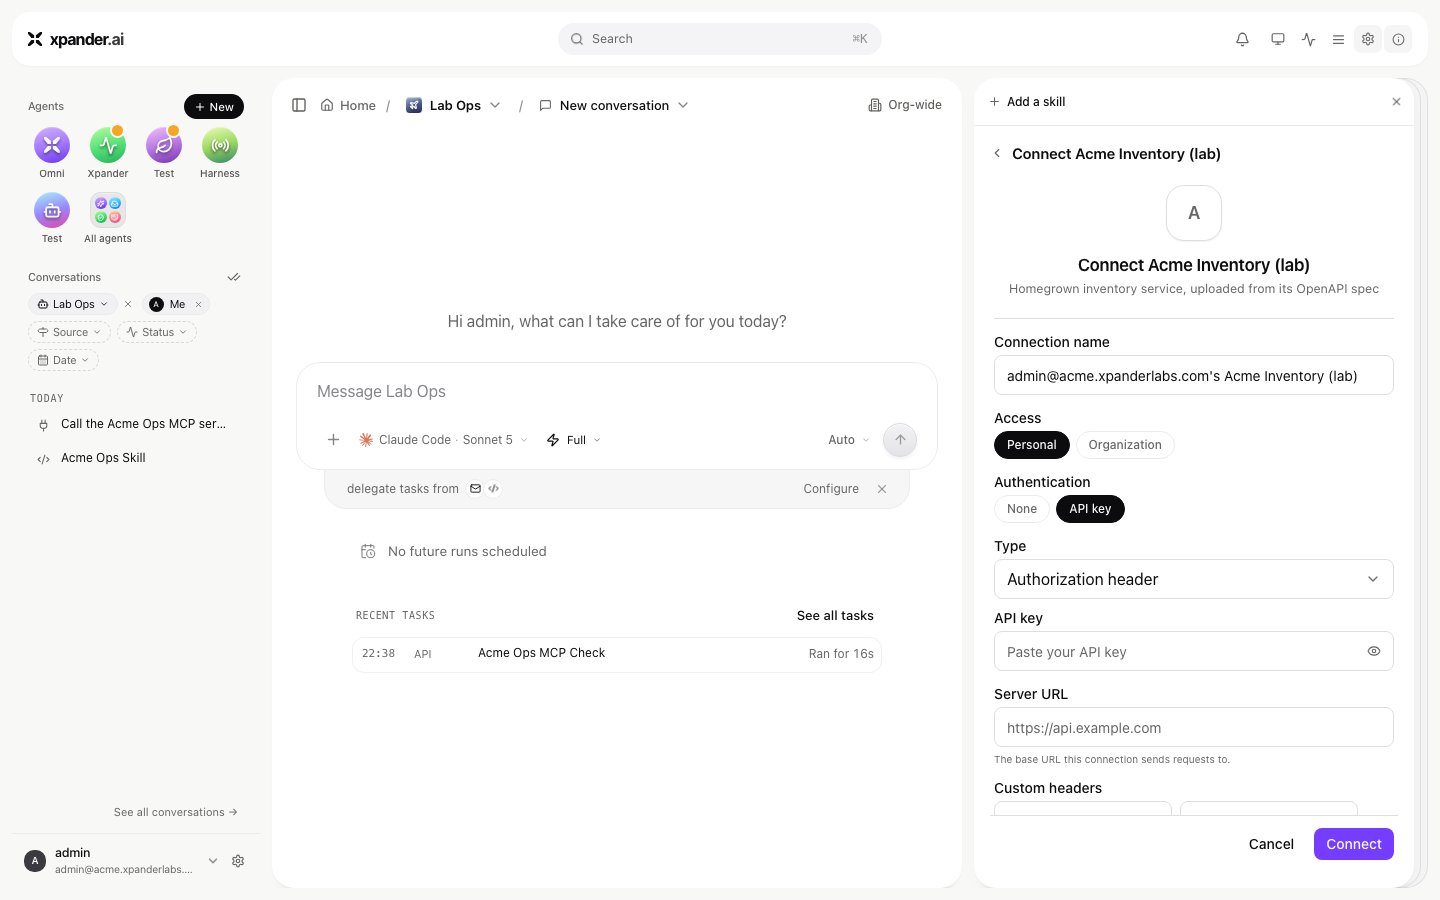
2. Select it. The connect dialog is titled **Connect** followed by the skill name. **Connection name** is prefilled with your email and the skill name. **Access** is **Personal** (your own account, so the agent acts with your permissions where the system allows) or **Organization** (one shared account).
3. Authenticate the way the skill requires: **Sign in with the vendor** for OAuth, or a key. With **Authentication** on **API key**, the **Type** list decides how the key travels: **Authorization header**, **Basic**, **Bearer**, **In-URL**, **Custom header** or **API key** (sent as `ApiKey `). Paste the key under **API key**. **Server URL** overrides the base URL this connection sends requests to; empty means the address from the skill's spec. **Custom headers** adds fixed headers to every call. Click **Connect**. xpander stores the credential and injects it at call time; the agent never sees it.
4. The skill panel lists the actions by group. Enable only the groups the agent needs, and mark the actions that should wait for a named person under **These actions need approval**.
### From the catalog
1. In **Add skill**, choose the **Connectors** filter and search for the system.
2. Select it. The connect dialog is titled **Connect** followed by the skill name. **Connection name** is prefilled with your email and the skill name. **Access** is **Personal** (your own account, so the agent acts with your permissions where the system allows) or **Organization** (one shared account).
3. Authenticate the way the skill requires: **Sign in with the vendor** for OAuth, or a key. With **Authentication** on **API key**, the **Type** list decides how the key travels: **Authorization header**, **Basic**, **Bearer**, **In-URL**, **Custom header** or **API key** (sent as `ApiKey `). Paste the key under **API key**. **Server URL** overrides the base URL this connection sends requests to; empty means the address from the skill's spec. **Custom headers** adds fixed headers to every call. Click **Connect**. xpander stores the credential and injects it at call time; the agent never sees it.
4. The skill panel lists the actions by group. Enable only the groups the agent needs, and mark the actions that should wait for a named person under **These actions need approval**.
 Each skill page in this section carries the **HTTP API connector** badge, the address the calls go to, the credential they carry, and the actions.
### From your own OpenAPI spec
1. At the bottom of **Add skill** choose **Custom skill**, then **API Connector**. The dialog that opens is titled **Create connector**.
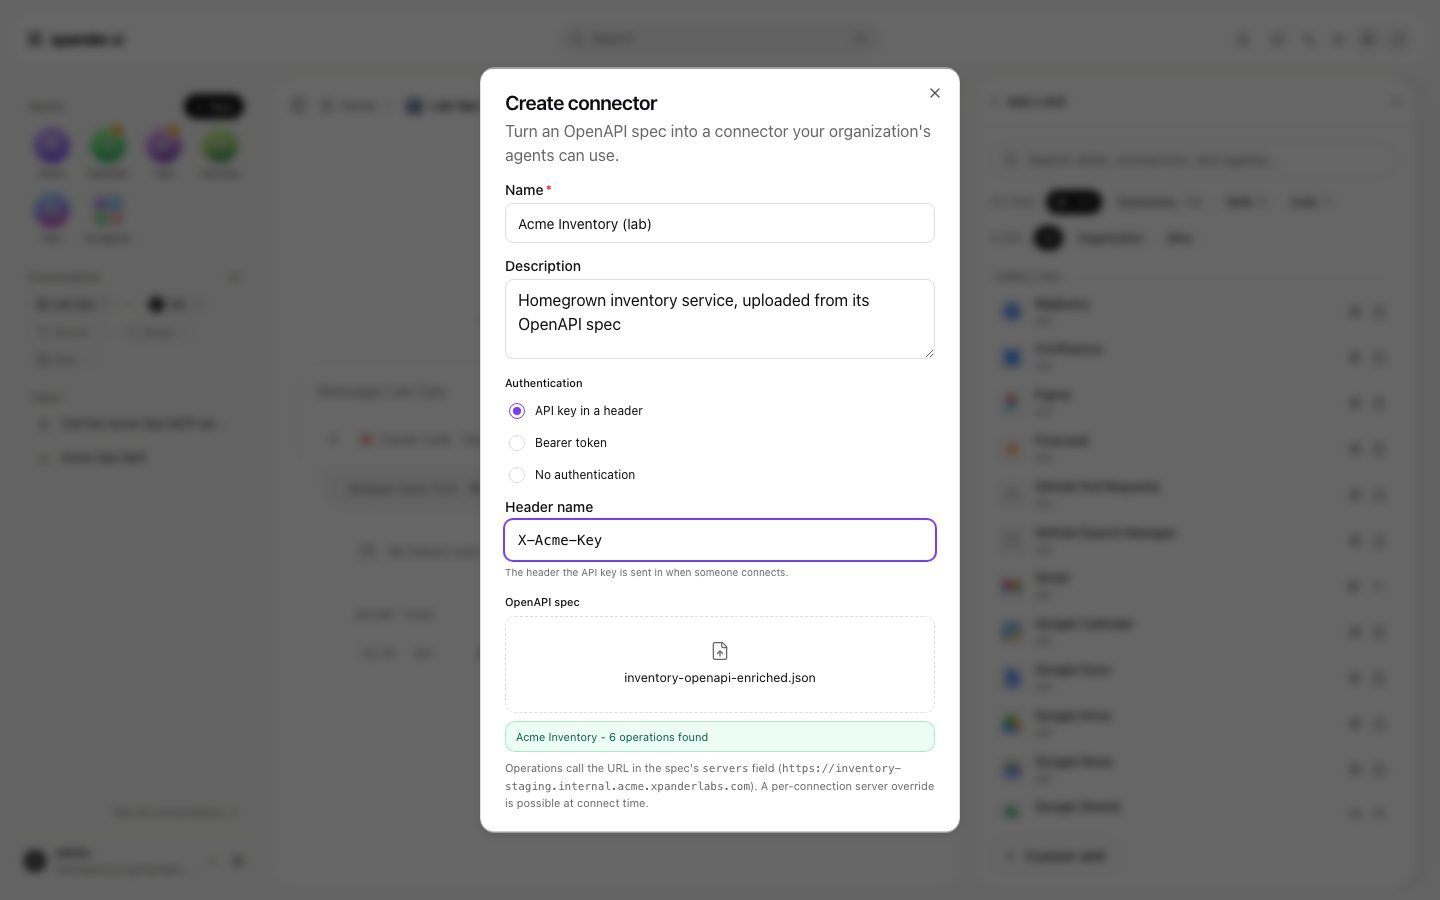
2. Fill in **Name** and **Description**. Under **Authentication** pick what the API expects: **API key in a header** (then **Header name**, the header the key is sent in when someone connects), **Bearer token** or **No authentication**.
3. Upload the spec under **OpenAPI spec**. The dialog reads it at once and reports the spec's title and how many operations it found. Operations call the URL in the spec's `servers` field; a per-connection server override is possible at connect time.
4. Create it. The dialog shows the pipeline as it runs: **Creating the connector**, **Starting AI enrichment**, **Generating the enriched spec**, **Activating in the catalog**, **Waiting for ready**. Generation runs in the background, so closing the dialog is safe. When no LLM provider is configured for the generator, the spec is ingested as-is with no enrichment.
5. Connect it like a catalog skill.
Each skill page in this section carries the **HTTP API connector** badge, the address the calls go to, the credential they carry, and the actions.
### From your own OpenAPI spec
1. At the bottom of **Add skill** choose **Custom skill**, then **API Connector**. The dialog that opens is titled **Create connector**.
2. Fill in **Name** and **Description**. Under **Authentication** pick what the API expects: **API key in a header** (then **Header name**, the header the key is sent in when someone connects), **Bearer token** or **No authentication**.
3. Upload the spec under **OpenAPI spec**. The dialog reads it at once and reports the spec's title and how many operations it found. Operations call the URL in the spec's `servers` field; a per-connection server override is possible at connect time.
4. Create it. The dialog shows the pipeline as it runs: **Creating the connector**, **Starting AI enrichment**, **Generating the enriched spec**, **Activating in the catalog**, **Waiting for ready**. Generation runs in the background, so closing the dialog is safe. When no LLM provider is configured for the generator, the spec is ingested as-is with no enrichment.
5. Connect it like a catalog skill.
 The enrichment steps call the LLM provider the install chose for the `openapi-spec-generator` service at install time: Bedrock when the install has Bedrock configured, otherwise OpenAI when the installer ran with `--openai-key`. With OpenAI the service dials `api.openai.com` directly, so the pods need that egress. A step that fails leaves the API connector at status `faulty` with no operations, and its row offers **Retry**. One failure seen on the current build: the tags step ends with `400 Invalid schema for response_format 'TagGroups'` from the provider. **Retry** repeats the same pipeline, so it fails the same way until the cause is fixed; read the `openapi-spec-generator` pod log first. The provider choice and the bucket the generator needs are on [AI Skill Generation](/self-hosted/airgap#ai-skill-generation).
Do not connect an API connector while it is `faulty`. The connection is accepted, and every call to that agent then fails with `500 Failed to build agent details` until the connection is gone. The app cannot remove that connection; the recovery is an operator step on [Air-Gapped troubleshooting](/self-hosted/airgap#an-agent-answers-500-failed-to-build-agent-details).
Later, upload a new spec version from the skill's row; it preloads the current auth method. Deleting the skill says which agents lose it. An API connector you create exists only in your installation.
### Remote server
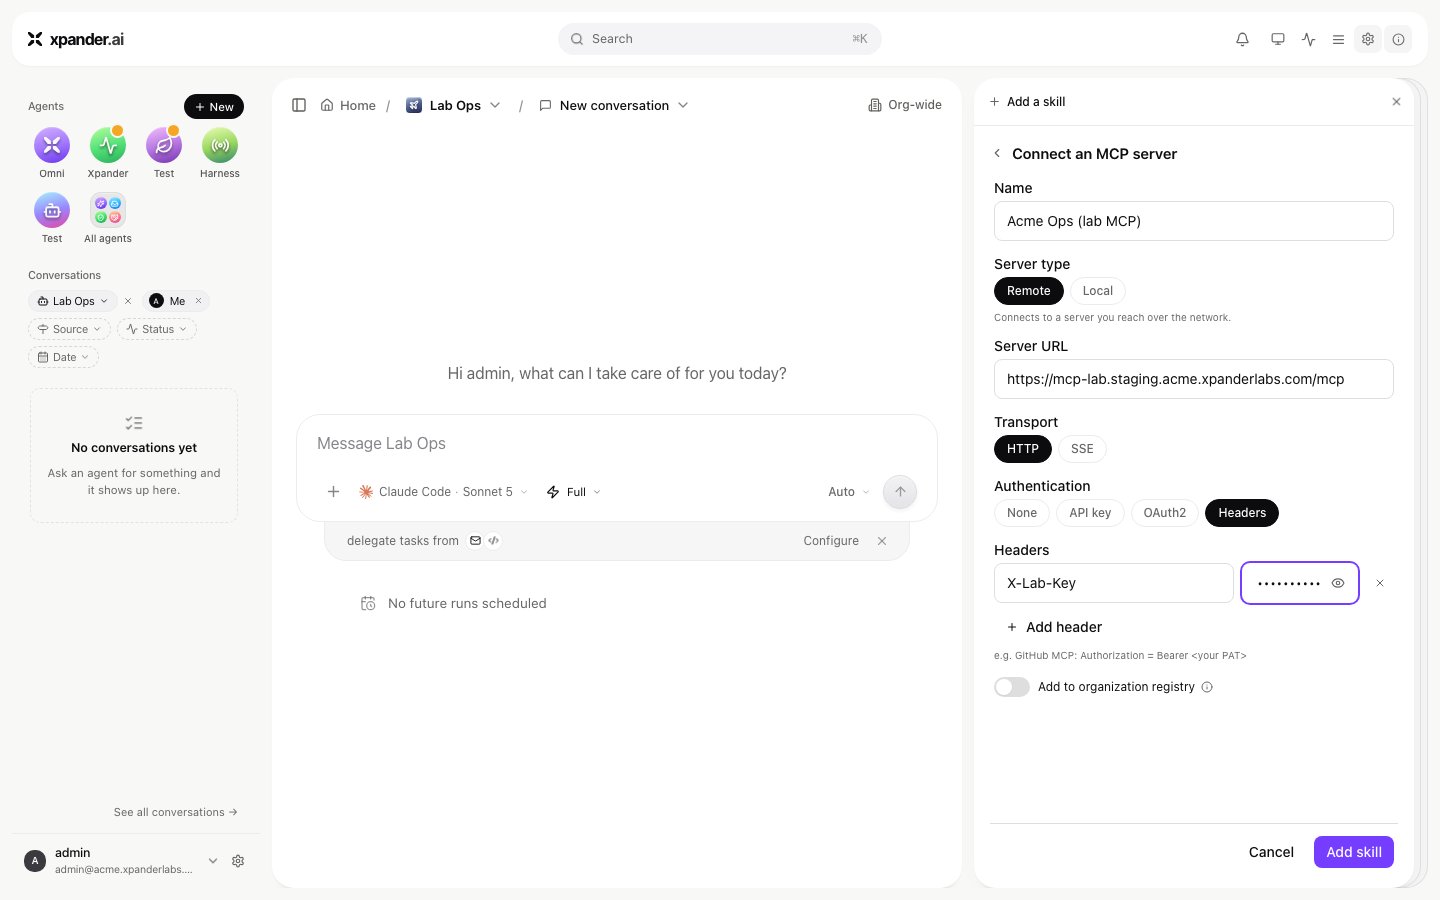
1. In **Add skill** choose **Custom skill**, then **MCP Connector**. The dialog that opens is titled **Connect an MCP server**. Or register it for the whole organization under **Settings > MCP registry** with **Add server**. There is no built-in list of MCP servers to pick from; you bring the server's address.
2. Enter a **Name**, keep **Server type** on **Remote**, and enter the **Server URL**. **Transport** is **HTTP** or **SSE**.
3. Choose the **Authentication**: **None**, **API key**, **OAuth2**, or **Headers**. With **Headers**, each row is a header name and value; the name defaults to `Authorization`, and a key the server expects in a header of its own goes here. With OAuth, each person can authorize their own account, so the agent acts with that person's permissions where the server allows; a person's token can be shared across the agents they use.
4. **Add to organization registry** files the entry under **Organization servers** in **Settings > MCP registry**, where every agent in the organization can attach it. Click **Add skill**. The dialog tests the address as soon as you enter it and shows the result inline; you can still add it while it is unreachable and the agent retries at runtime. The registry shows a health indicator per row and a badge when the server supports dynamic client registration; deleting an entry says which agents lose it.
The enrichment steps call the LLM provider the install chose for the `openapi-spec-generator` service at install time: Bedrock when the install has Bedrock configured, otherwise OpenAI when the installer ran with `--openai-key`. With OpenAI the service dials `api.openai.com` directly, so the pods need that egress. A step that fails leaves the API connector at status `faulty` with no operations, and its row offers **Retry**. One failure seen on the current build: the tags step ends with `400 Invalid schema for response_format 'TagGroups'` from the provider. **Retry** repeats the same pipeline, so it fails the same way until the cause is fixed; read the `openapi-spec-generator` pod log first. The provider choice and the bucket the generator needs are on [AI Skill Generation](/self-hosted/airgap#ai-skill-generation).
Do not connect an API connector while it is `faulty`. The connection is accepted, and every call to that agent then fails with `500 Failed to build agent details` until the connection is gone. The app cannot remove that connection; the recovery is an operator step on [Air-Gapped troubleshooting](/self-hosted/airgap#an-agent-answers-500-failed-to-build-agent-details).
Later, upload a new spec version from the skill's row; it preloads the current auth method. Deleting the skill says which agents lose it. An API connector you create exists only in your installation.
### Remote server
1. In **Add skill** choose **Custom skill**, then **MCP Connector**. The dialog that opens is titled **Connect an MCP server**. Or register it for the whole organization under **Settings > MCP registry** with **Add server**. There is no built-in list of MCP servers to pick from; you bring the server's address.
2. Enter a **Name**, keep **Server type** on **Remote**, and enter the **Server URL**. **Transport** is **HTTP** or **SSE**.
3. Choose the **Authentication**: **None**, **API key**, **OAuth2**, or **Headers**. With **Headers**, each row is a header name and value; the name defaults to `Authorization`, and a key the server expects in a header of its own goes here. With OAuth, each person can authorize their own account, so the agent acts with that person's permissions where the server allows; a person's token can be shared across the agents they use.
4. **Add to organization registry** files the entry under **Organization servers** in **Settings > MCP registry**, where every agent in the organization can attach it. Click **Add skill**. The dialog tests the address as soon as you enter it and shows the result inline; you can still add it while it is unreachable and the agent retries at runtime. The registry shows a health indicator per row and a badge when the server supports dynamic client registration; deleting an entry says which agents lose it.
 On the agent's next turn the runtime resolves the endpoint and its actions, and the agent can call them. Once registered, the server appears under **Add skill** like a catalog skill, and its actions can be marked to wait for approval. Per-user OAuth setup and the SDK view are on [whose credential a shared agent uses](/use/agents/permissions#whose-credential-a-shared-agent-uses).
### Local server (stdio)
1. In **Add skill** choose **Custom skill**, then **MCP Connector**, and pick **Local**.
2. Enter the command and its environment variables. The form says which commands are supported and lints what you typed.
3. Save. The server is started and tested inside the agent's own workspace; a held test is polled rather than timed out, and the server's own output is shown on failure.
A local server runs in the agent's workspace, stays claimed across restarts, and its environment can be edited after attaching. Any agent can register one, from this form or from the chat.
A Markdown skill is a `SKILL.md` that tells the agent when and how to do one job, alone or in a zip bundle with the scripts and files it points to. It is loaded fully into the agent at run time, so keep it short.
### Write one in the app
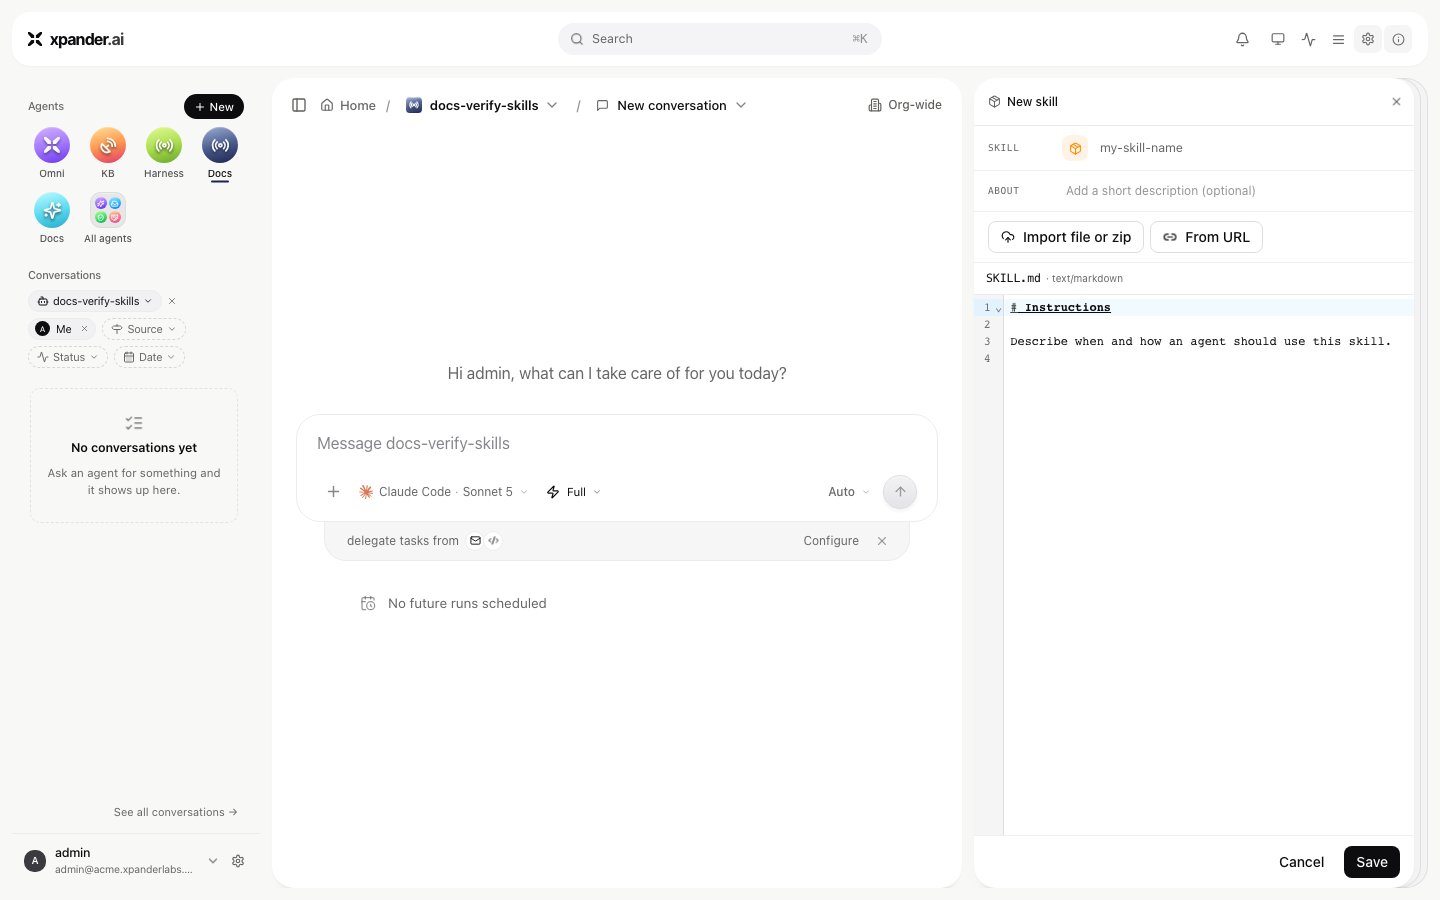
1. At the bottom of **Add skill** choose **Custom skill**, then **Skill** (or **Create a skill** when the Skills view is empty).
2. **SKILL**: the name, lowercase letters and digits separated by single hyphens, unique within the organization. The words `anthropic` and `claude` are not allowed.
3. **ABOUT**: a one-line description; empty means the document's first line is used.
4. **SKILL.md**: the document. A `name:` or `description:` in its front matter fills the rows above, and editing the rows writes back.
5. **Save** creates version `1.0.0` and attaches the skill to the agent you started from.
On the agent's next turn the runtime resolves the endpoint and its actions, and the agent can call them. Once registered, the server appears under **Add skill** like a catalog skill, and its actions can be marked to wait for approval. Per-user OAuth setup and the SDK view are on [whose credential a shared agent uses](/use/agents/permissions#whose-credential-a-shared-agent-uses).
### Local server (stdio)
1. In **Add skill** choose **Custom skill**, then **MCP Connector**, and pick **Local**.
2. Enter the command and its environment variables. The form says which commands are supported and lints what you typed.
3. Save. The server is started and tested inside the agent's own workspace; a held test is polled rather than timed out, and the server's own output is shown on failure.
A local server runs in the agent's workspace, stays claimed across restarts, and its environment can be edited after attaching. Any agent can register one, from this form or from the chat.
A Markdown skill is a `SKILL.md` that tells the agent when and how to do one job, alone or in a zip bundle with the scripts and files it points to. It is loaded fully into the agent at run time, so keep it short.
### Write one in the app
1. At the bottom of **Add skill** choose **Custom skill**, then **Skill** (or **Create a skill** when the Skills view is empty).
2. **SKILL**: the name, lowercase letters and digits separated by single hyphens, unique within the organization. The words `anthropic` and `claude` are not allowed.
3. **ABOUT**: a one-line description; empty means the document's first line is used.
4. **SKILL.md**: the document. A `name:` or `description:` in its front matter fills the rows above, and editing the rows writes back.
5. **Save** creates version `1.0.0` and attaches the skill to the agent you started from.
 ### Import one
* **Import file or zip**: a `.md` file, or a zip containing `SKILL.md` and any other files. Files beyond `SKILL.md` can only arrive this way.
* **From URL**: a link to a `SKILL.md` or to a bundle zip that contains one.
* Skills written for Claude Code use the same format and import unchanged; a bundle that needed adjusting shows an `Imported with warnings` banner.
### Publish from a repository
Keep skills in a repository with their scope set in `xpander.yaml` and publish them with the [Publish Skills](/api-reference/v1/skills/publish) endpoint; visibility is `org`, `restricted` (an allowlist of agents) or `agent`.
After creation: **Edit** bumps the patch version, **Manage access** sets Private, Group or Org-wide, **Skill contents** lists every file in the bundle, **Download** fetches the zip, and **Delete skill** removes it for everyone. Built-in skills carry the **Powered by Xpander** badge. The registry and its badges are on [Skills registry](/use/skills-registry).
A custom action is a Python function xpander stores and runs. Under **Custom skill** in **Add skill** it is the **Code** entry; opening it takes you straight to the agent's workspace to write the function.
### Through the API
* `POST /v1/custom_functions` with `name`, `function_name`, `description`, `source_code` and `limits` creates one.
* `POST /v1/custom_functions/generate` writes the function for you from a `query` (a description), a `user_function` to adapt, or an `import_curl` call to wrap.
* `POST /v1/custom_functions/{function_id}/execute` runs it; `PATCH` and `DELETE` update and remove it.
* A new function starts at `status: created` and moves to `ready` once its analysis finishes. Attach a ready function to an agent with `POST /v1/agents/{agent_id}/tools` and the body `{"type": "custom_function", "custom_function_id": ""}`; the response is the agent's attached list.
Reference: [Custom Functions](/api-reference/v1/custom_functions/create-custom-function). Workspace secrets are injected server-side when a function executes, so the code never holds a credential.
### From inside a skill
A Markdown skill's script can generate, save, poll, execute and delete custom functions through the loopback `skill_utils` endpoints in the agent's workspace, with no API key; the `skills-generator` built-in skill is a worked example.
### In an agent loop you run yourself
Decorate a typed Python function with `@register_tool` and the SDK generates its schema from the type hints; the agent calls it like any other skill. See [Connect custom skills](/developers/tools/custom-tools).
## What is recorded
Whatever the kind, the task record shows each skill call an agent made, with its parameters and result, under the person who asked. **Settings > Audit logs** records `Skill Created` and `Skill Added` events with the person who did it, and a skill's row shows its version and who provided it, so an agent's skills list reads as a bill of materials.
### Import one
* **Import file or zip**: a `.md` file, or a zip containing `SKILL.md` and any other files. Files beyond `SKILL.md` can only arrive this way.
* **From URL**: a link to a `SKILL.md` or to a bundle zip that contains one.
* Skills written for Claude Code use the same format and import unchanged; a bundle that needed adjusting shows an `Imported with warnings` banner.
### Publish from a repository
Keep skills in a repository with their scope set in `xpander.yaml` and publish them with the [Publish Skills](/api-reference/v1/skills/publish) endpoint; visibility is `org`, `restricted` (an allowlist of agents) or `agent`.
After creation: **Edit** bumps the patch version, **Manage access** sets Private, Group or Org-wide, **Skill contents** lists every file in the bundle, **Download** fetches the zip, and **Delete skill** removes it for everyone. Built-in skills carry the **Powered by Xpander** badge. The registry and its badges are on [Skills registry](/use/skills-registry).
A custom action is a Python function xpander stores and runs. Under **Custom skill** in **Add skill** it is the **Code** entry; opening it takes you straight to the agent's workspace to write the function.
### Through the API
* `POST /v1/custom_functions` with `name`, `function_name`, `description`, `source_code` and `limits` creates one.
* `POST /v1/custom_functions/generate` writes the function for you from a `query` (a description), a `user_function` to adapt, or an `import_curl` call to wrap.
* `POST /v1/custom_functions/{function_id}/execute` runs it; `PATCH` and `DELETE` update and remove it.
* A new function starts at `status: created` and moves to `ready` once its analysis finishes. Attach a ready function to an agent with `POST /v1/agents/{agent_id}/tools` and the body `{"type": "custom_function", "custom_function_id": ""}`; the response is the agent's attached list.
Reference: [Custom Functions](/api-reference/v1/custom_functions/create-custom-function). Workspace secrets are injected server-side when a function executes, so the code never holds a credential.
### From inside a skill
A Markdown skill's script can generate, save, poll, execute and delete custom functions through the loopback `skill_utils` endpoints in the agent's workspace, with no API key; the `skills-generator` built-in skill is a worked example.
### In an agent loop you run yourself
Decorate a typed Python function with `@register_tool` and the SDK generates its schema from the type hints; the agent calls it like any other skill. See [Connect custom skills](/developers/tools/custom-tools).
## What is recorded
Whatever the kind, the task record shows each skill call an agent made, with its parameters and result, under the person who asked. **Settings > Audit logs** records `Skill Created` and `Skill Added` events with the person who did it, and a skill's row shows its version and who provided it, so an agent's skills list reads as a bill of materials.