> ## Documentation Index
> Fetch the complete documentation index at: https://docs.xpander.ai/llms.txt
> Use this file to discover all available pages before exploring further.
# Fibery
> Learn how to integrate AI agents with Fibery using xpander.ai. Create intelligent workflows that automate routine tasks, extract actionable insights from unstructured data like customer feedback, and trigger updates across your workspace.
## About Fibery
Fibery is a no-code platform that allows organizations to build custom workspaces tailored to their unique needs. It enables teams to define their own data structures, establish relationships between them, and visualize information through customizable views like boards, timelines, calendars, and reports.
Fibery key features:
* **Customizable Data Structures**: Define your own entities (e.g., Projects, Tasks, Bugs) and their relationships.
* **Visual Workspaces**: Use Kanban boards, calendars, timelines, and tables to manage and visualize work.
* **Collaborative Documents**: Create and edit rich-text documents with real-time collaboration.
* **Whiteboards**: Brainstorm and map out ideas visually.
* **Automation Rules**: Set up custom workflows and triggers to automate routine tasks.
* **AI Integration**: Leverage AI to extract insights from feedback and automate content creation.
* **Integrations**: Connect with external tools like GitHub, Jira, Slack, Intercom, and more.
## Authentication Options
Below are possible authentication options you can choose:
### Generate a Fibery API Key
1. Log in to your [Fibery workspace](https://fibery.io/login).
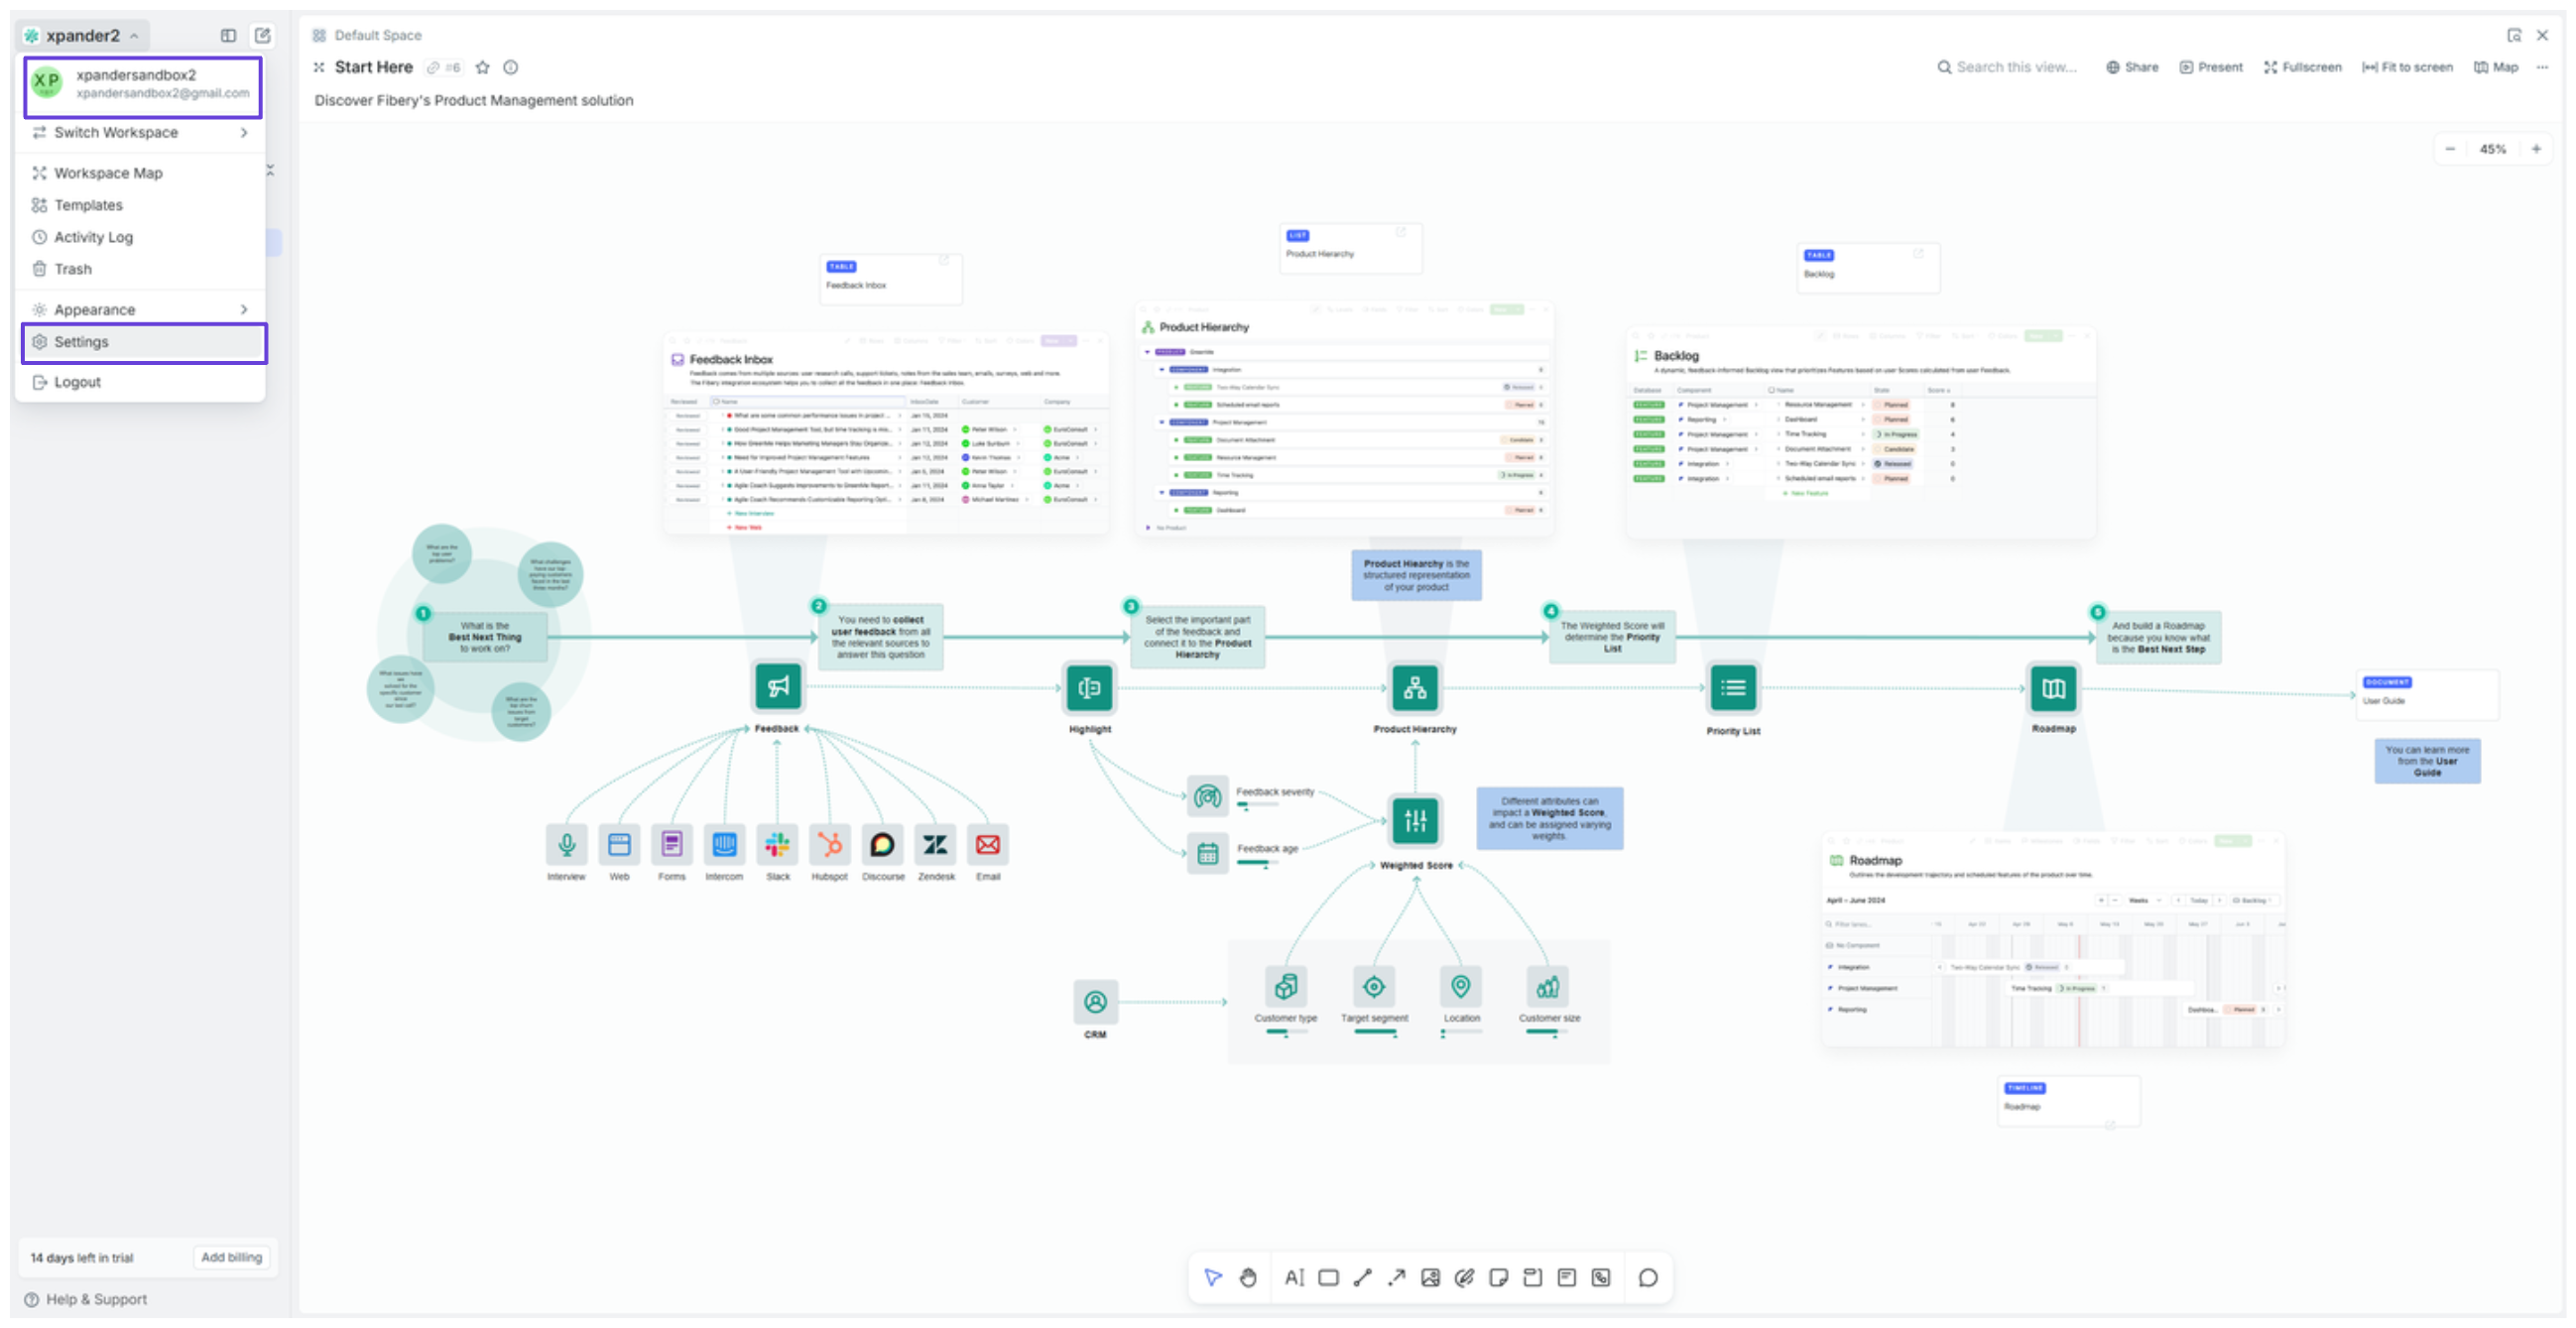 2. Click your username at the top-left of your dashboard, then select **Settings**.
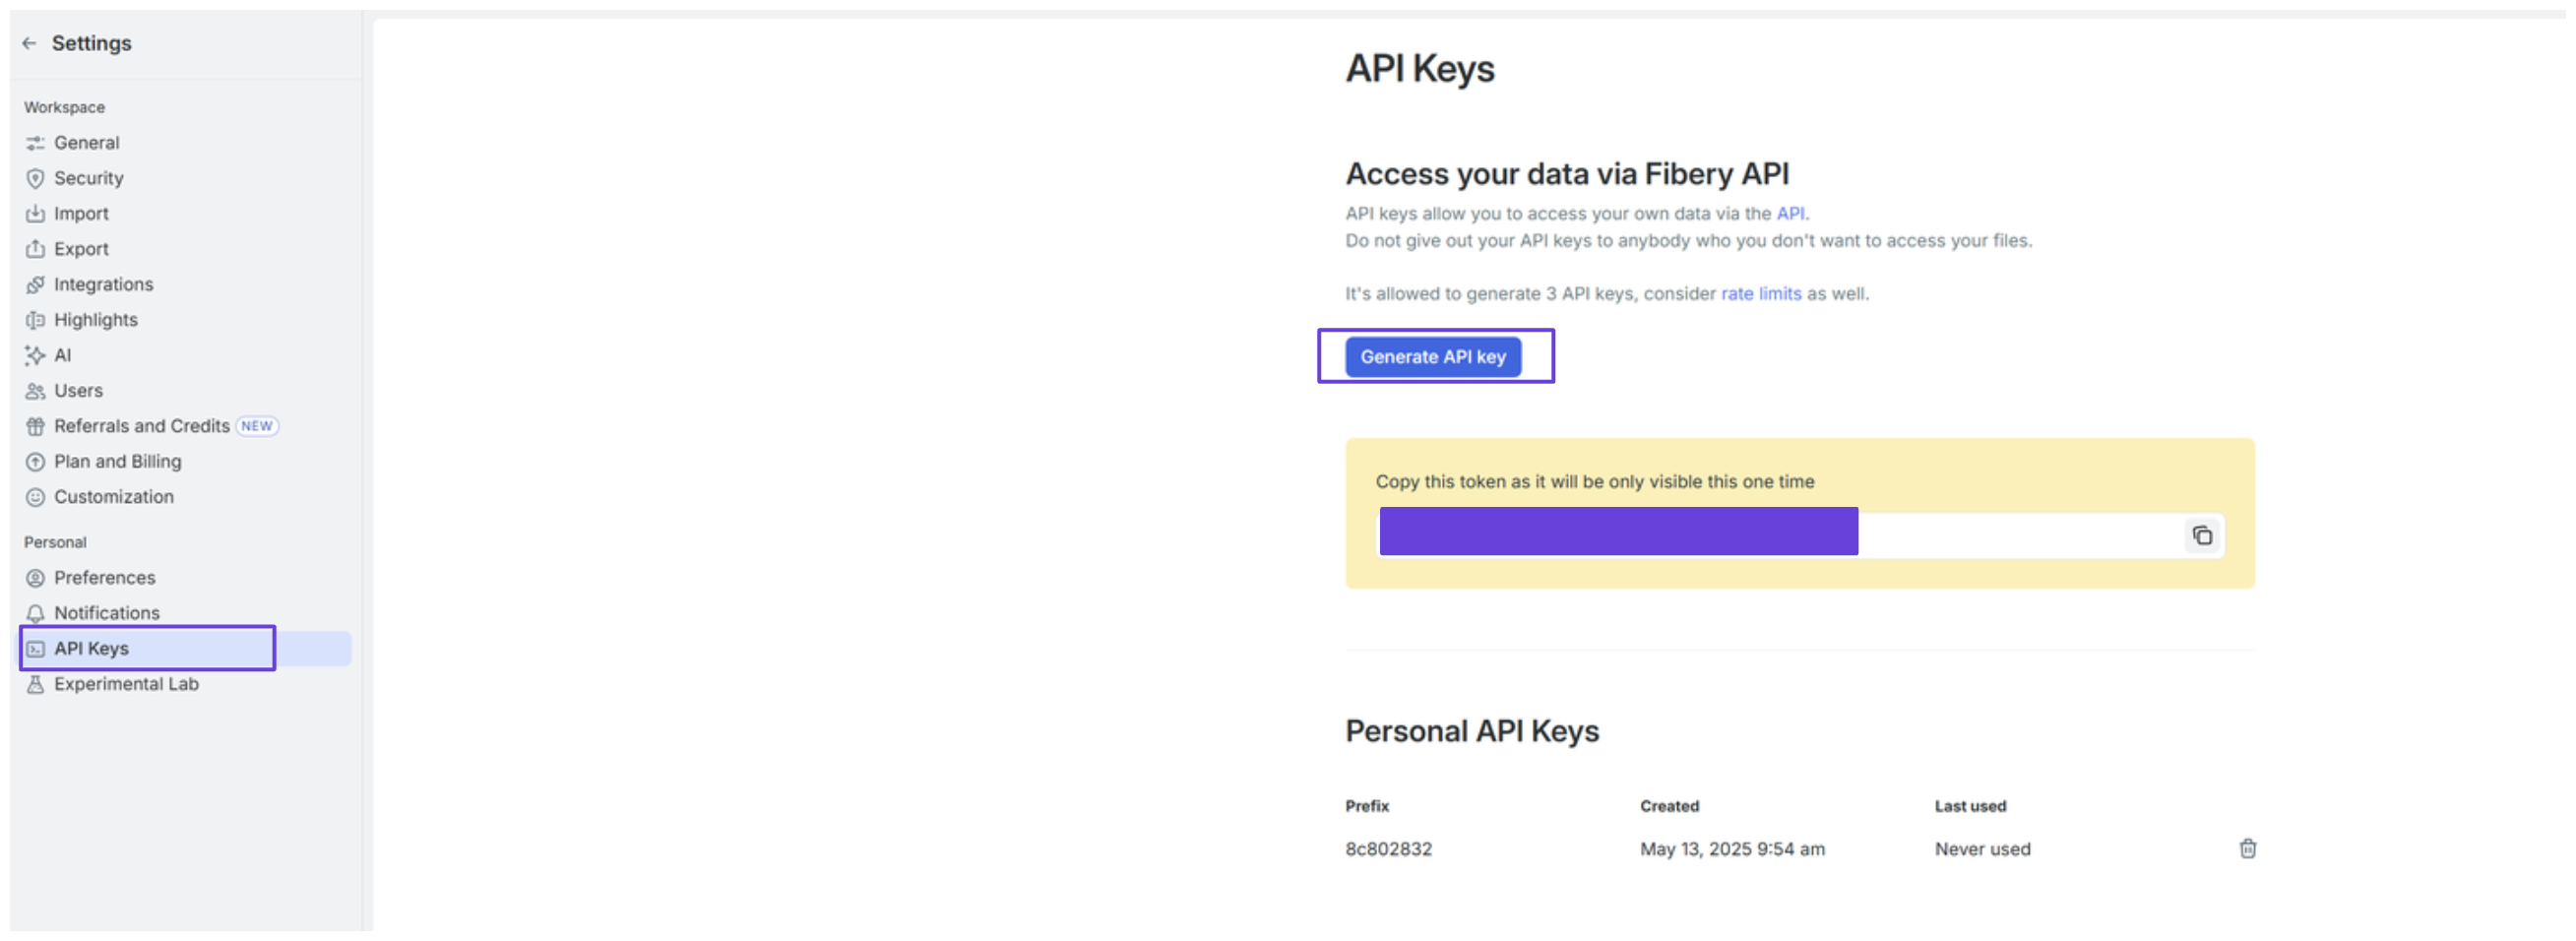
3. In the sidebar, go to the **API Keys** section and click **Generate API key**.
4. Your API key is now ready to use.
2. Click your username at the top-left of your dashboard, then select **Settings**.
3. In the sidebar, go to the **API Keys** section and click **Generate API key**.
4. Your API key is now ready to use.
 ### Integrate Fibery into xpander.ai
1. In your xpander.ai dashboard, go to the **Connectors** section in the sidebar.
2. Select **Fibery** from the available integrations.
3. Click **Enable**.
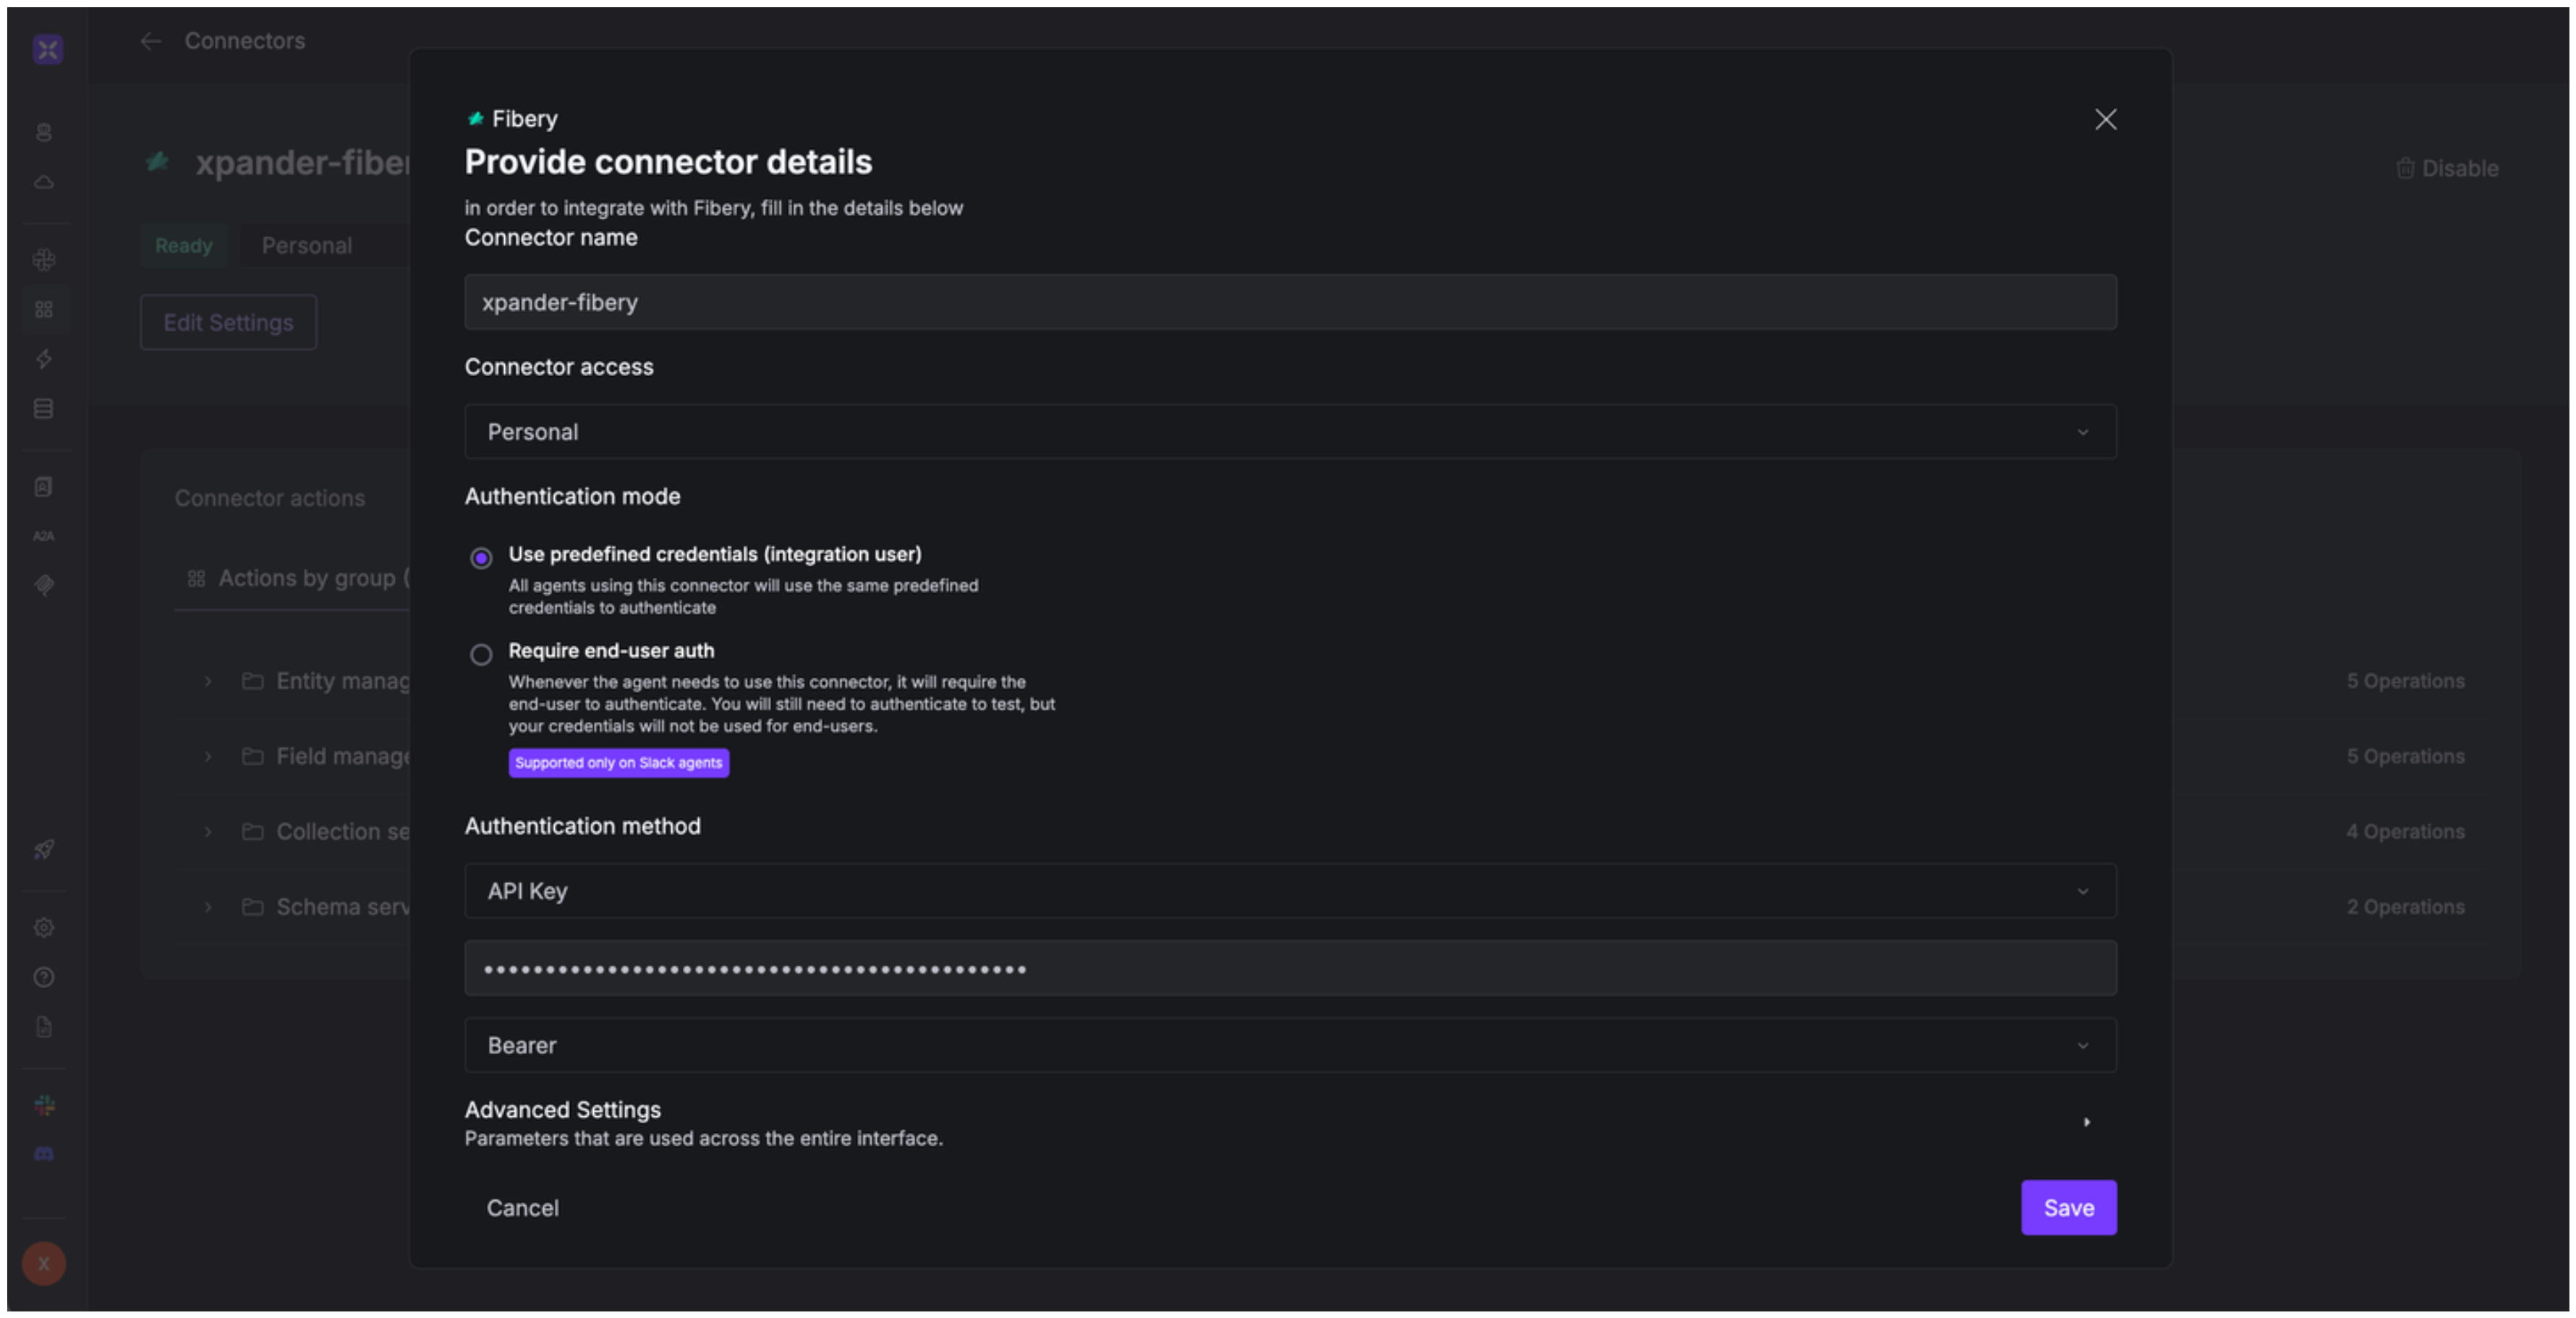
4. Enter a **connector name**, e.g., "xpander-fibery".
5. Select **Integration User** for the authentication mode.
6. Choose **API Key** as the authentication method.
7. Paste your Fibery API key into the provided field.
8. Set the **Auth Type** to **Custom**.
9. In the **Custom header name** field, enter: `Authorization: Token`.
10. Save the configuration.
### Integrate Fibery into xpander.ai
1. In your xpander.ai dashboard, go to the **Connectors** section in the sidebar.
2. Select **Fibery** from the available integrations.
3. Click **Enable**.
4. Enter a **connector name**, e.g., "xpander-fibery".
5. Select **Integration User** for the authentication mode.
6. Choose **API Key** as the authentication method.
7. Paste your Fibery API key into the provided field.
8. Set the **Auth Type** to **Custom**.
9. In the **Custom header name** field, enter: `Authorization: Token`.
10. Save the configuration.
 ## Integration of Fibery into AI Agent
Once you've configured your Fibery account with the authentication option(s) described above, you can integrate it into your AI agent with xpander.ai:
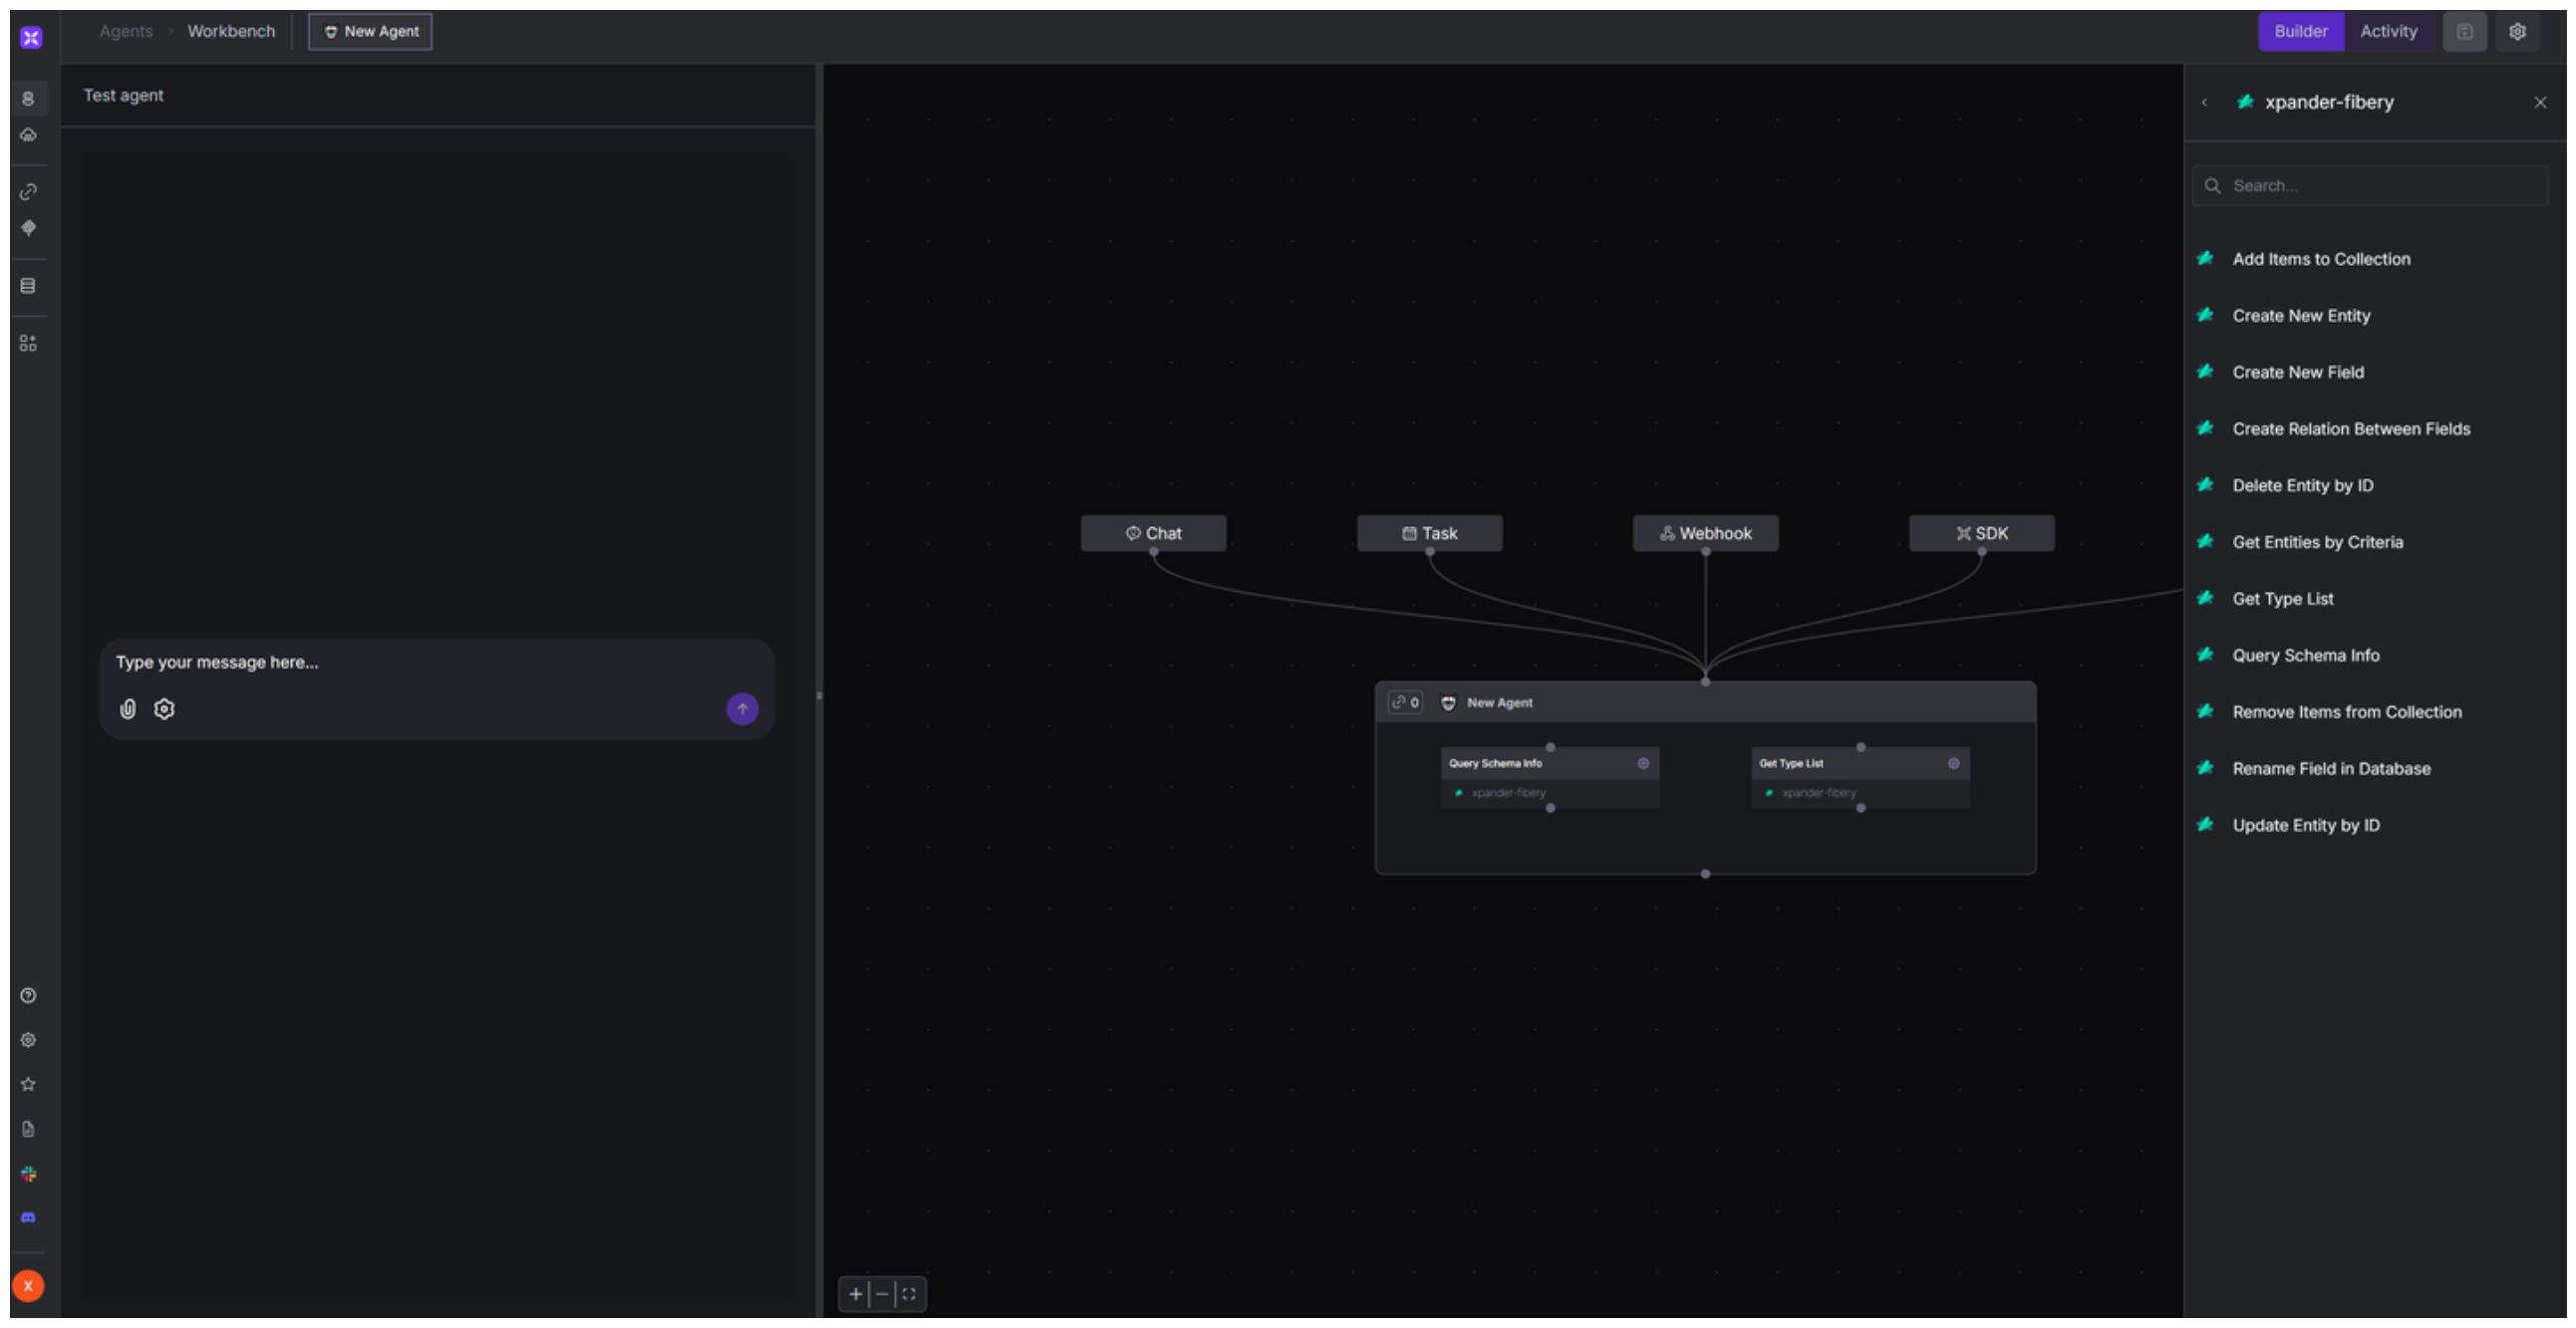
1. In your xpander.ai dashboard, go to the **Agent Configuration** tab and select **Tools**, then click **Add Tools**.
2. Select **Connectors**.
3. Choose **Fibery** with the same **connector name** you configured in the previous section (e.g., xpander-fibery).
4. Select the available Fibery operations that suit your use case.
## Integration of Fibery into AI Agent
Once you've configured your Fibery account with the authentication option(s) described above, you can integrate it into your AI agent with xpander.ai:
1. In your xpander.ai dashboard, go to the **Agent Configuration** tab and select **Tools**, then click **Add Tools**.
2. Select **Connectors**.
3. Choose **Fibery** with the same **connector name** you configured in the previous section (e.g., xpander-fibery).
4. Select the available Fibery operations that suit your use case.
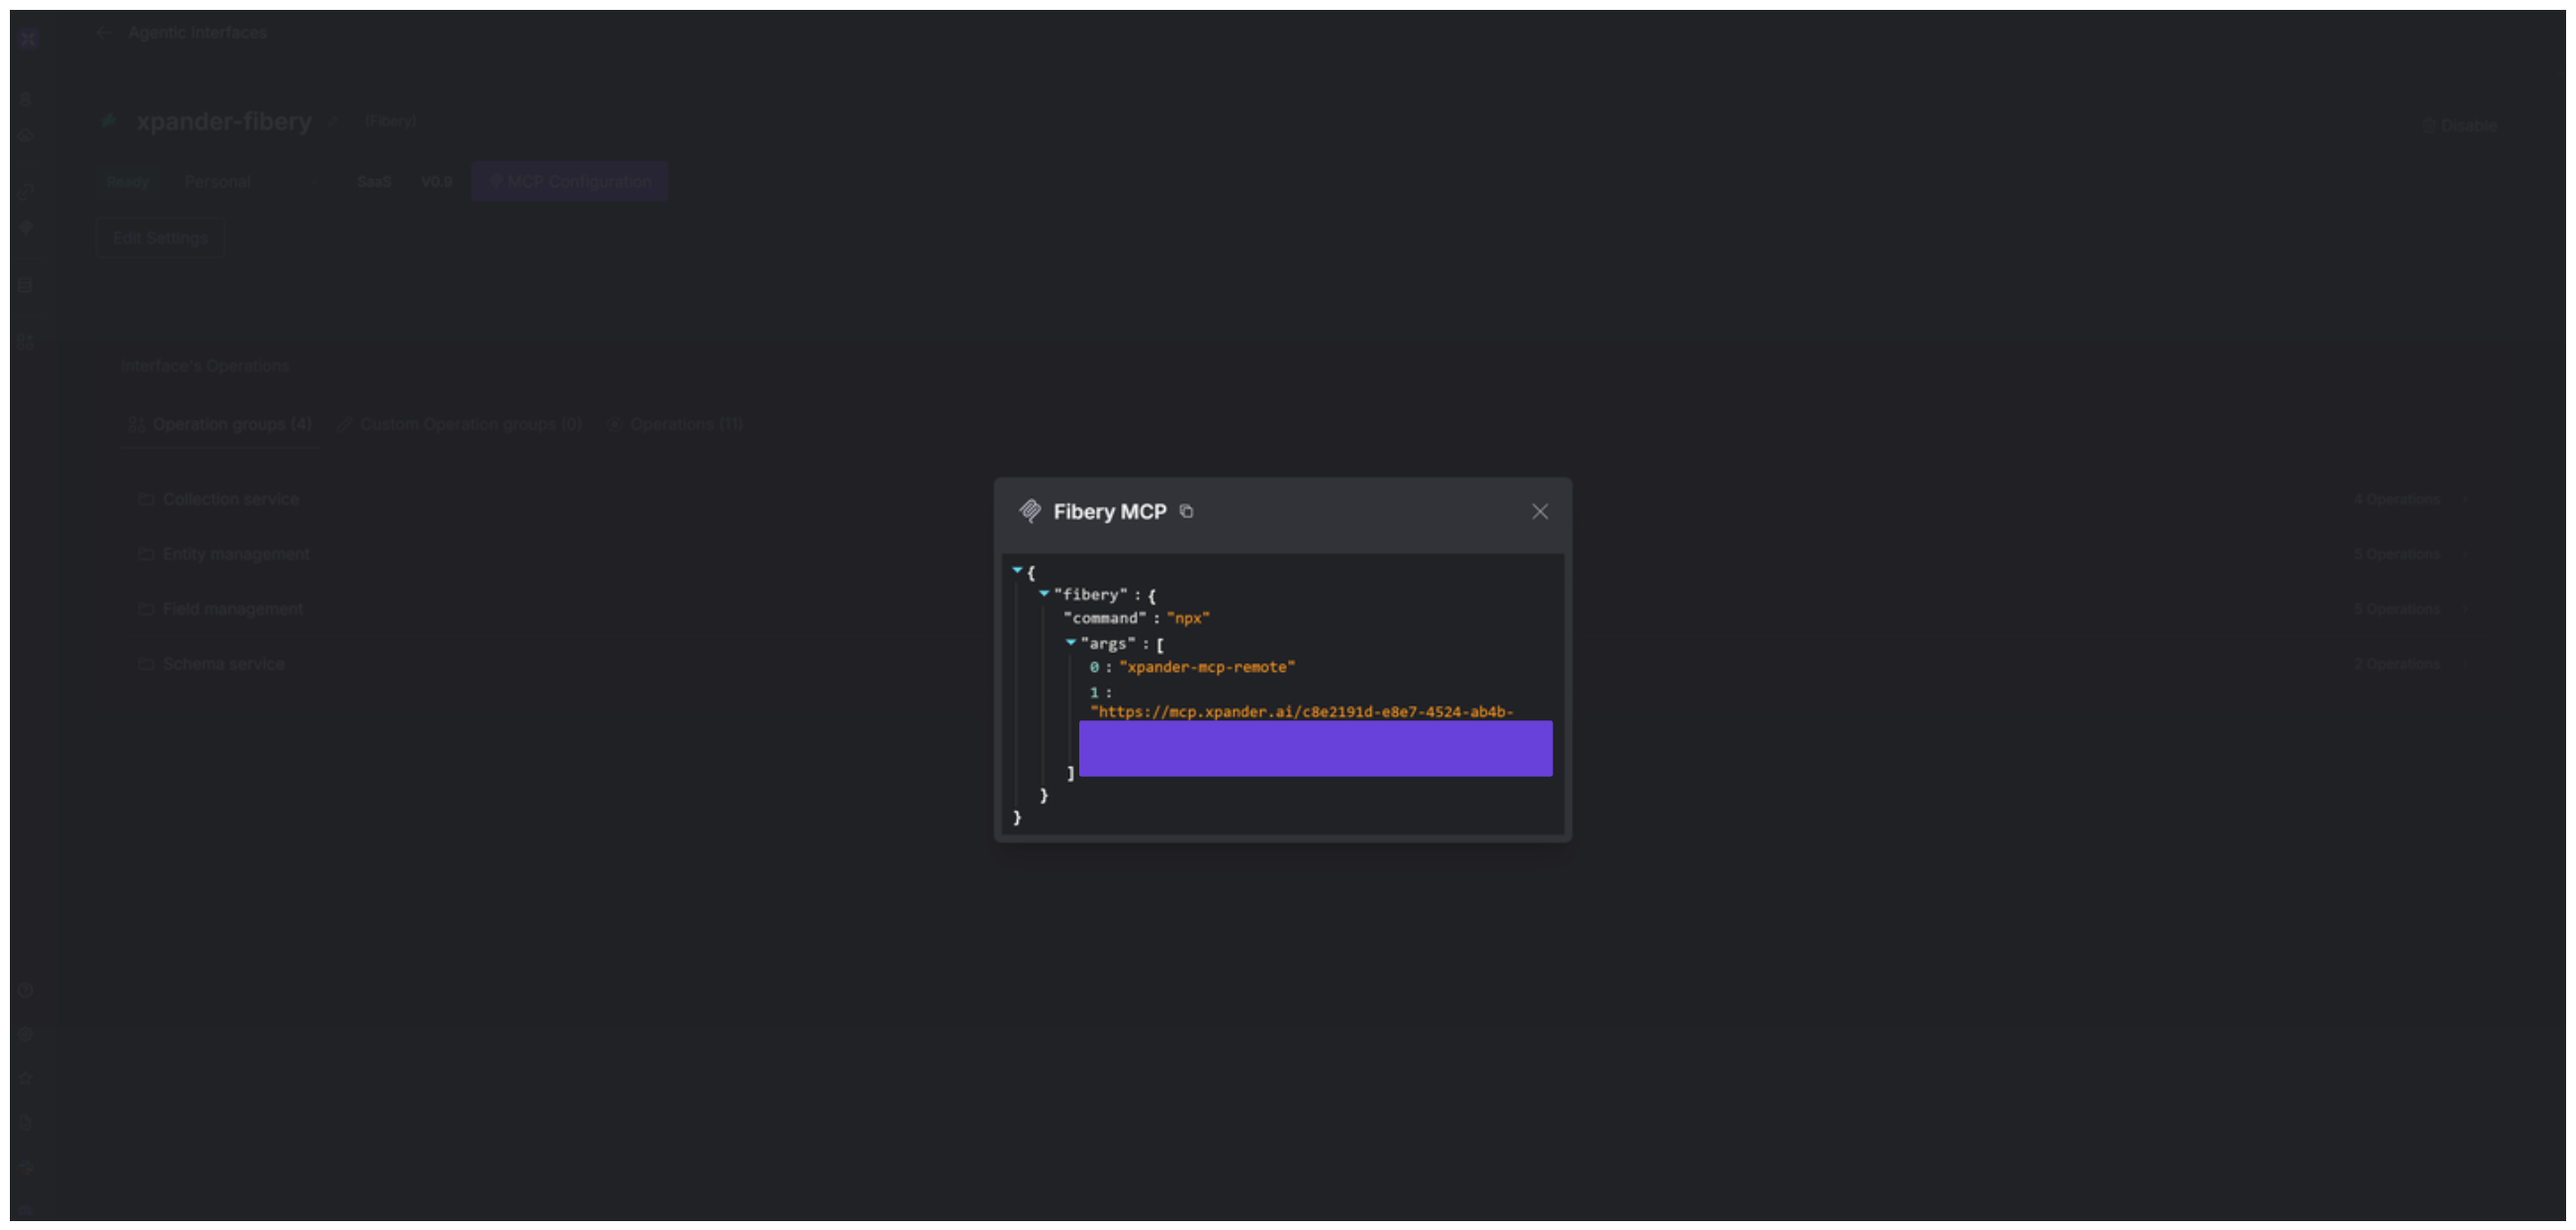
 ## Expose Fibery as MCP Server
Alternatively, you can also expose your Fibery account as an MCP server. To do so:
1. Go to the **Connectors** section in the sidebar of your xpander.ai dashboard.
2. Select **Fibery** with the same **connector name** you configured in the previous section (e.g., xpander-fibery).
3. Click **MCP Configuration**.
4. Enter the MCP configuration into the appropriate settings of the client app you want to use (e.g., Cursor, Windsurf, Claude Desktop, etc.).
## Expose Fibery as MCP Server
Alternatively, you can also expose your Fibery account as an MCP server. To do so:
1. Go to the **Connectors** section in the sidebar of your xpander.ai dashboard.
2. Select **Fibery** with the same **connector name** you configured in the previous section (e.g., xpander-fibery).
3. Click **MCP Configuration**.
4. Enter the MCP configuration into the appropriate settings of the client app you want to use (e.g., Cursor, Windsurf, Claude Desktop, etc.).
 ## AI Agent Fibery Prompt Library
Below are possible prompts or use cases you can try after integrating Fibery into your xpander AI agent:
```
Can we create a new feature request titled "{feature_title}" in our Product Backlog?
```
```
Can you show me all the tasks assigned to {assignee_name} with a "High" priority?
```
```
Can you rename the "Due Date" field to "Deadline" in our Tasks database?
```
```
Could you show me the current schema of our {workspace_name} workspace to help with our database planning?
```
## Related Resources
* [Understanding Model Context Protocol (MCP)](/guides/deploy/mcp)
* [Fibery API Documentation](https://the.fibery.io/@public/User_Guide/Guide/Fibery-API-overview-279)
## AI Agent Fibery Prompt Library
Below are possible prompts or use cases you can try after integrating Fibery into your xpander AI agent:
```
Can we create a new feature request titled "{feature_title}" in our Product Backlog?
```
```
Can you show me all the tasks assigned to {assignee_name} with a "High" priority?
```
```
Can you rename the "Due Date" field to "Deadline" in our Tasks database?
```
```
Could you show me the current schema of our {workspace_name} workspace to help with our database planning?
```
## Related Resources
* [Understanding Model Context Protocol (MCP)](/guides/deploy/mcp)
* [Fibery API Documentation](https://the.fibery.io/@public/User_Guide/Guide/Fibery-API-overview-279)