> ## Documentation Index
> Fetch the complete documentation index at: https://docs.xpander.ai/llms.txt
> Use this file to discover all available pages before exploring further.
# Github Actions Manager
> Learn how to integrate AI agents with GitHub Actions Manager using xpander.ai. Create dynamic, event-driven workflows where agents can trigger, monitor, and manage Actions workflows in real time.
## About Github Actions Manager
GitHub is a cloud-based platform designed for developers to store, manage, and collaborate on code.
GitHub Actions, enabling developers to automate workflows, manage runners, handle artifacts, and more.
Key features of Github Actions Manager include:
* **Workflows**: Manage and control workflow configurations within a repository.
* **Workflow Runs**: Track, re-run, cancel, or delete specific executions of workflows.
* **Jobs**: Inspect and monitor individual jobs within a workflow run, including logs.
* **Artifacts**: Handle generated build artifacts—list, download, or delete them as needed.
* **Secrets**: Securely manage sensitive values (like tokens) used in workflows.
* **Variables**: Store and manage non-sensitive config values for workflows.
* **Runners**: Manage GitHub-hosted or self-hosted machines that execute workflows.
* **Permissions**: Control what actions and workflows are allowed and who can run them.
## Authentication Options
Below are possible authentication options you can choose:
The simplest way to connect Github Actions Manager is by using xpander.ai's built-in authentication:
1. Go to the **Connectors** section in the sidebar of your xpander.ai dashboard.
2. Select **Github Actions Manager** from the available integrations.
3. Click **Sign in with Github Actions Manager**.
4. Grant xpander.ai permission to access your Github workspace.
5. Your Github Actions Manager integration is now ready to use.
### Generate a Github Actions Manager API Key
1. Log in to your [Github account](https://github.com/).
2. Click your profile icon in the top-right corner and select **Settings**.\\
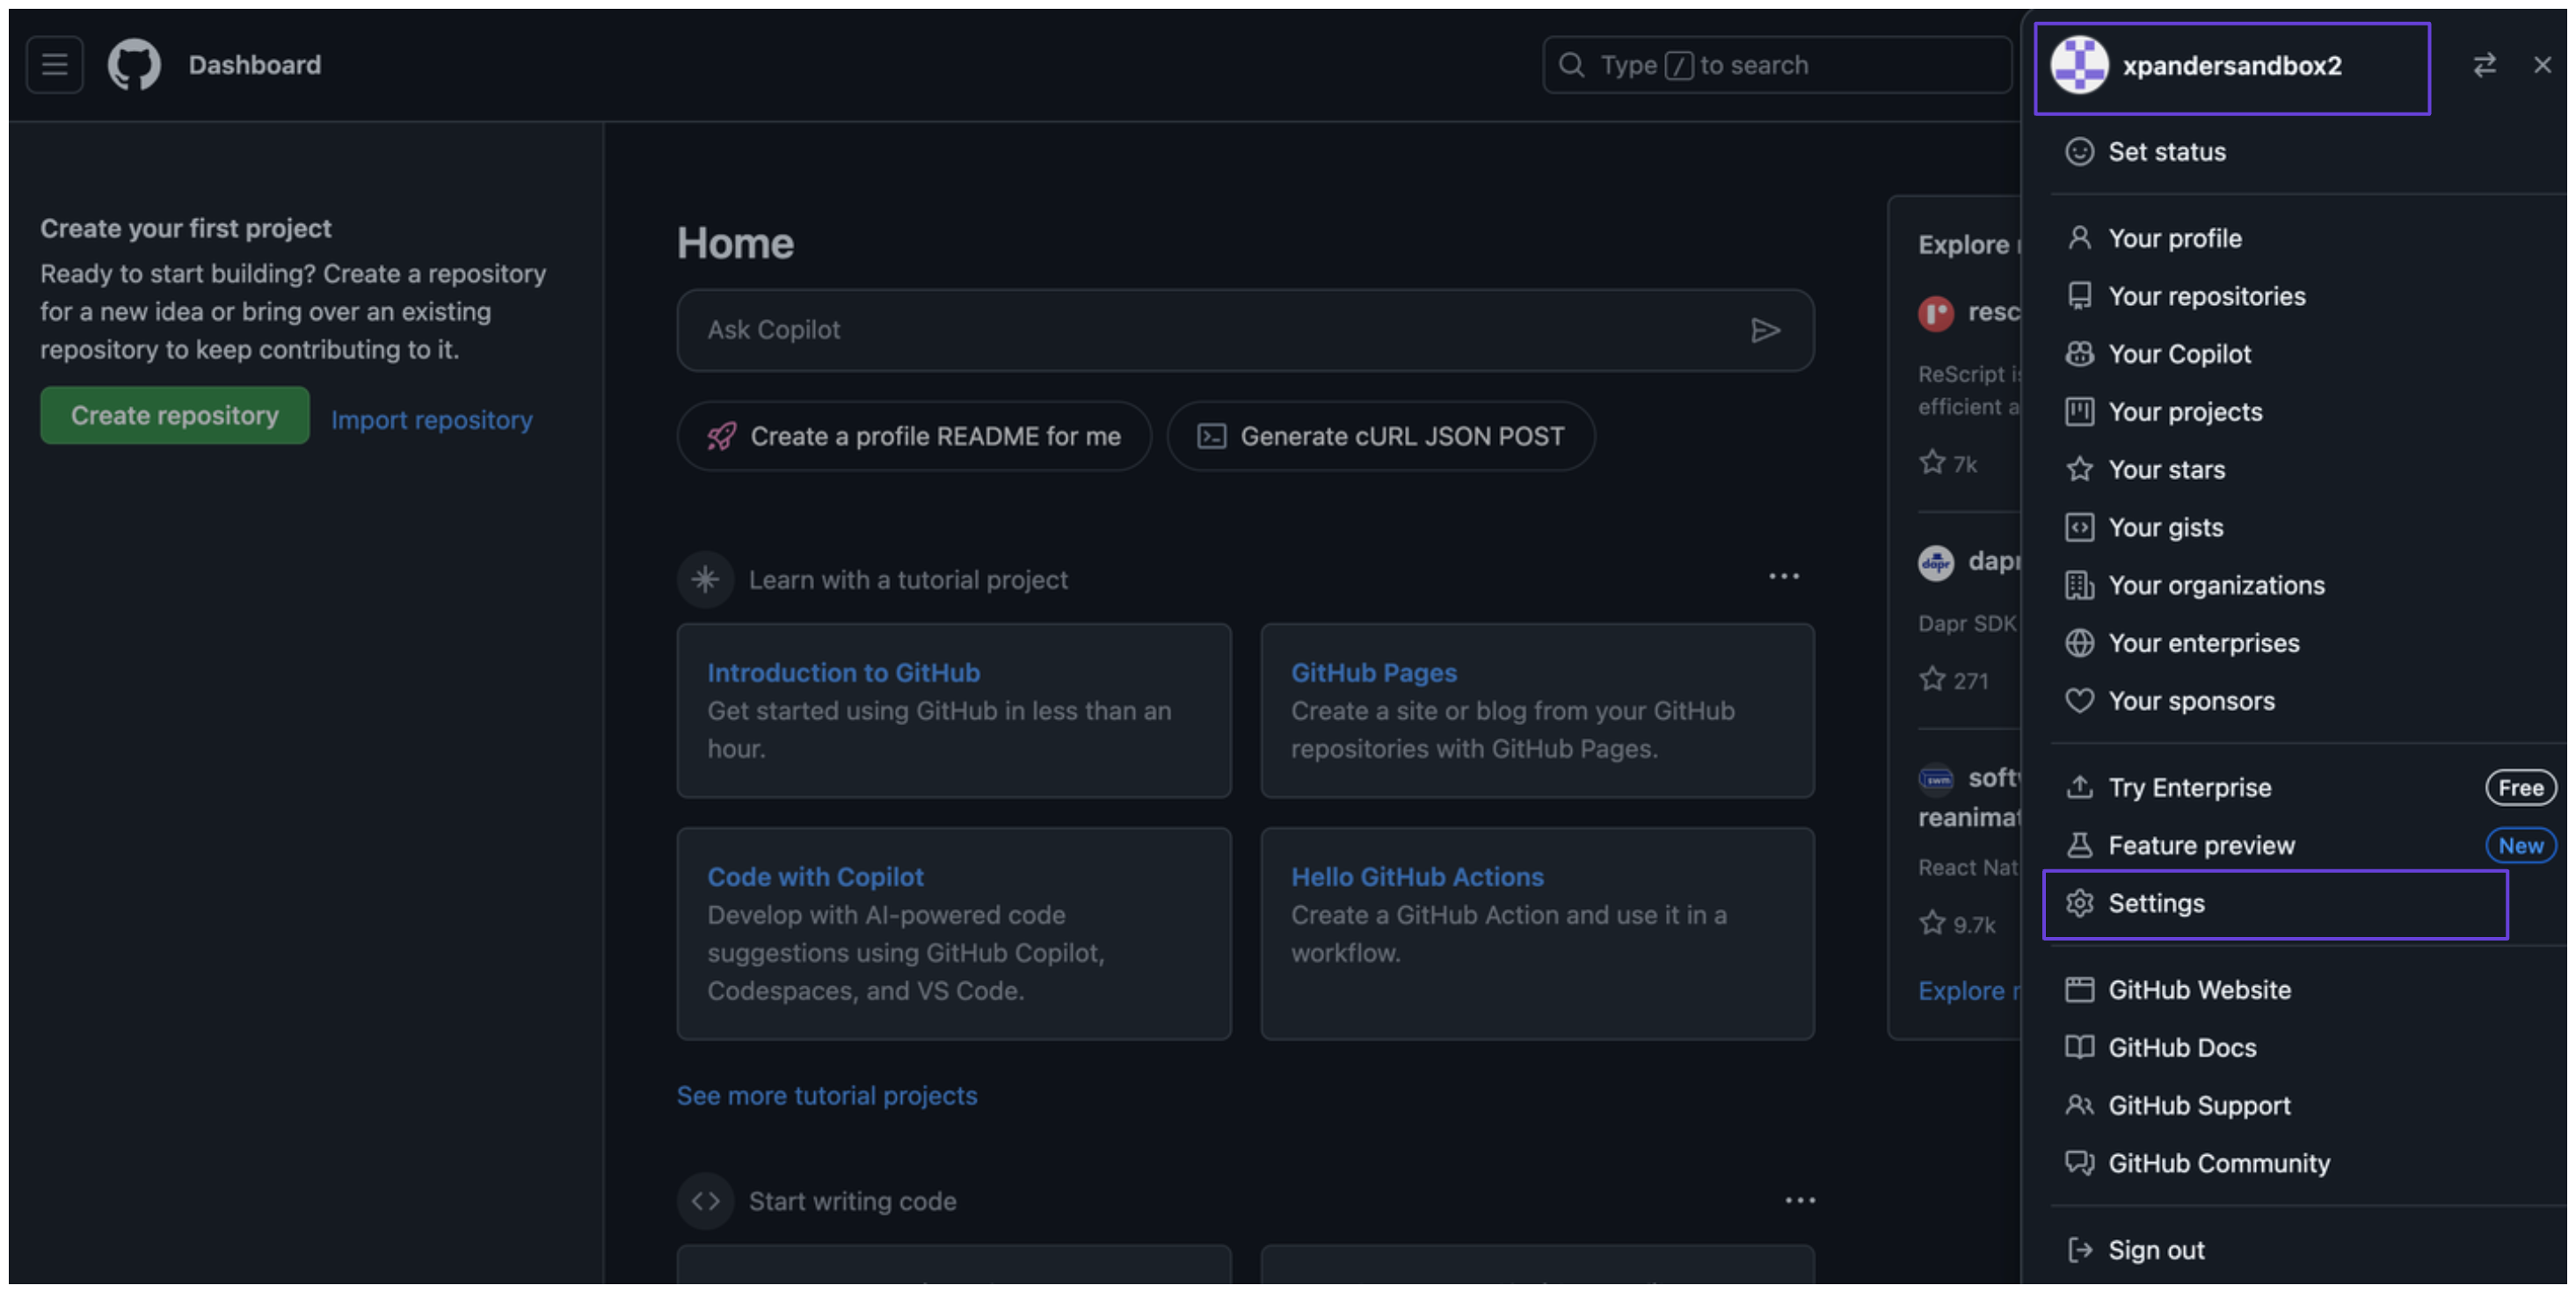 3. In the sidebar, click **Developer settings**.
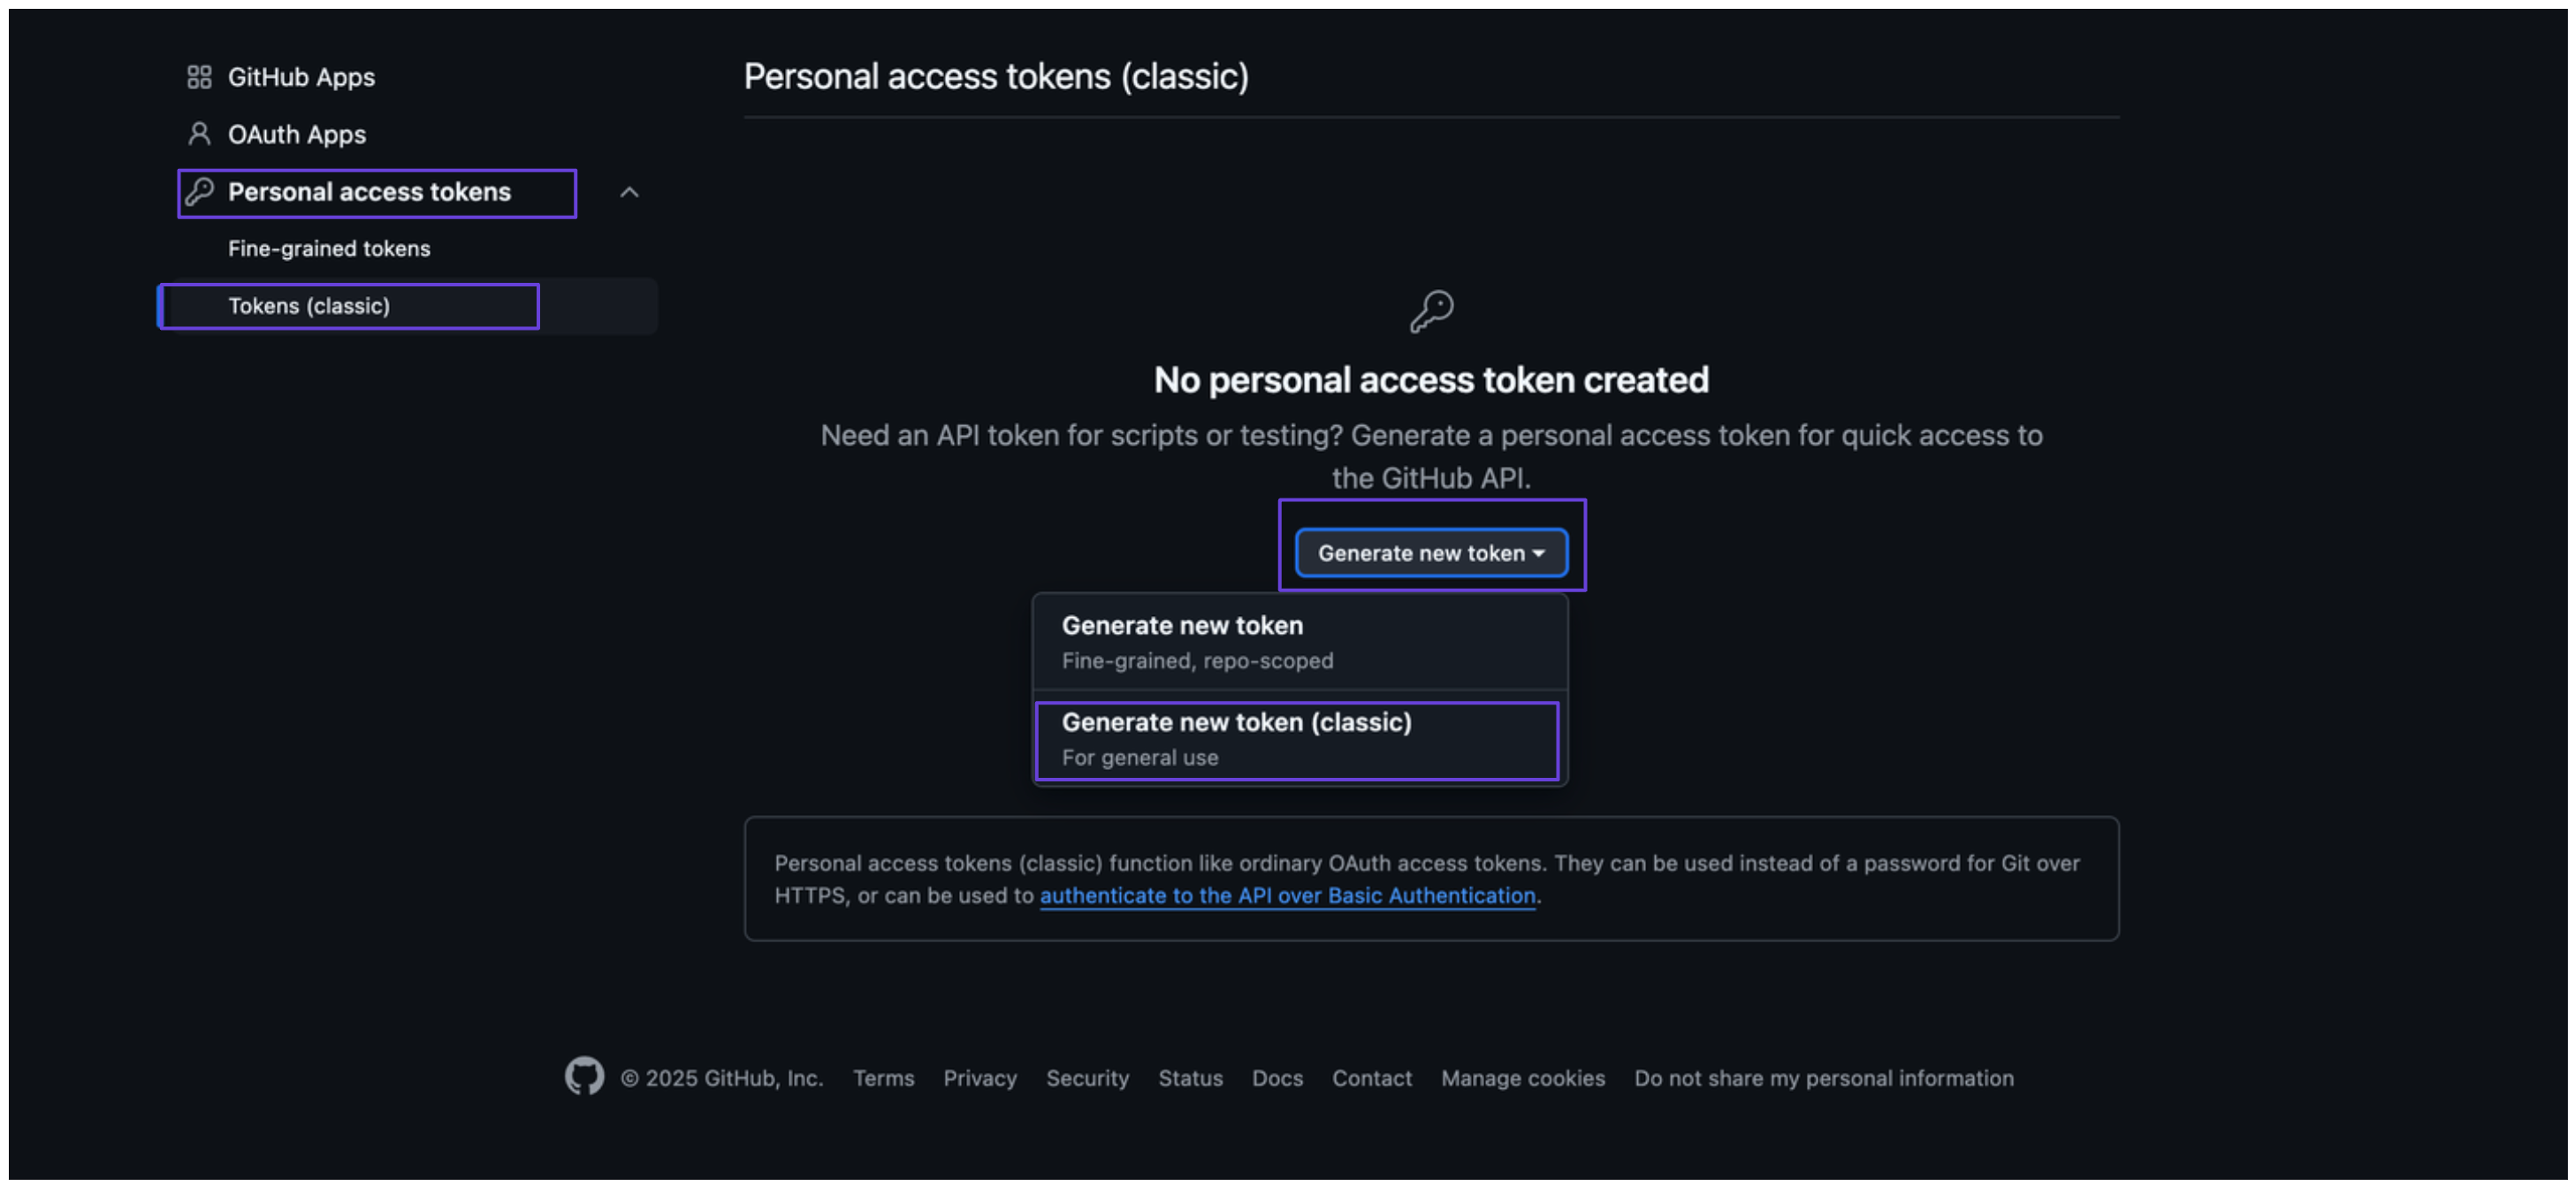
4. Select **Personal access tokens**, then click on **Tokens (classic)**.
5. Click **Generate new token**, then select **Generate new token (classic)**.\\
3. In the sidebar, click **Developer settings**.
4. Select **Personal access tokens**, then click on **Tokens (classic)**.
5. Click **Generate new token**, then select **Generate new token (classic)**.\\
 6. Add a description under **Note**, set an expiration date, and choose the appropriate scopes for your token.
7. After clicking **Generate token**, you’ll see your Github access token—be sure to copy and store it securely.
### Integrate Github Actions Manager into xpander.ai
1. Go to the **Connectors** section in the sidebar of your xpander.ai dashboard.
2. Select **Github Actions Manager** from the available integrations.
3. Click **Other auth options**.
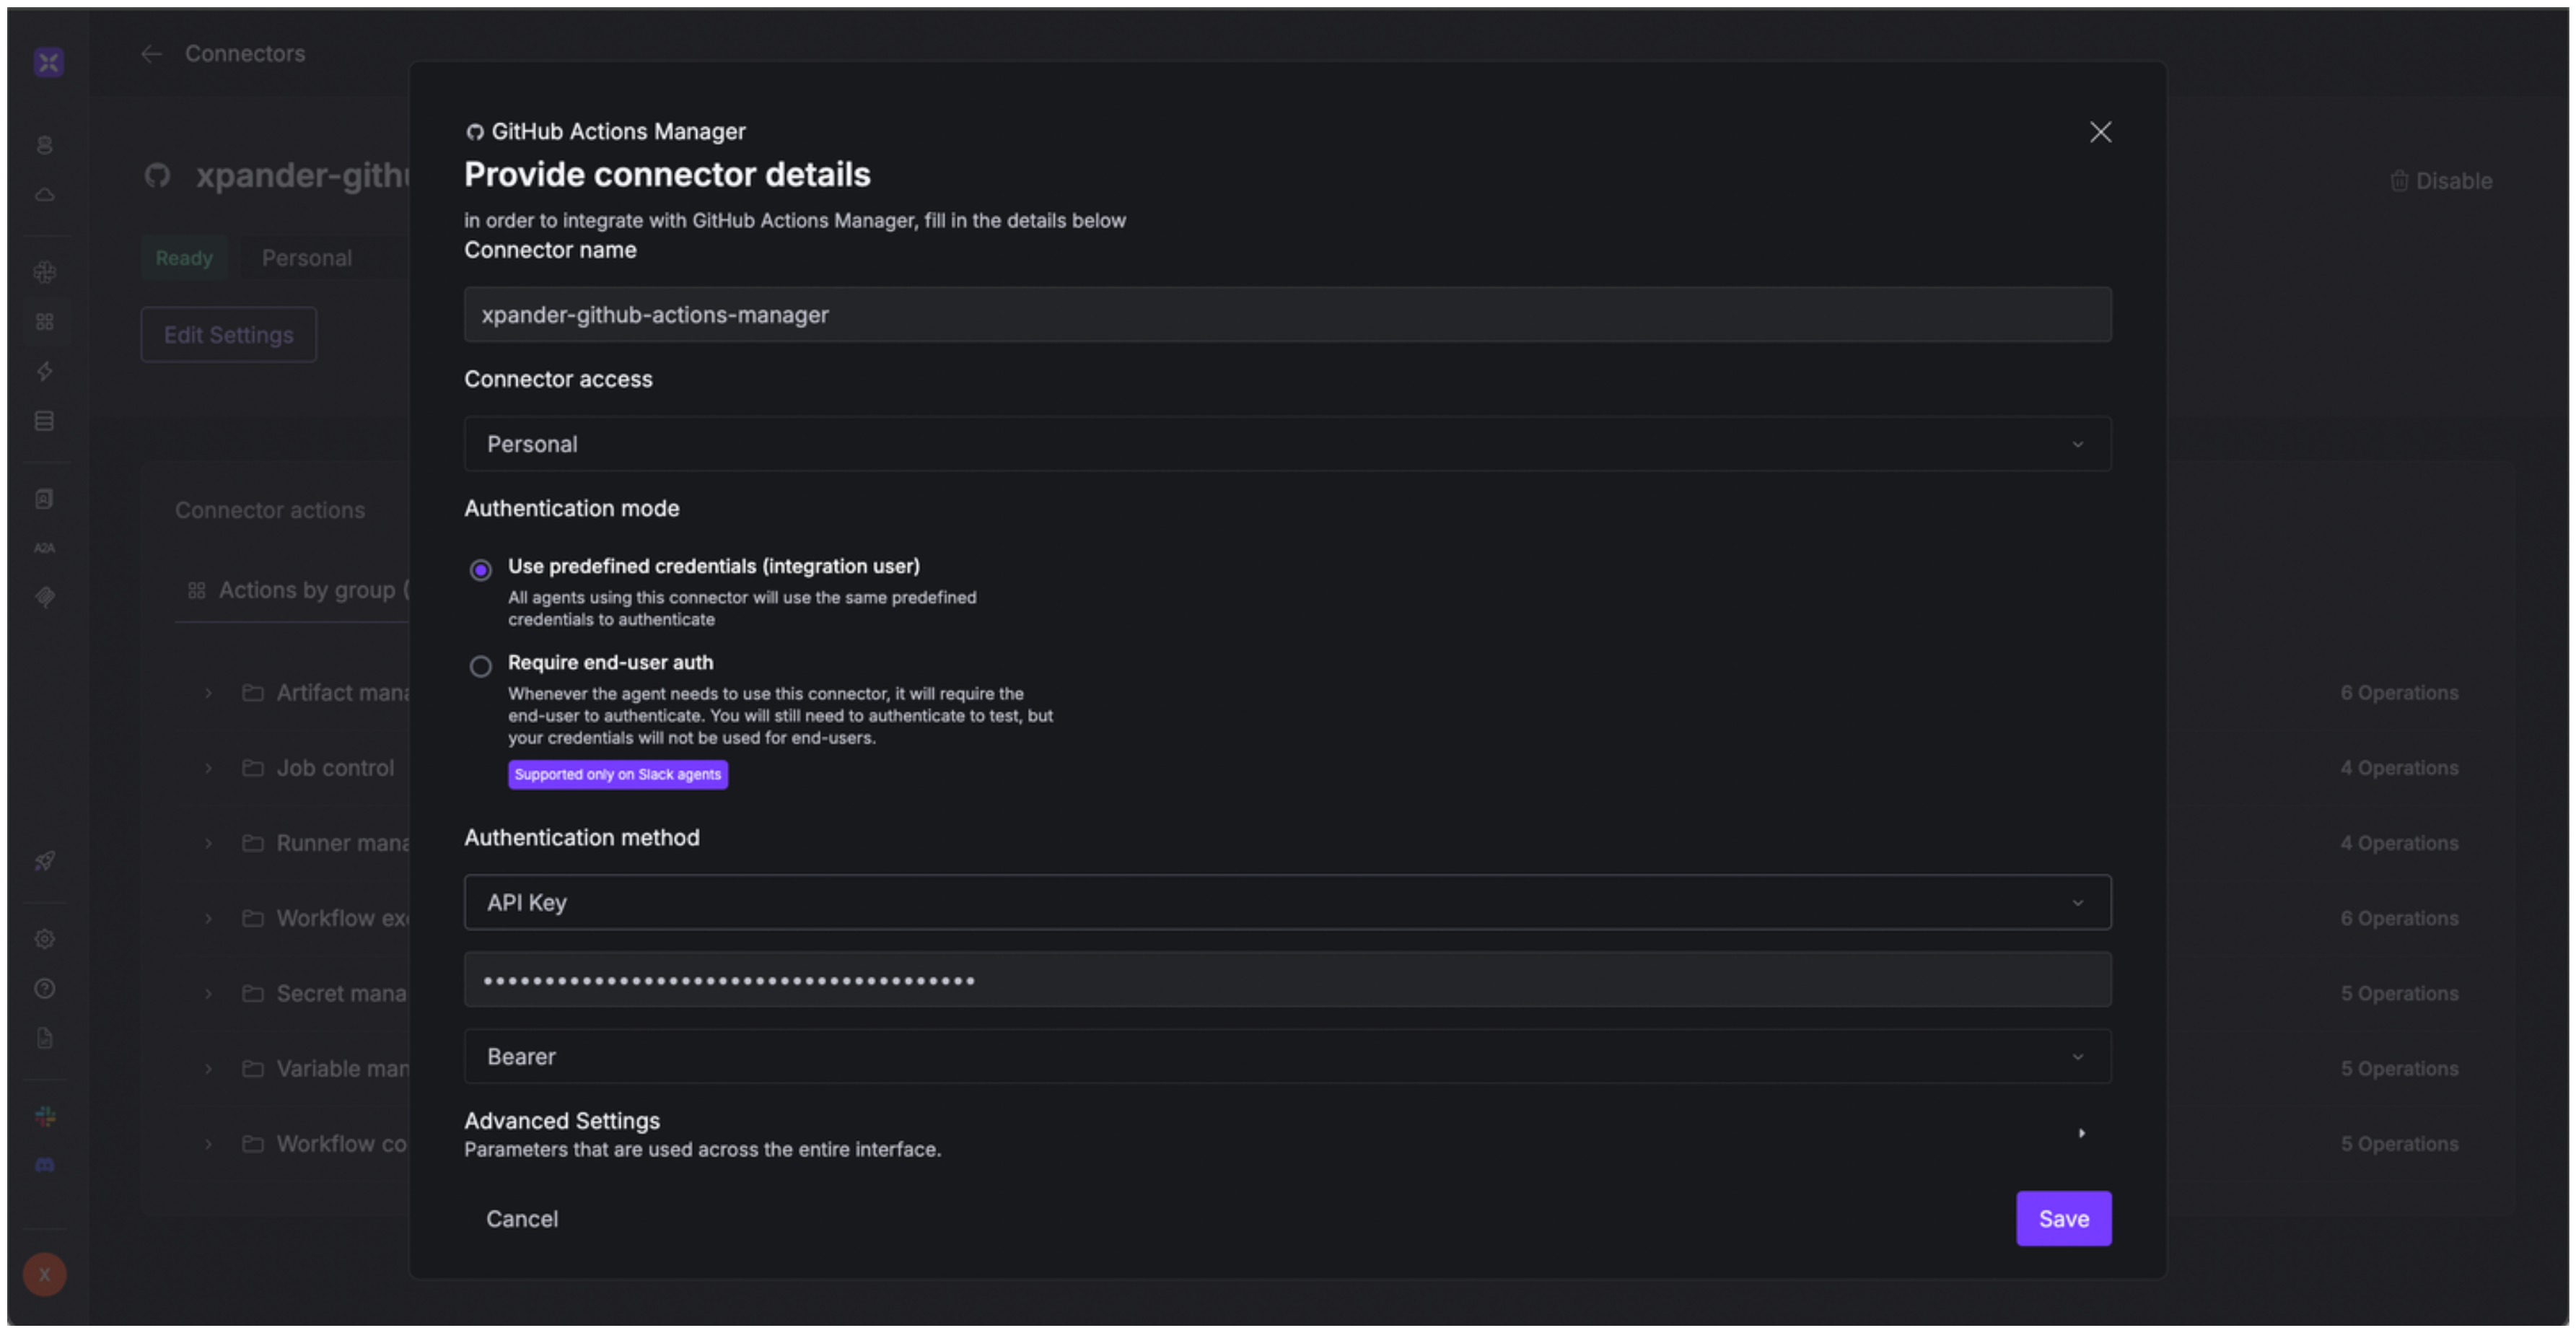
4. Enter a **connector name**, e.g., "xpander-github-actions-manager".
5. Select **Integration User** as the authentication mode.
6. Select **API Key** as the authentication method.
7. Paste the Github access token into the provided field.
8. Choose **Bearer** as the **Auth Type**.
9. Save the configuration.\\
6. Add a description under **Note**, set an expiration date, and choose the appropriate scopes for your token.
7. After clicking **Generate token**, you’ll see your Github access token—be sure to copy and store it securely.
### Integrate Github Actions Manager into xpander.ai
1. Go to the **Connectors** section in the sidebar of your xpander.ai dashboard.
2. Select **Github Actions Manager** from the available integrations.
3. Click **Other auth options**.
4. Enter a **connector name**, e.g., "xpander-github-actions-manager".
5. Select **Integration User** as the authentication mode.
6. Select **API Key** as the authentication method.
7. Paste the Github access token into the provided field.
8. Choose **Bearer** as the **Auth Type**.
9. Save the configuration.\\
 ## Integration of Github Actions Manager into AI Agent
Once you've configured your Github Actions Manager account with the authentication option(s) described above, you can integrate it into your AI agent with xpander.ai:
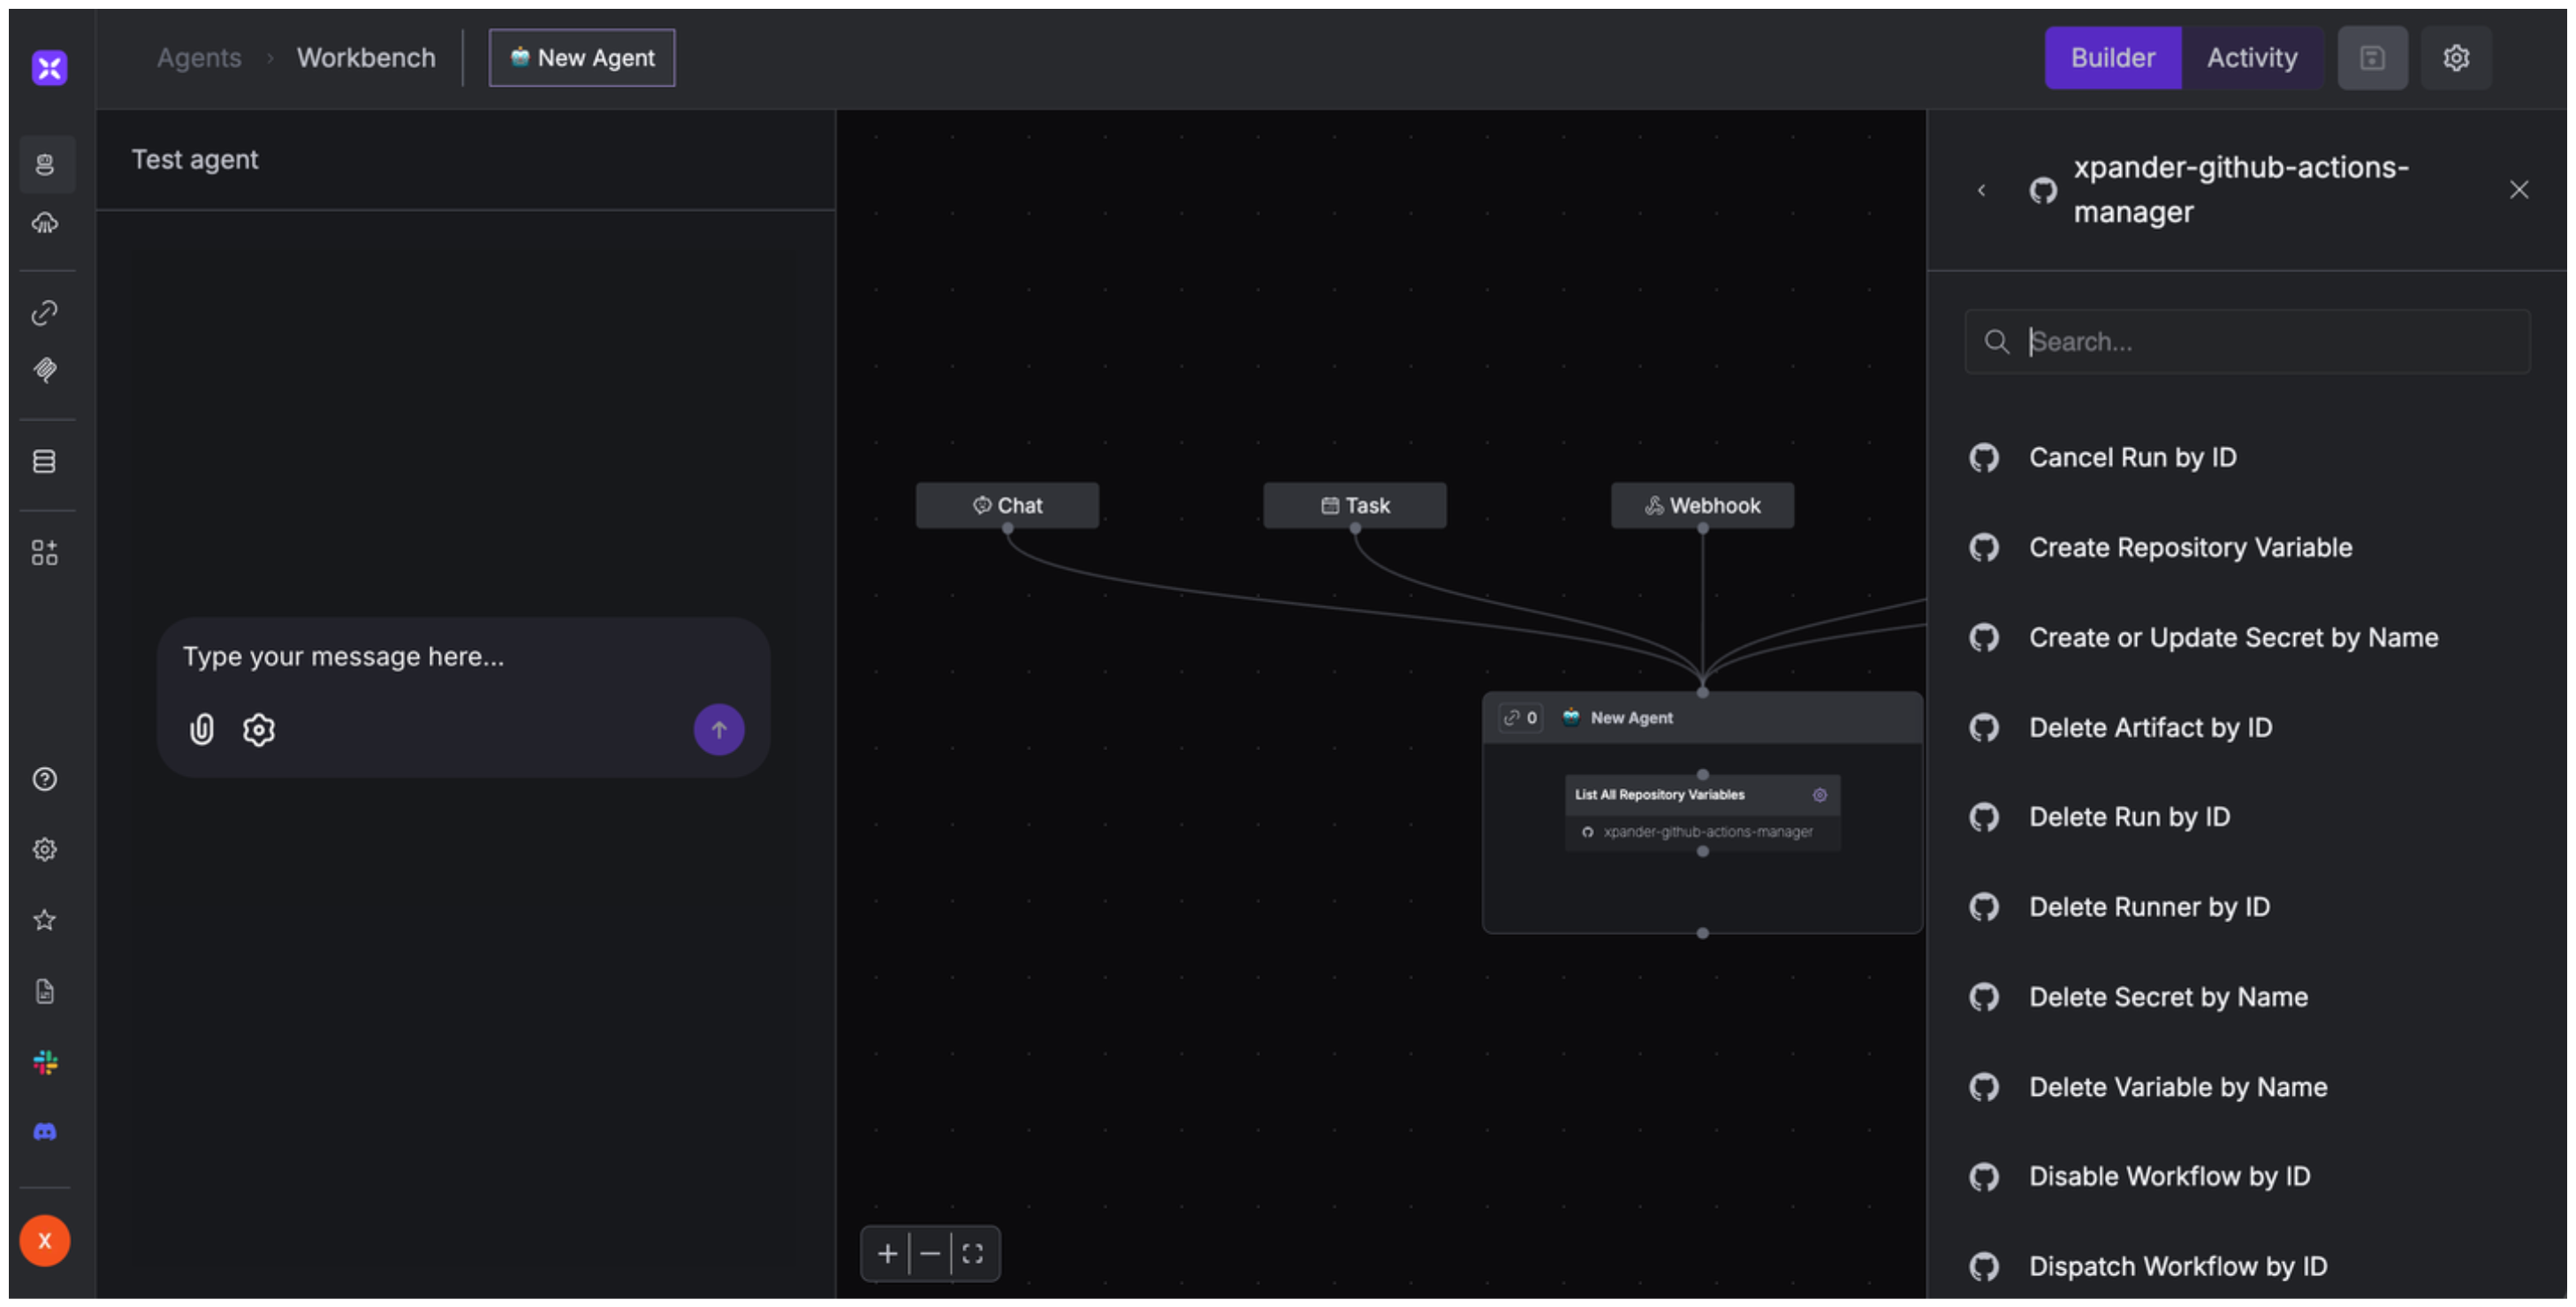
1. In your xpander.ai dashboard, go to the **Agent Configuration** tab and select **Tools**, then click **Add Tools**.
2. Select **Connectors**.
3. Choose **Github Actions Manager** with the same **connector name** you configured in the previous section (e.g., xpander-github-actions-manager).
4. Select the available Github Actions Manager operations that suit your use case.
## Integration of Github Actions Manager into AI Agent
Once you've configured your Github Actions Manager account with the authentication option(s) described above, you can integrate it into your AI agent with xpander.ai:
1. In your xpander.ai dashboard, go to the **Agent Configuration** tab and select **Tools**, then click **Add Tools**.
2. Select **Connectors**.
3. Choose **Github Actions Manager** with the same **connector name** you configured in the previous section (e.g., xpander-github-actions-manager).
4. Select the available Github Actions Manager operations that suit your use case.
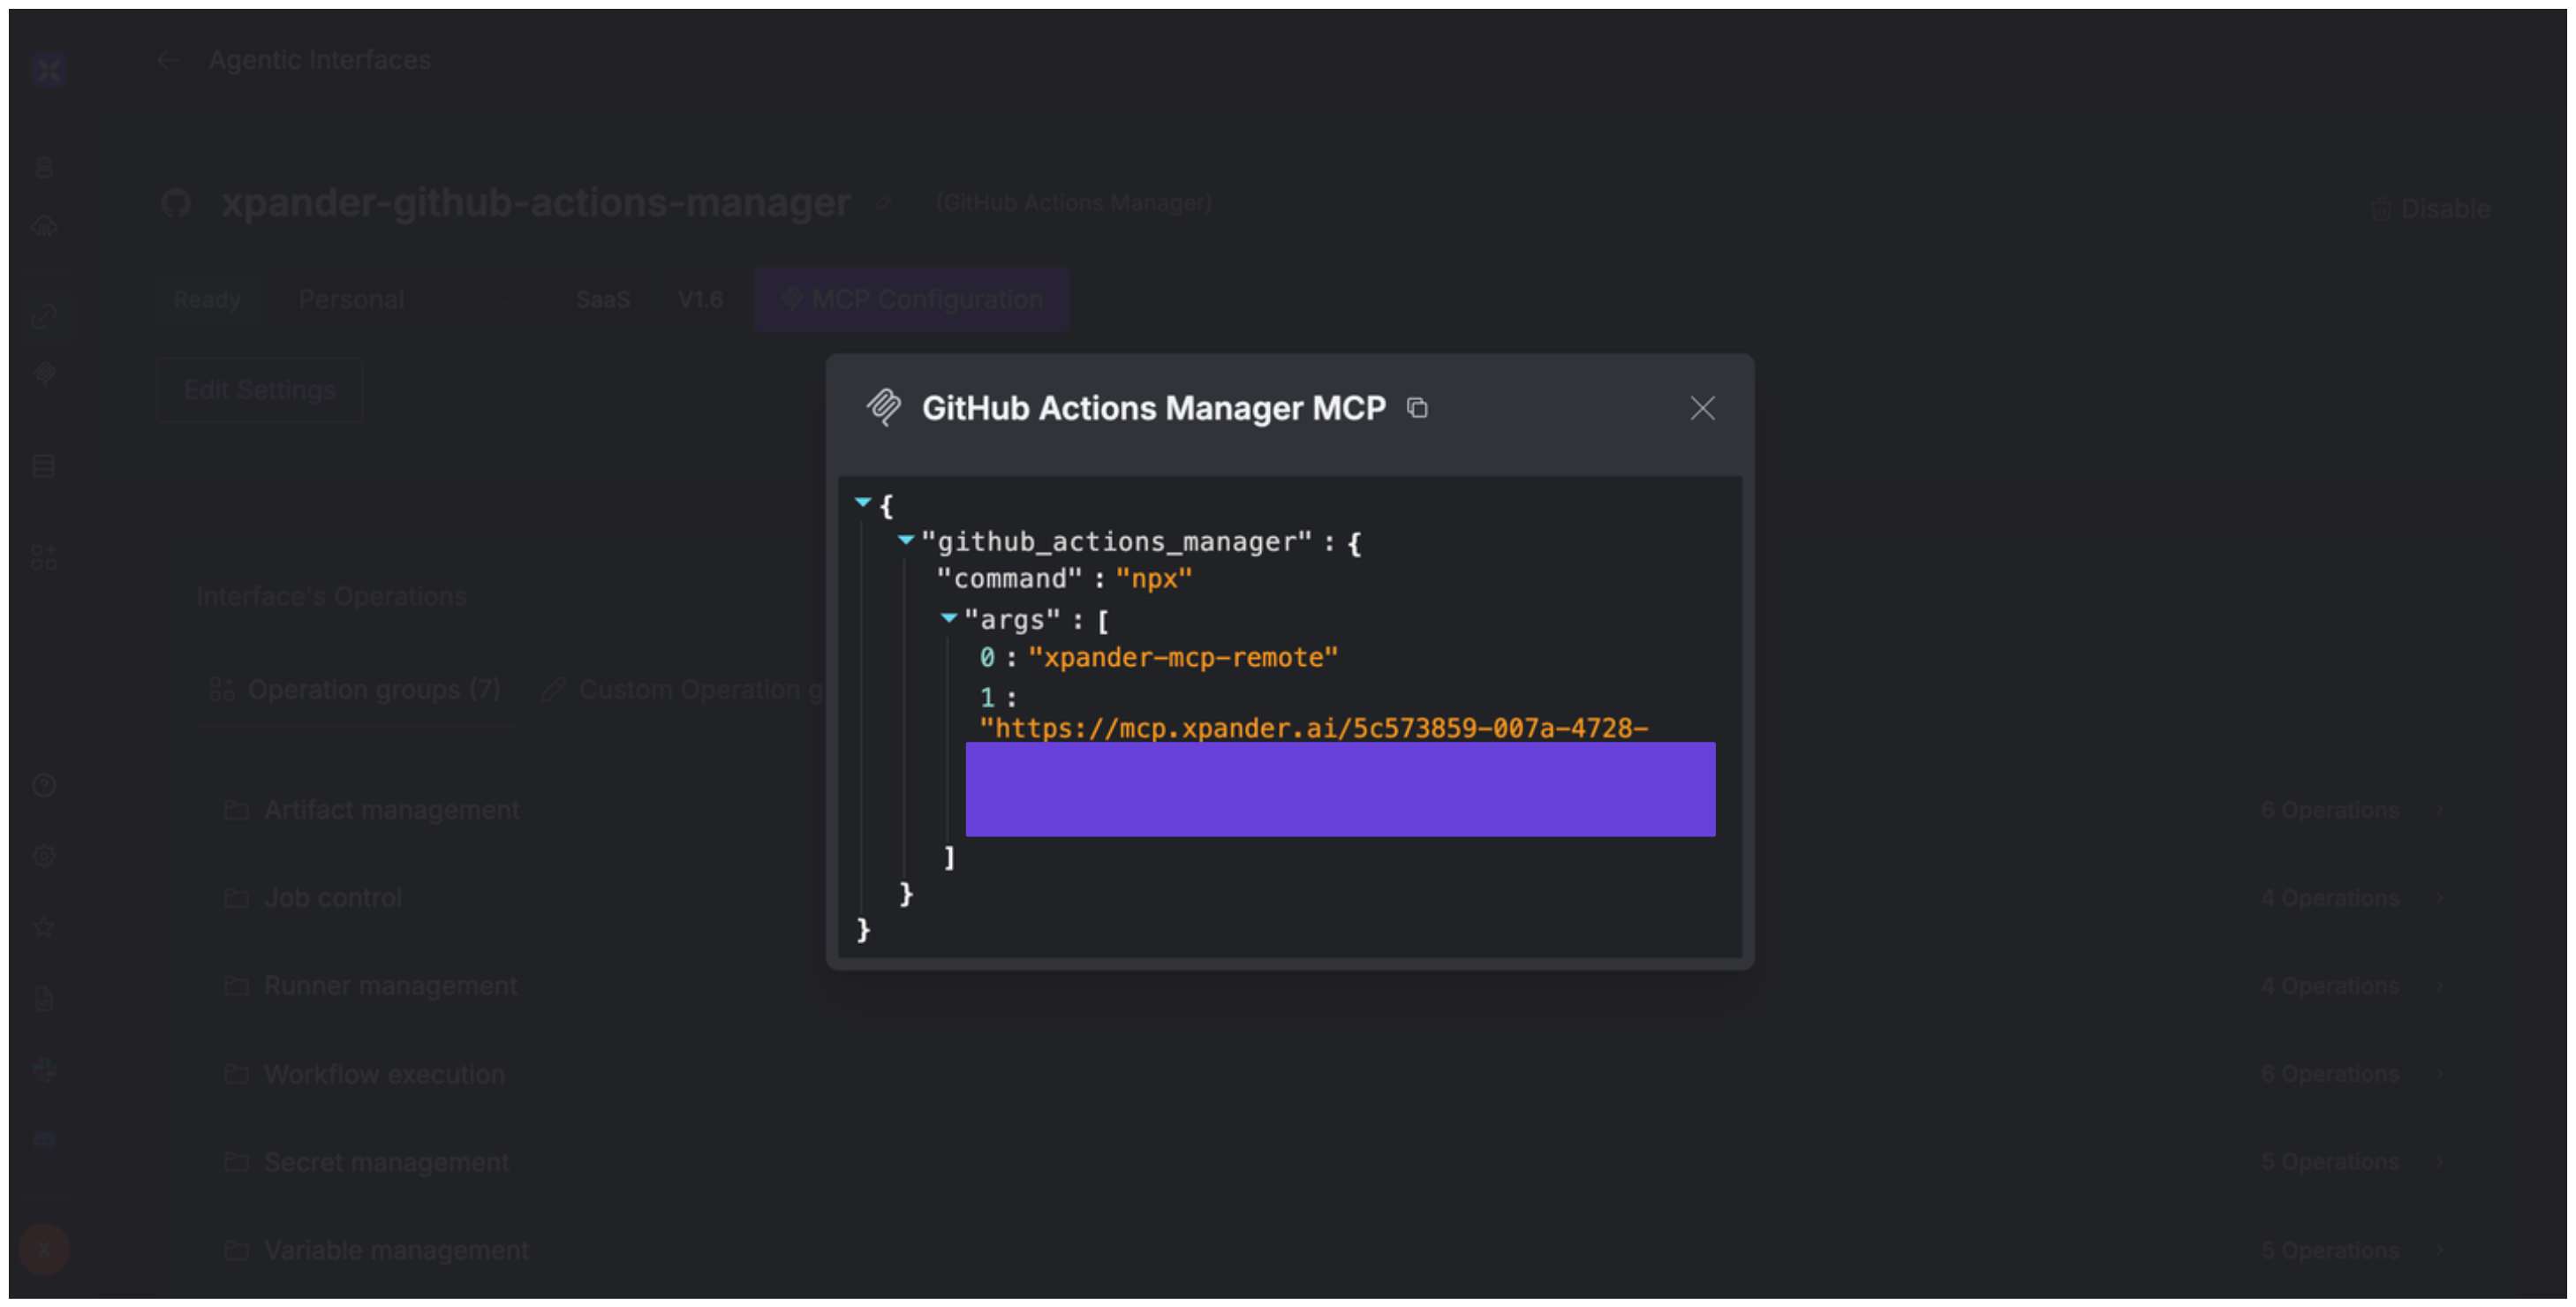
 ## Expose Github Actions Manager as MCP Server
Alternatively, you can also expose your Github Actions Manager account as an MCP server. To do so:
1. Go to the **Connectors** section in the sidebar of your xpander.ai dashboard.
2. Select **Github Actions Manager** with the same **connector name** you configured in the previous section (e.g., xpander-github-actions-manager).
3. Click **MCP Configuration**.
4. Enter the MCP configuration into the appropriate settings of the client app you want to use (e.g., Cursor, Windsurf, Claude Desktop, etc.).
## Expose Github Actions Manager as MCP Server
Alternatively, you can also expose your Github Actions Manager account as an MCP server. To do so:
1. Go to the **Connectors** section in the sidebar of your xpander.ai dashboard.
2. Select **Github Actions Manager** with the same **connector name** you configured in the previous section (e.g., xpander-github-actions-manager).
3. Click **MCP Configuration**.
4. Enter the MCP configuration into the appropriate settings of the client app you want to use (e.g., Cursor, Windsurf, Claude Desktop, etc.).
 ## AI Agent Github Actions Manager Prompt Library
Below are possible prompts or use cases you can try after integrating Github Actions Manager into your xpander AI agent:
```
Can you provide the job details for job ID {job_id} in {repository_owner}/{repository_name}?
```
```
Can you delete the artifact with ID {artifact_id} from {repository_owner}/{repository_name}?
```
```
Can you cancel the workflow run with ID {run_id} in {repository_owner}/{repository_name}?
```
```
Can you rerun the job with ID {job_id} in {repository_owner}/{repository_name} with debug logging enabled?
```
## Related Resources
* [Understanding Model Context Protocol (MCP)](/guides/deploy/mcp)
* [Github Actions Manager API Documentation](https://docs.github.com/en/rest/actions/)
## AI Agent Github Actions Manager Prompt Library
Below are possible prompts or use cases you can try after integrating Github Actions Manager into your xpander AI agent:
```
Can you provide the job details for job ID {job_id} in {repository_owner}/{repository_name}?
```
```
Can you delete the artifact with ID {artifact_id} from {repository_owner}/{repository_name}?
```
```
Can you cancel the workflow run with ID {run_id} in {repository_owner}/{repository_name}?
```
```
Can you rerun the job with ID {job_id} in {repository_owner}/{repository_name} with debug logging enabled?
```
## Related Resources
* [Understanding Model Context Protocol (MCP)](/guides/deploy/mcp)
* [Github Actions Manager API Documentation](https://docs.github.com/en/rest/actions/)