> ## Documentation Index
> Fetch the complete documentation index at: https://docs.xpander.ai/llms.txt
> Use this file to discover all available pages before exploring further.
# Google Calendar
> Learn how to integrate AI agents with Google Calendar using xpander.ai. Create intelligent workflows that automatically schedule meetings, manage availability, send reminders, and adjust events in real-time based on contextual data.
## About Google Calendar
Google Calendar is a free, cloud-based time-management and scheduling service developed by Google.
Key features include:
* **Event Creation & Management**: Schedule one-time or recurring events, set start and end times, add locations, and invite guests. You can also set reminders via email or push notifications.
* **Multiple Calendar Support**: Create and manage multiple calendars within your account to separate work, personal, or project-specific events. Each calendar can be color-coded for easy identification.
* **Sharing & Collaboration**: Share your calendar with others, allowing them to view or edit events. This is particularly useful for coordinating schedules within teams or families.
* **Integration with Google Services**: Events from Gmail (like flight or hotel reservations) are automatically added to your calendar. It also integrates with Google Meet for video conferencing.
* **Cross-Platform Accessibility**: Accessible via web browsers and dedicated apps for Android and iOS, ensuring your schedule is always at your fingertips.
* **Customizable Views**: Switch between daily, weekly, monthly, or agenda views to suit your planning needs.
## Authentication Options
Below are possible authentication options you can choose:
The simplest way to connect Google Calendar is by using xpander.ai's built-in authentication:
1. Go to the **Connectors** section in the sidebar of your xpander.ai dashboard.
2. Select **Google Calendar** from the available integrations.
3. Click **Sign in with Google Calendar**.
4. Grant xpander.ai permission to access your account.
5. Your Google Calendar integration is now ready to use.
This method is recommended for most users. xpander.ai securely manages your OAuth tokens without exposing any credentials.
### Generate a Google Calendar API Key
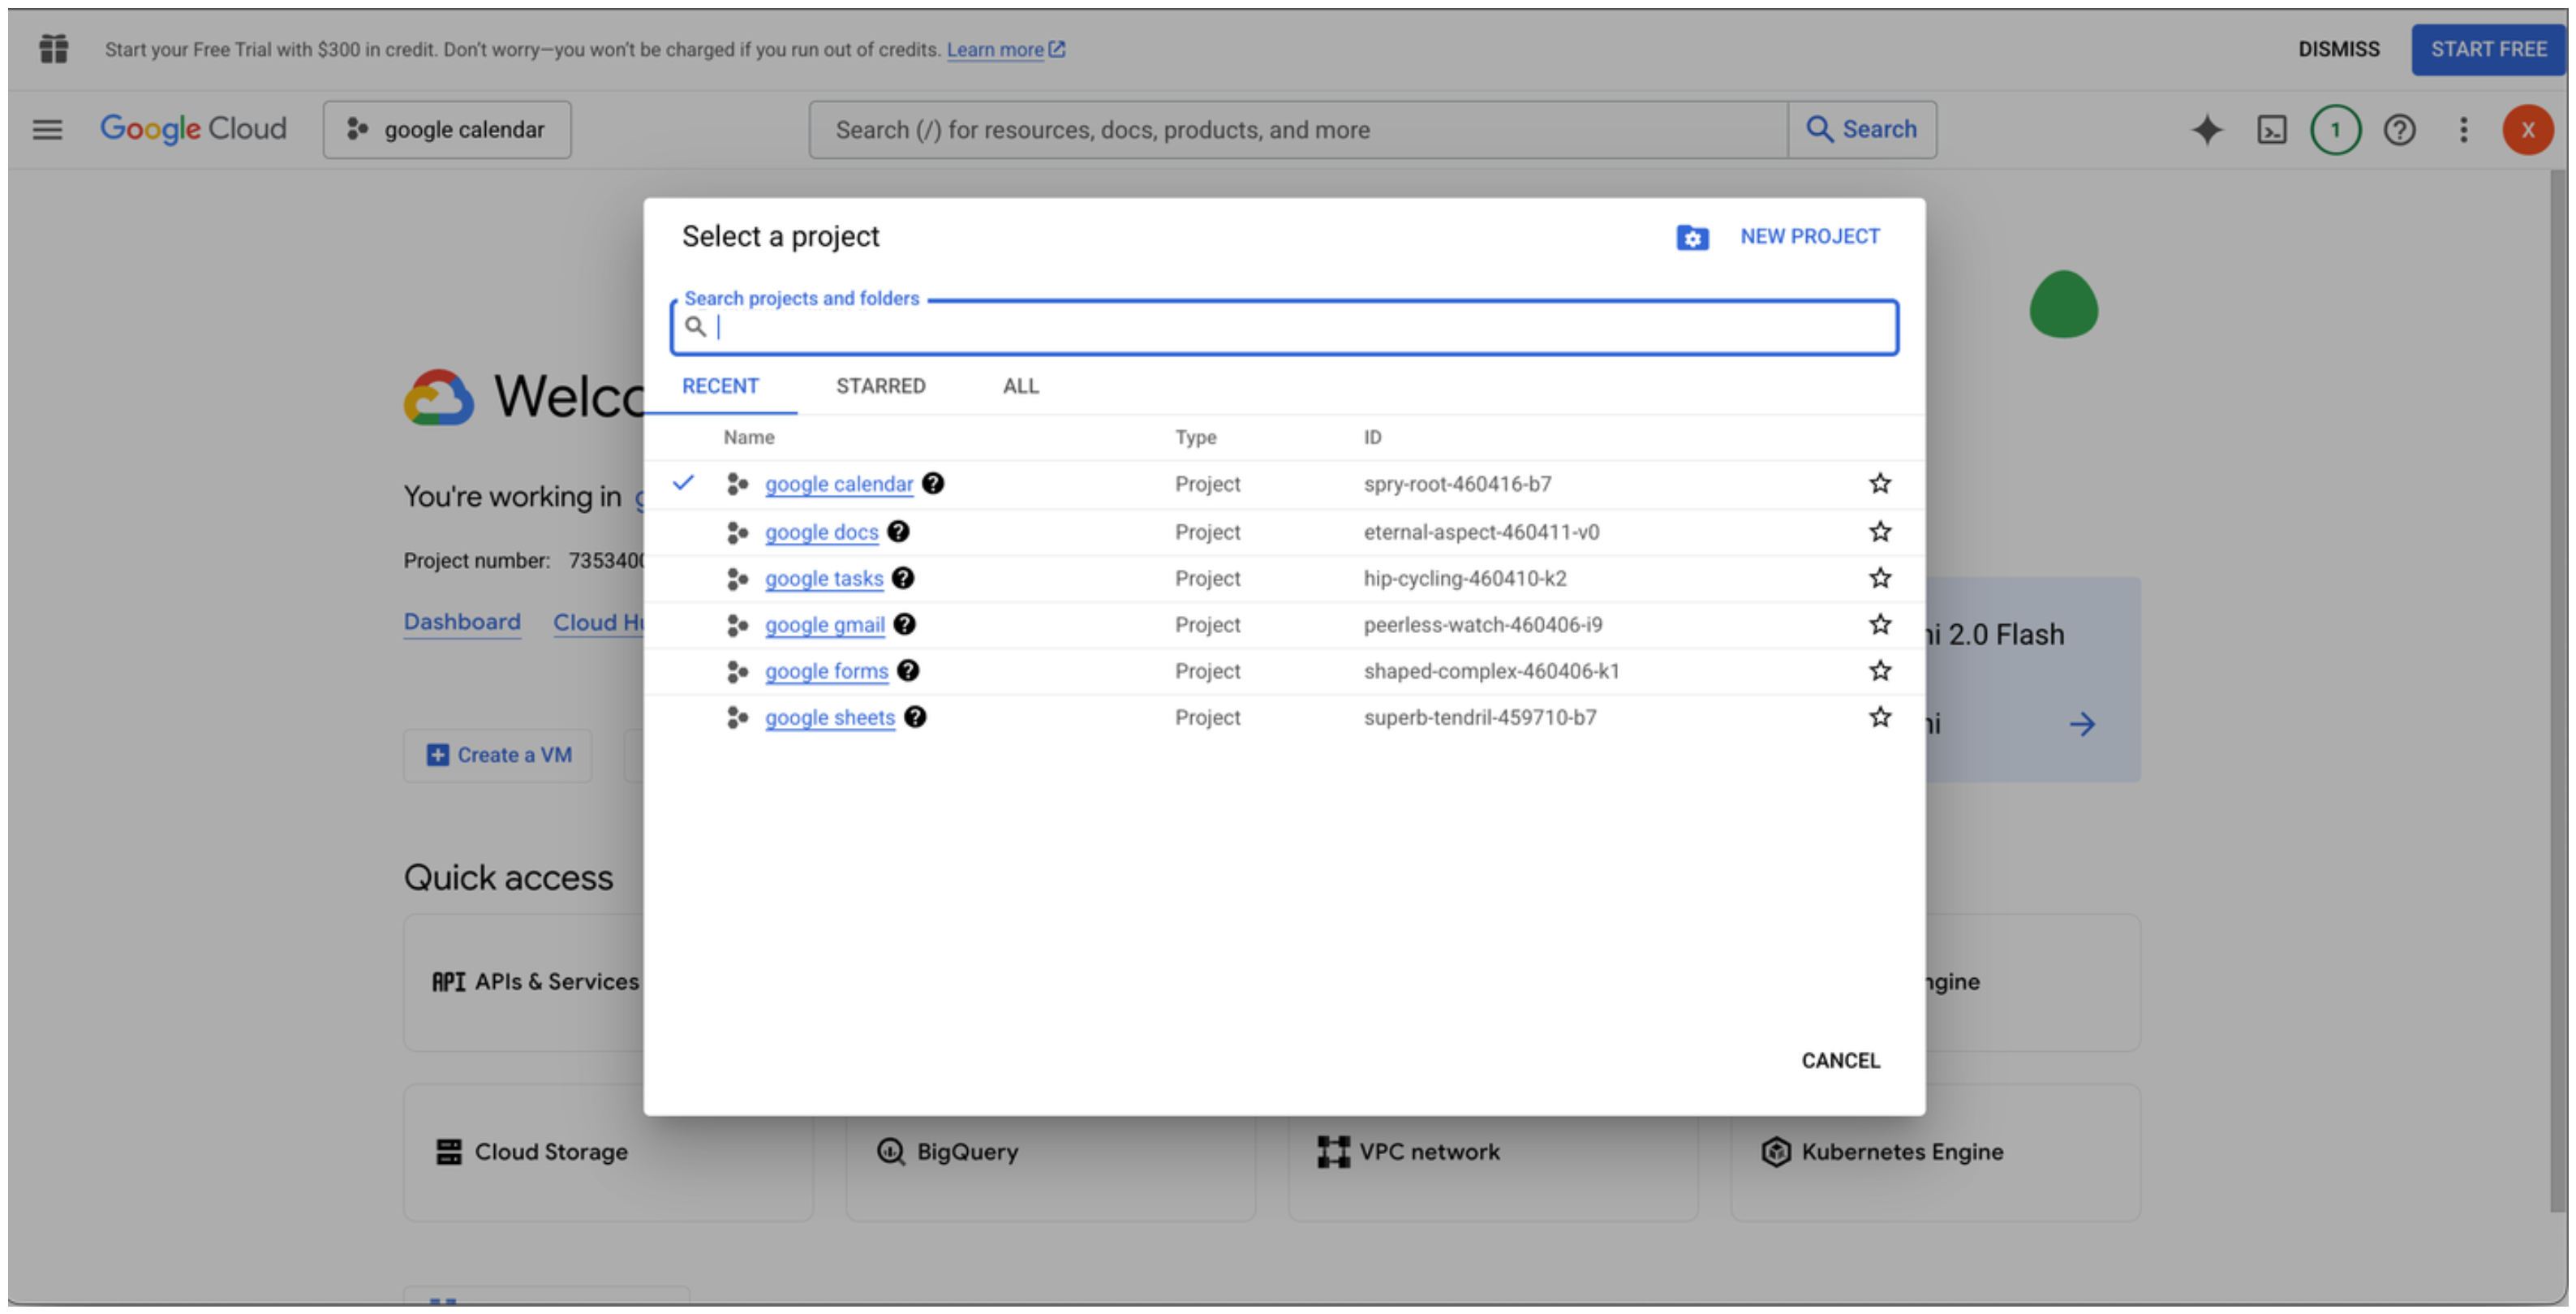
1. Log in to your [Google Cloud Console](https://console.cloud.google.com/).
2. Create a new project or select an existing one.\\
 3. Go to the [Google Cloud API Library](https://console.cloud.google.com/apis/library).\\
 4. Search for and select **Google Calendar API**, then click **Enable**.
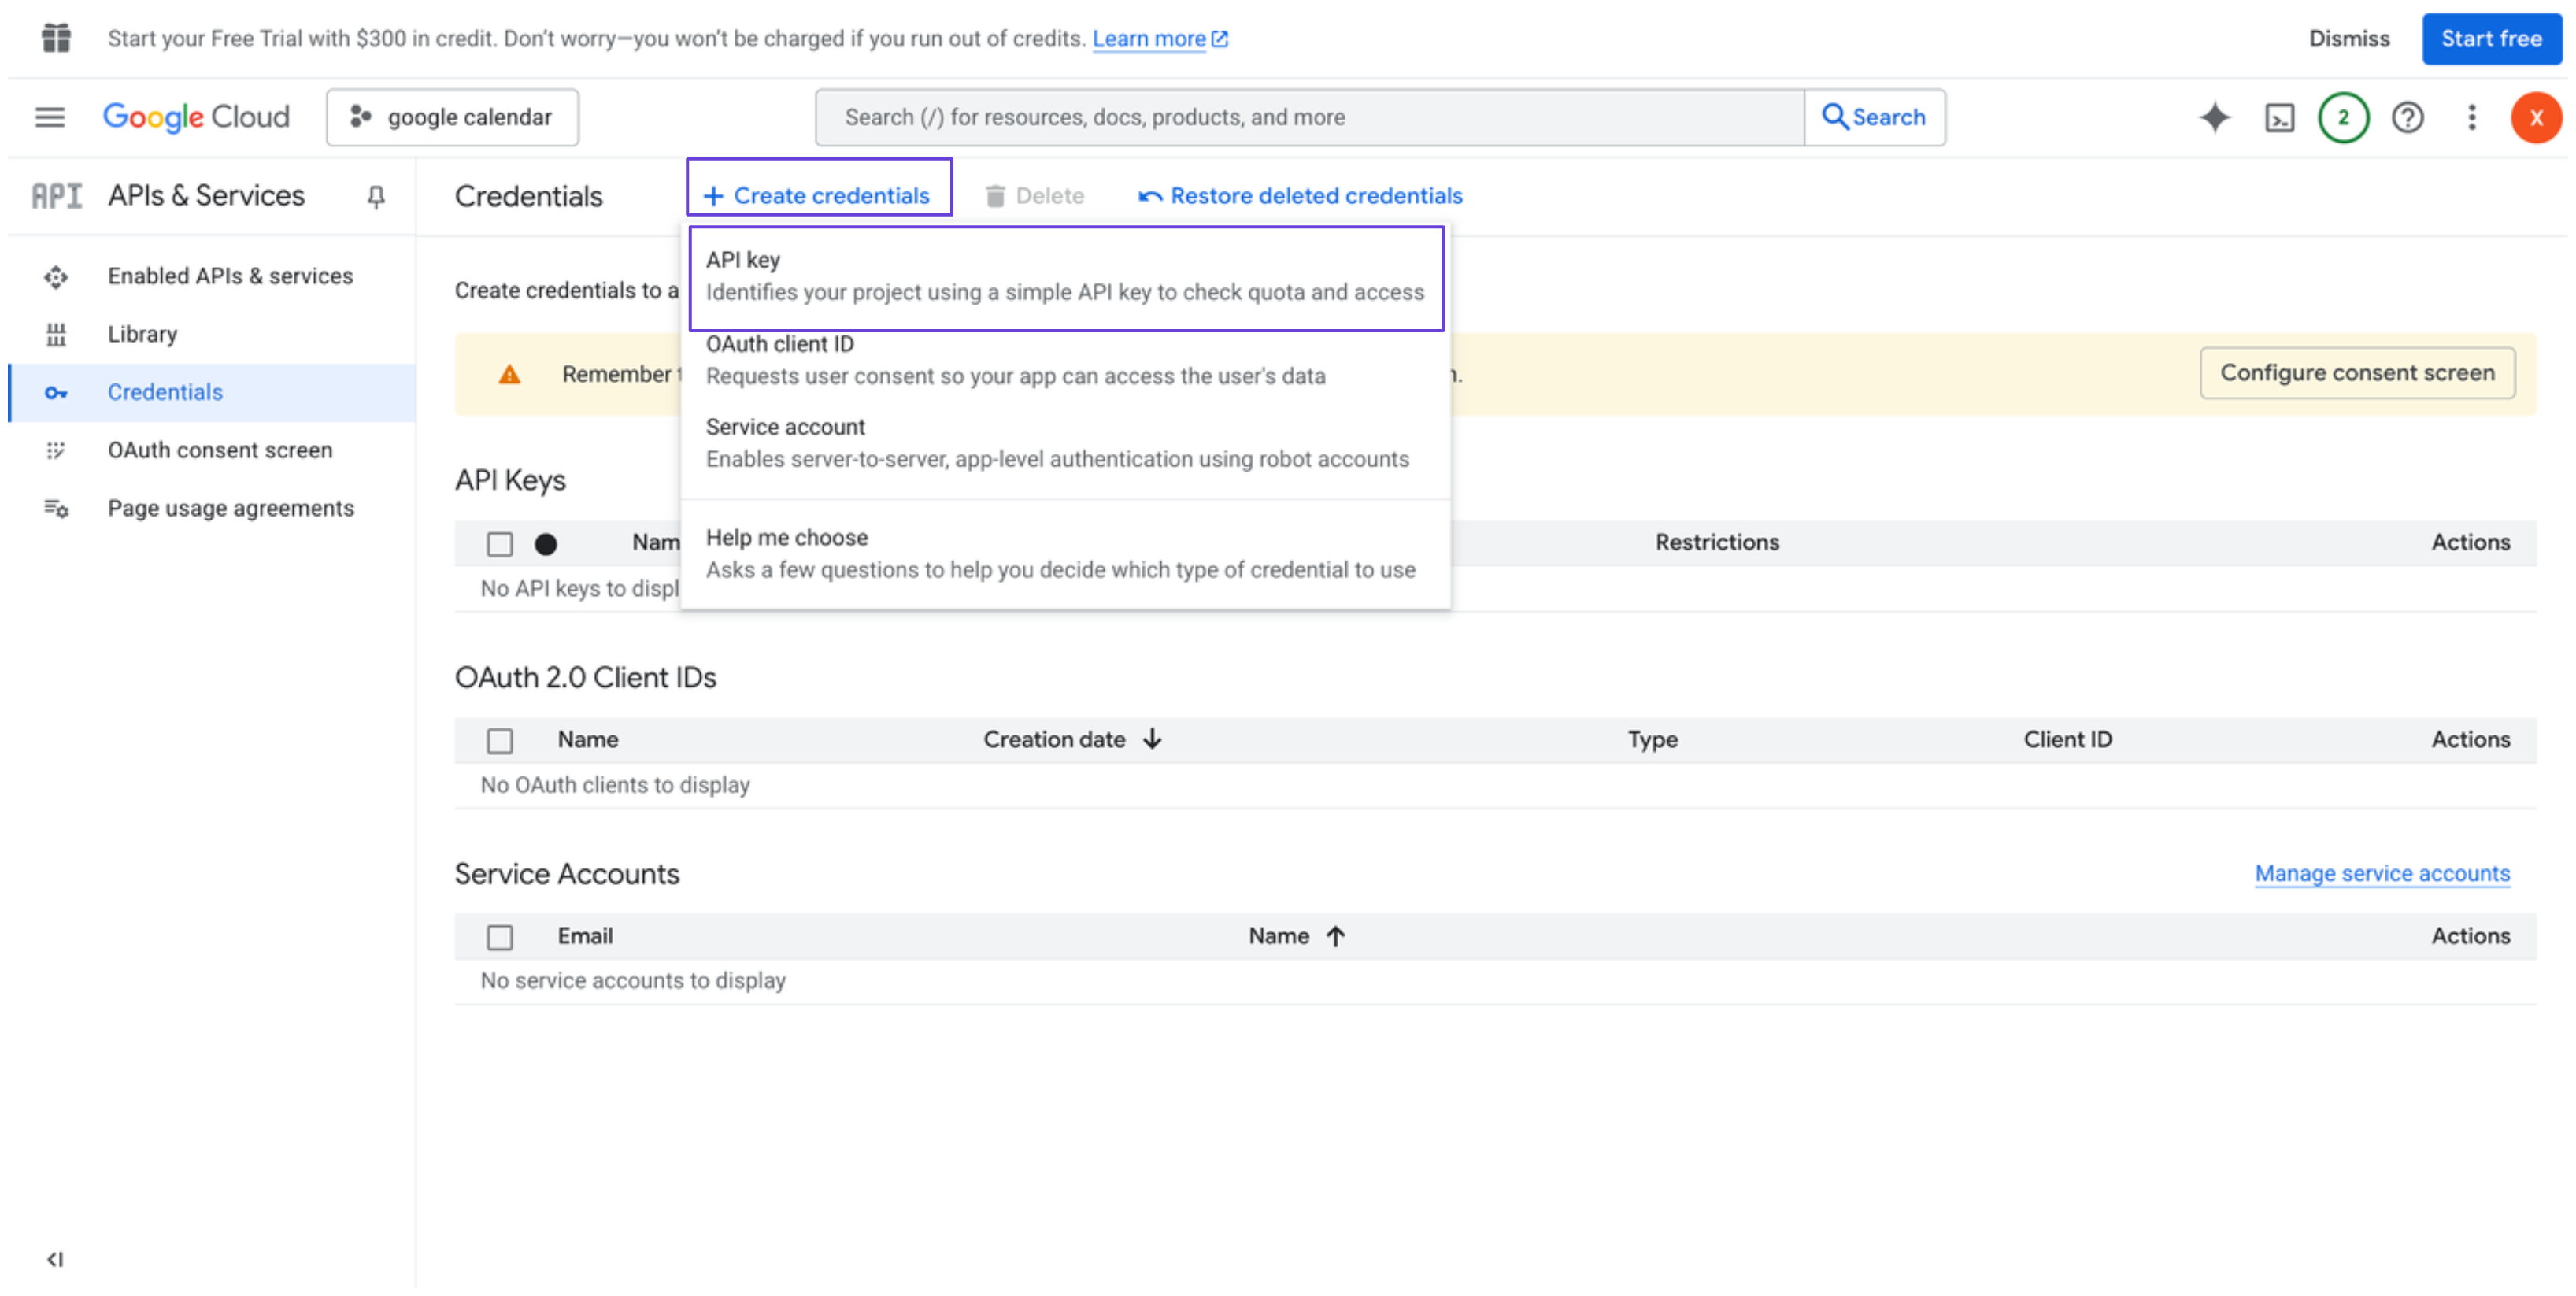
5. In the sidebar, go to **Credentials**.
6. Click **Create credentials**, and select **API key**.\\
4. Search for and select **Google Calendar API**, then click **Enable**.
5. In the sidebar, go to **Credentials**.
6. Click **Create credentials**, and select **API key**.\\
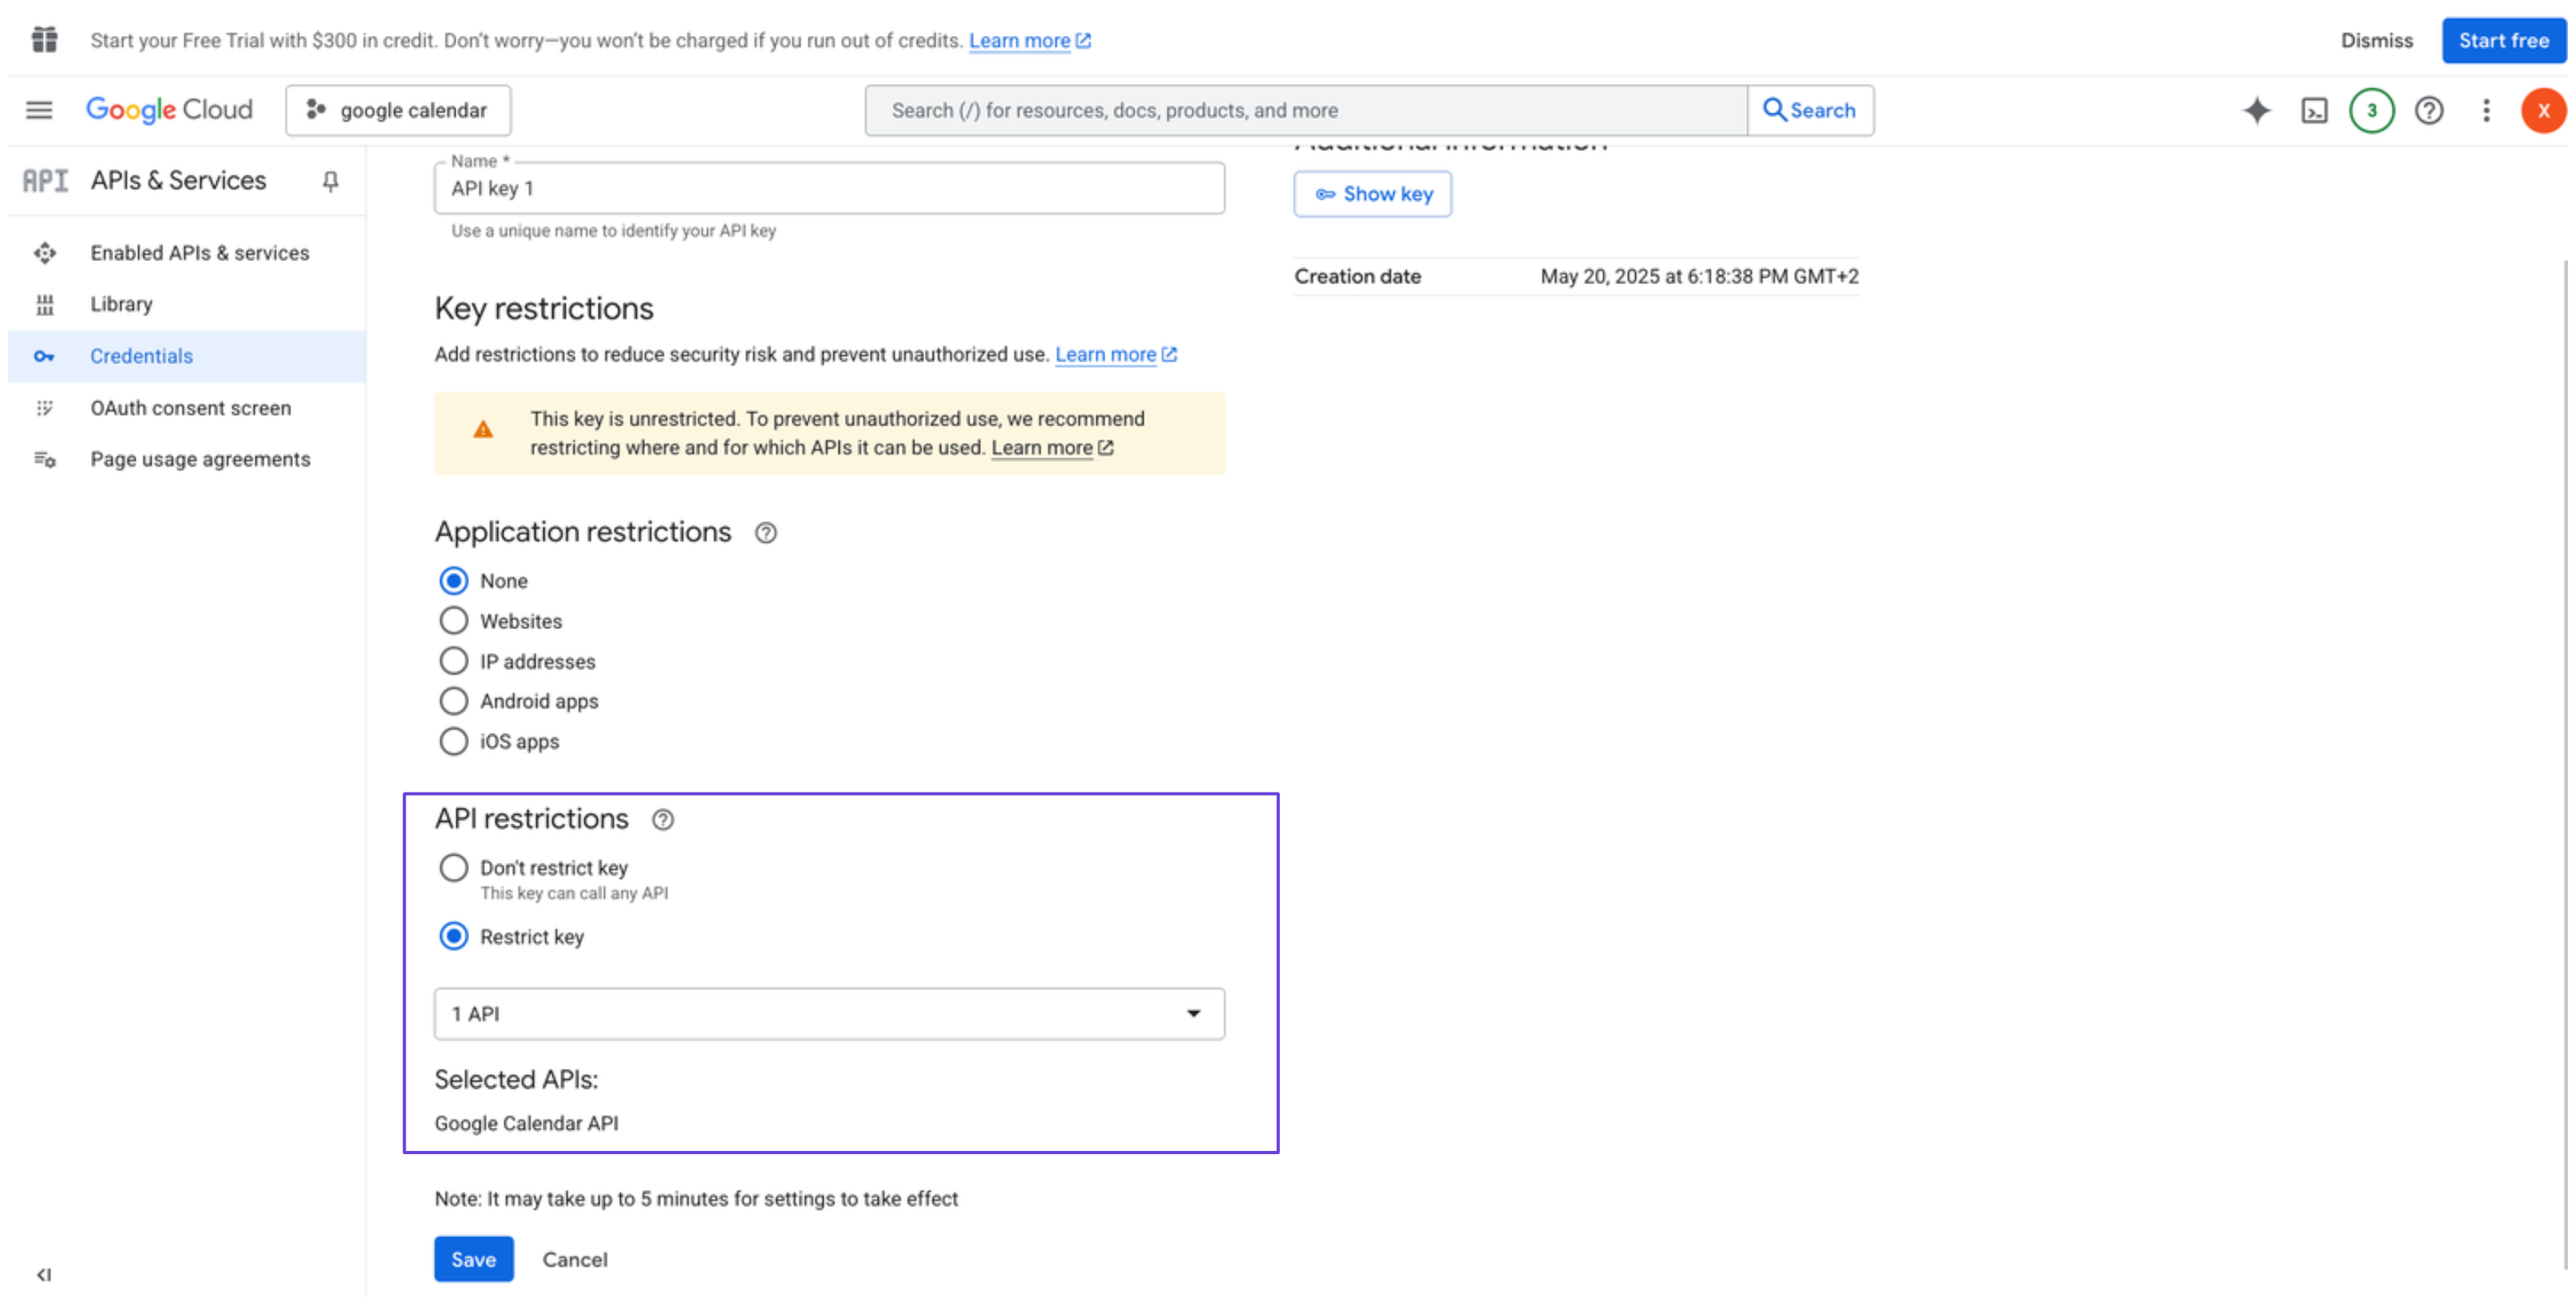
 7. Restrict the API key to Google Calendar API only (optional but recommended).\\
 ### Integrate Google Calendar into xpander.ai
1. Go to the **Connectors** section in the sidebar of your xpander.ai dashboard.
2. Select **Google Calendar** from the available integrations.
3. Click **Other auth options**.
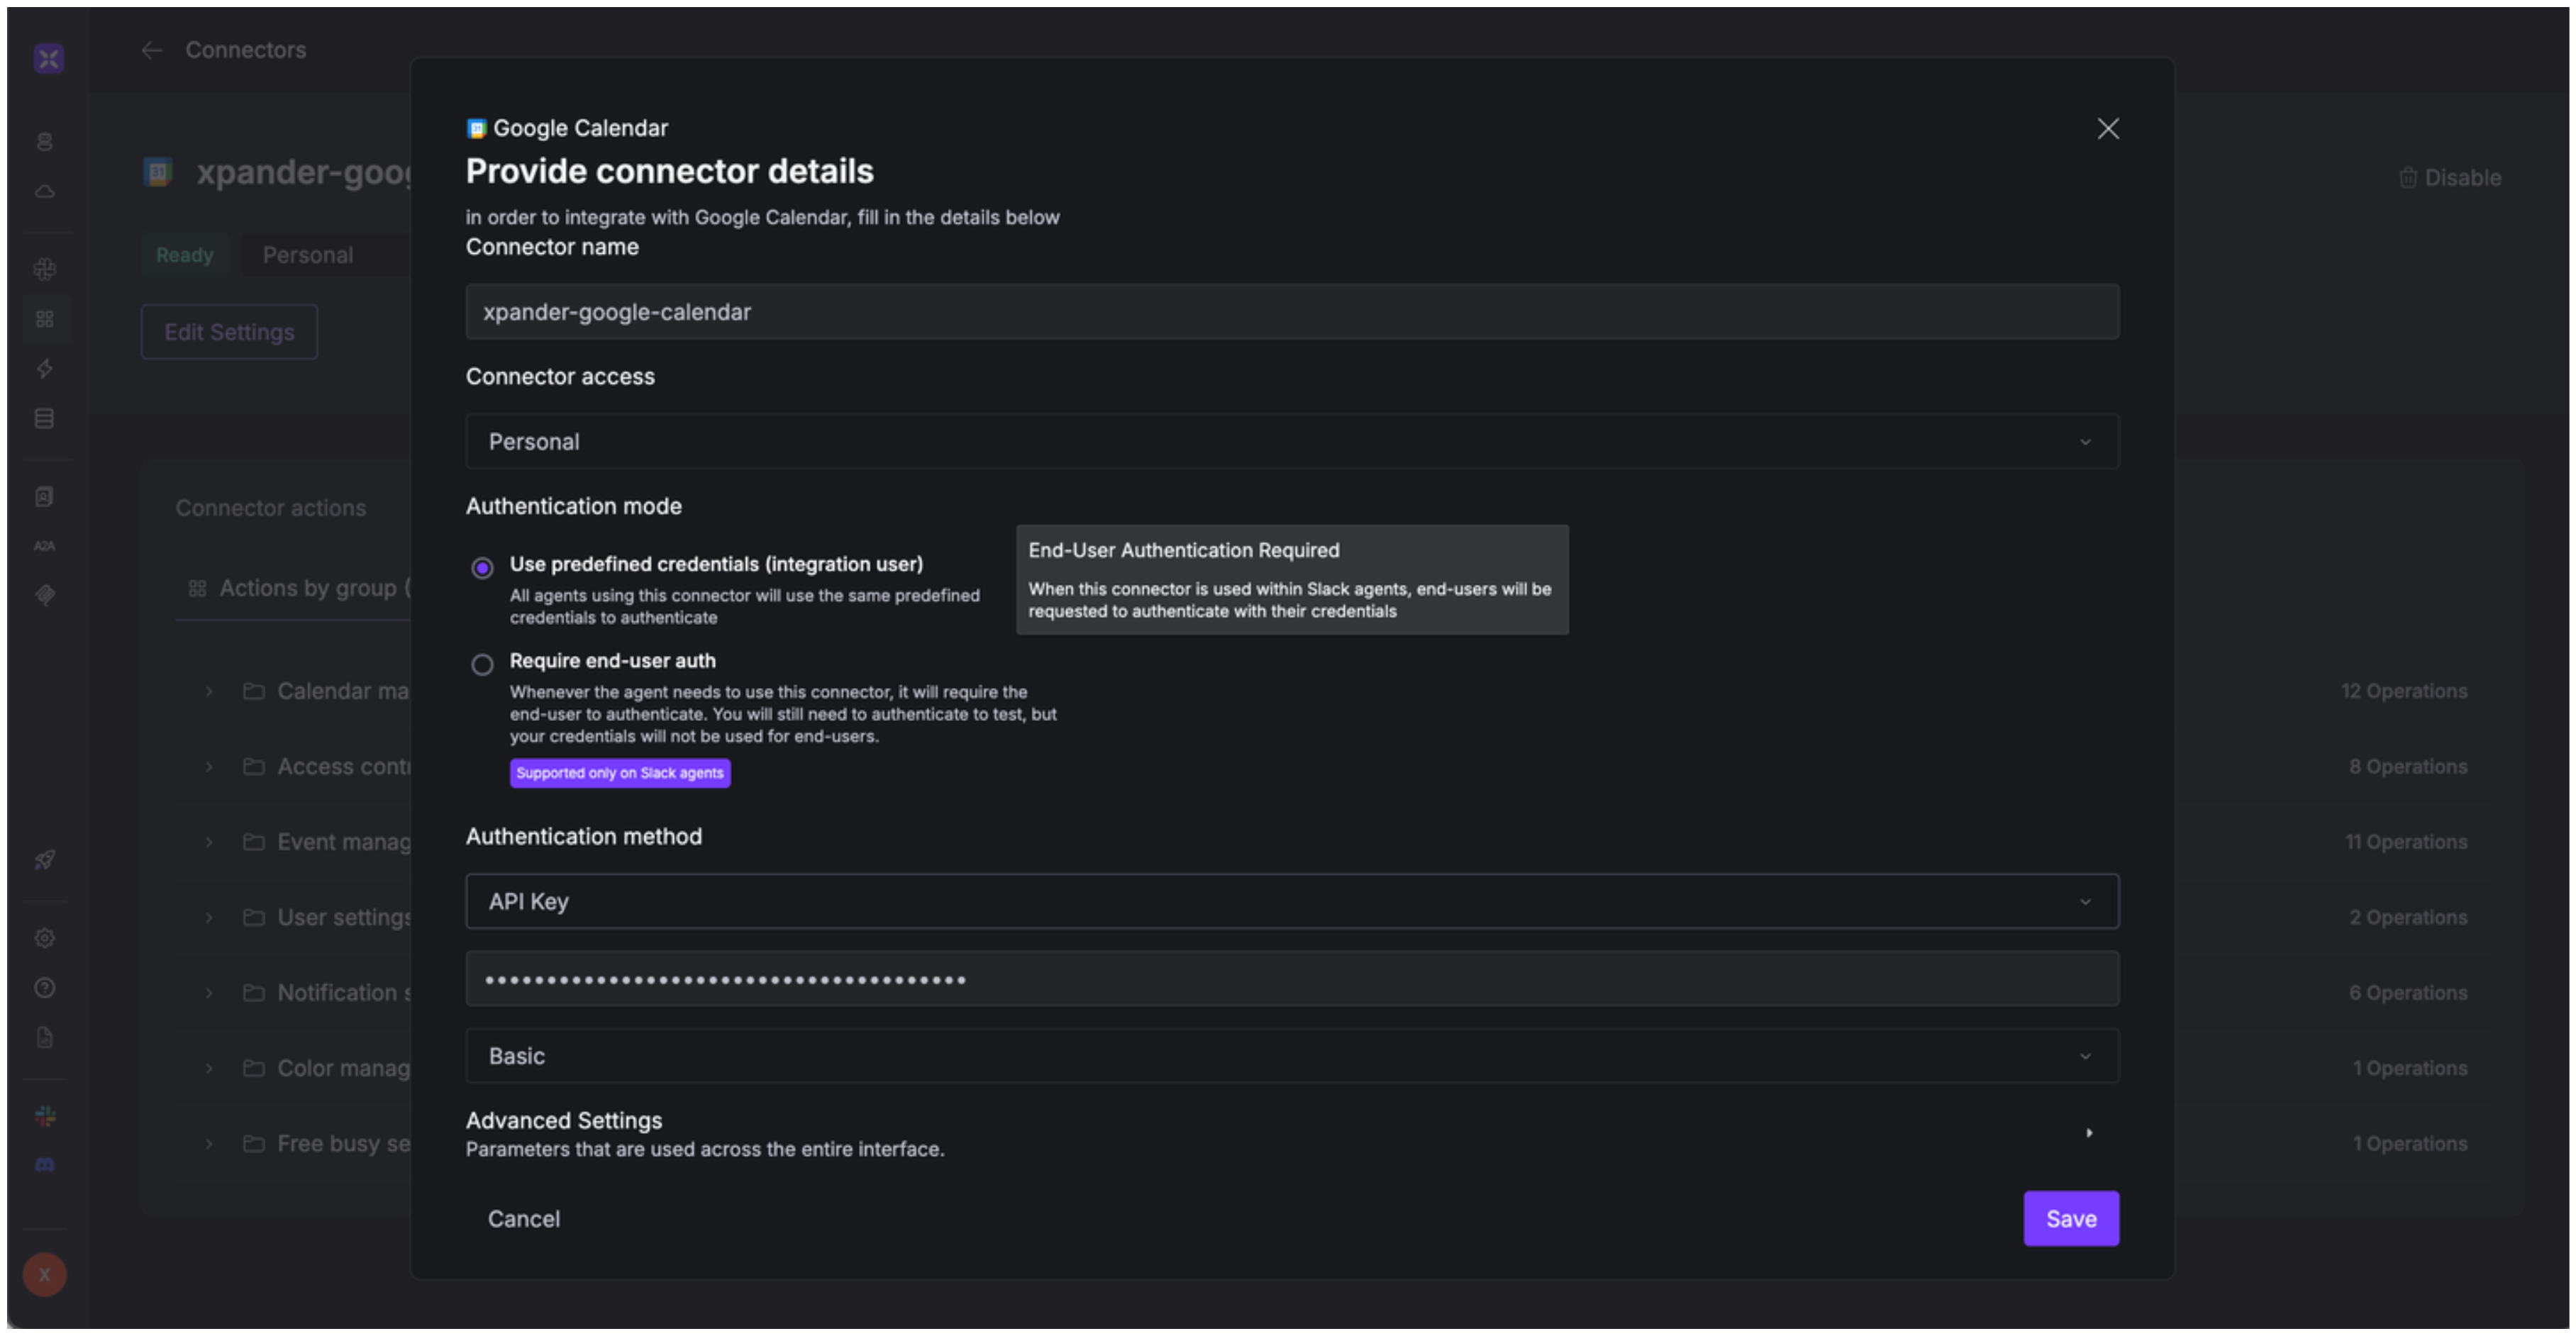
4. Enter a **connector name**, e.g., "xpander-google-calendar".
5. Select **Integration User** as the authentication mode.
6. Select **API Key** as the authentication method.
7. Paste the Google Calendar API key into the provided field.
8. Choose **Basic** as the **Auth Type**.
9. Save the configuration.\\
### Integrate Google Calendar into xpander.ai
1. Go to the **Connectors** section in the sidebar of your xpander.ai dashboard.
2. Select **Google Calendar** from the available integrations.
3. Click **Other auth options**.
4. Enter a **connector name**, e.g., "xpander-google-calendar".
5. Select **Integration User** as the authentication mode.
6. Select **API Key** as the authentication method.
7. Paste the Google Calendar API key into the provided field.
8. Choose **Basic** as the **Auth Type**.
9. Save the configuration.\\
 API keys provide limited functionality and are best for read-only operations on public files. For full access, use OAuth methods.
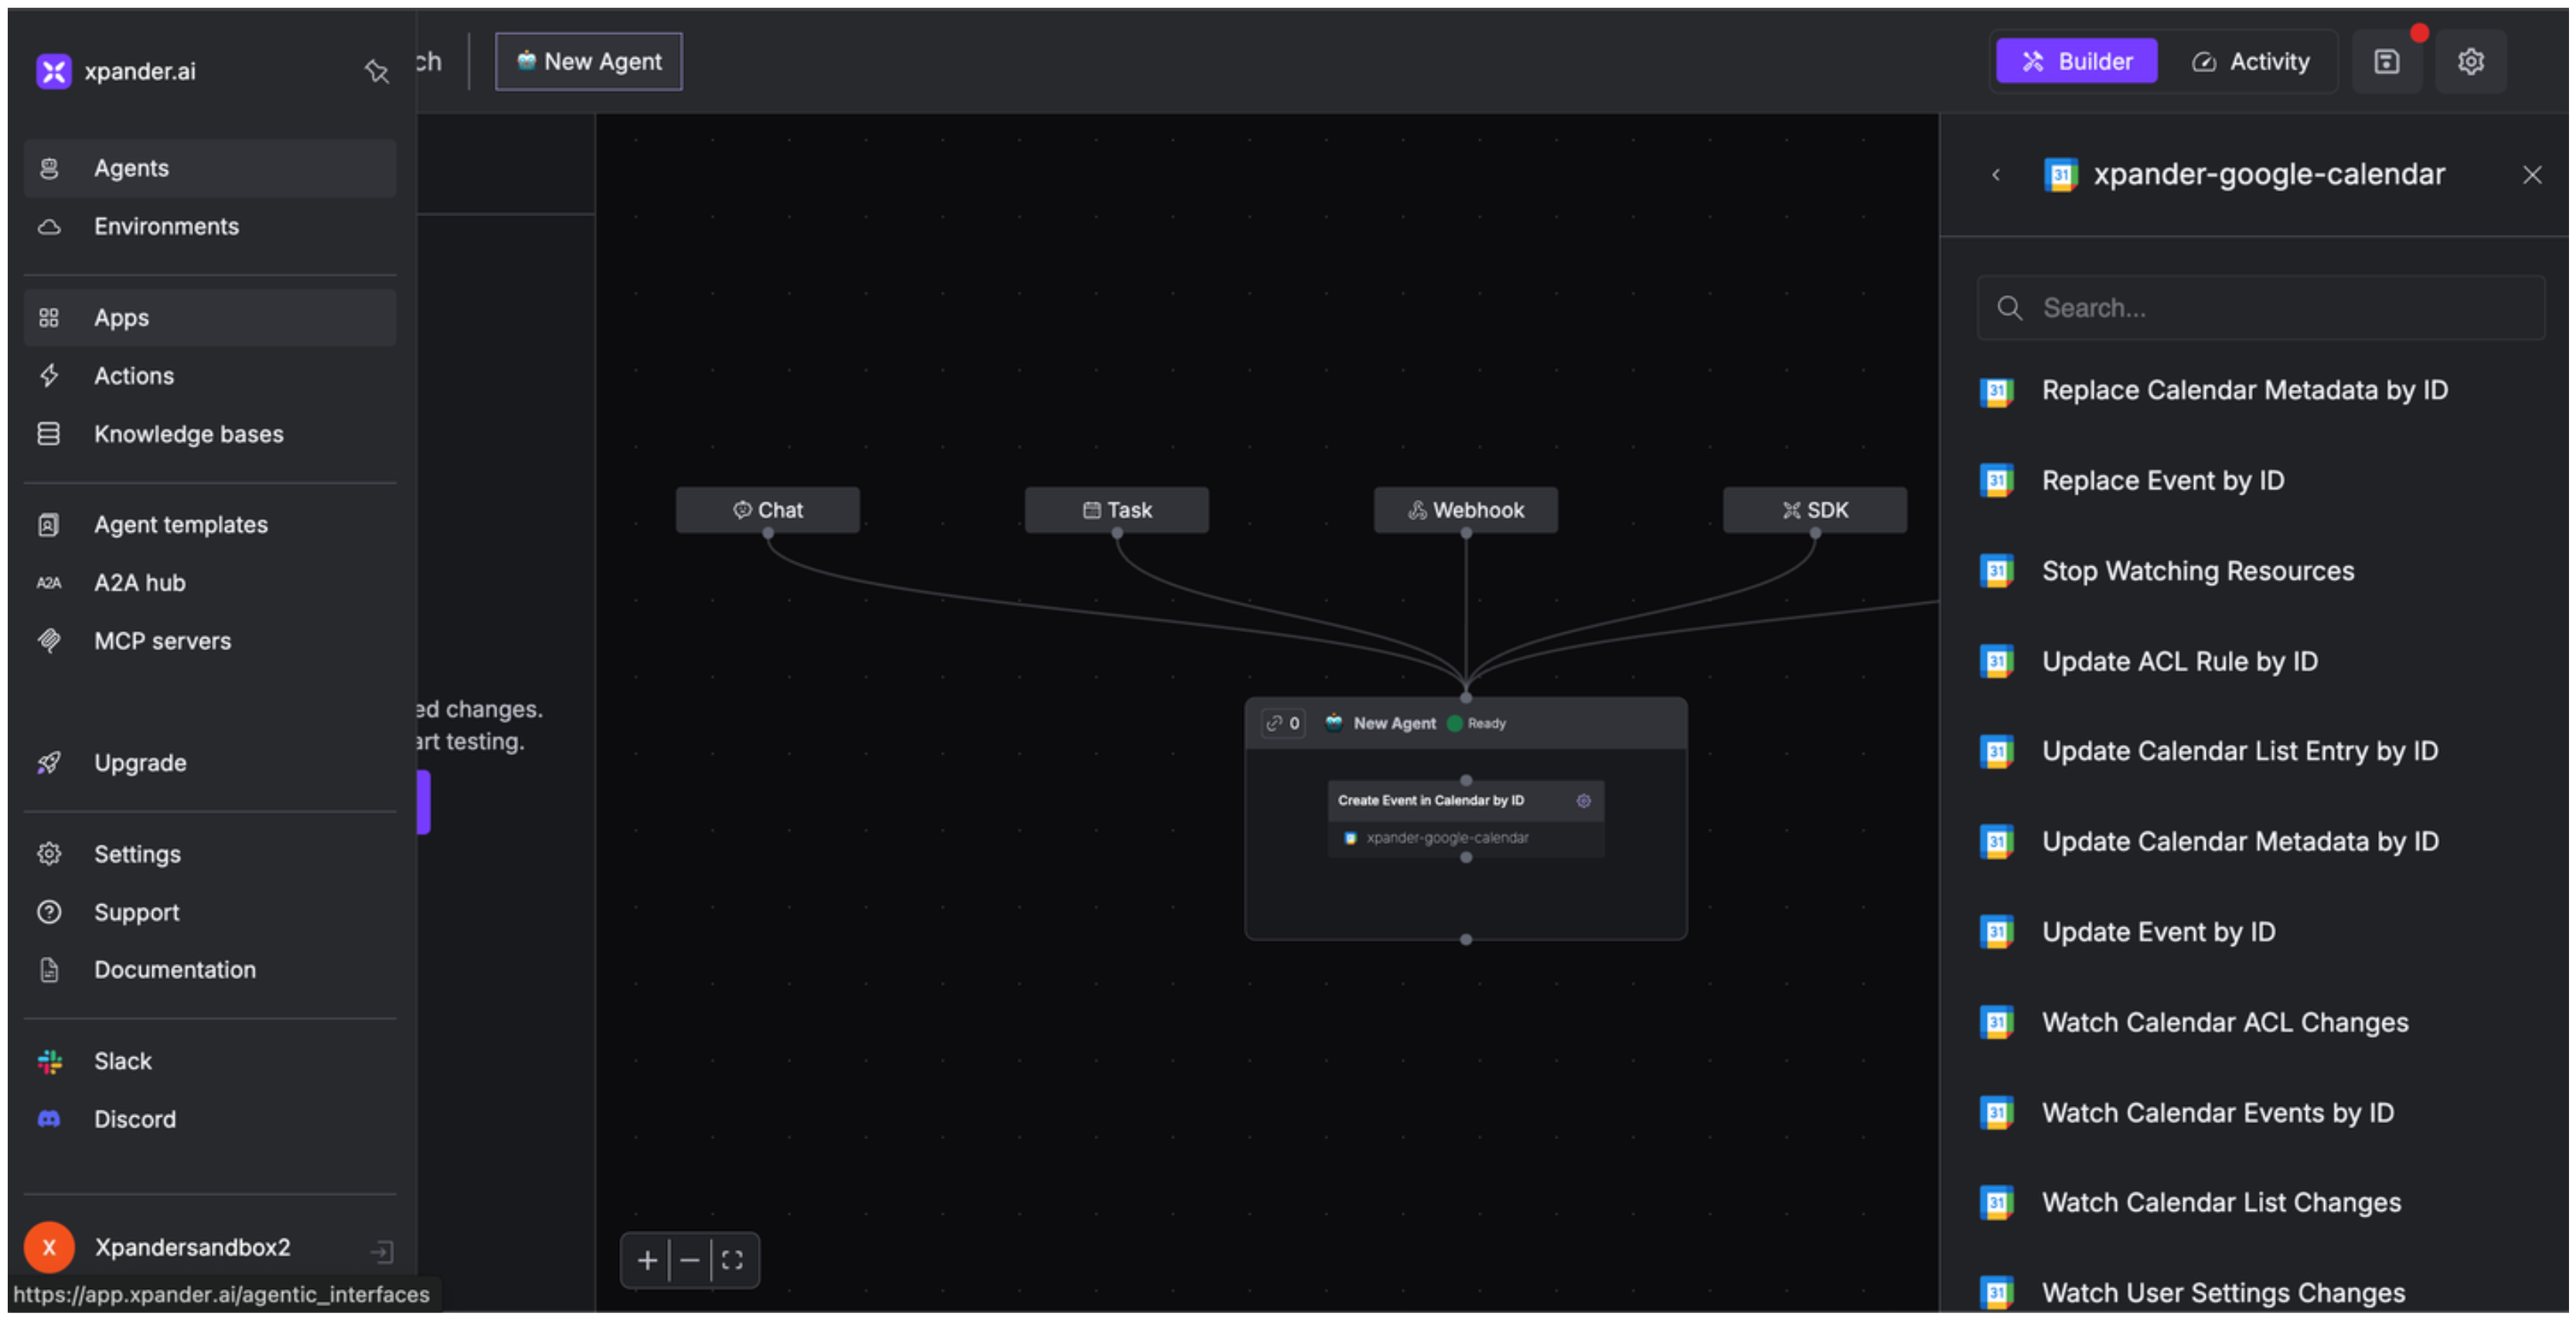
## Integration of Google Calendar into AI Agent
Once you've configured your Google Calendar account with the authentication option(s) described above, you can integrate it into your AI agent with xpander.ai:
1. In your xpander.ai dashboard, go to the **Agent Configuration** tab and select **Tools**, then click **Add Tools**.
2. Select **Connectors**.
3. Choose **Google Calendar** with the same **connector name** you configured in the previous section (e.g., xpander-google-calendar).
4. Select the available Google Calendar operations that suit your use case.
API keys provide limited functionality and are best for read-only operations on public files. For full access, use OAuth methods.
## Integration of Google Calendar into AI Agent
Once you've configured your Google Calendar account with the authentication option(s) described above, you can integrate it into your AI agent with xpander.ai:
1. In your xpander.ai dashboard, go to the **Agent Configuration** tab and select **Tools**, then click **Add Tools**.
2. Select **Connectors**.
3. Choose **Google Calendar** with the same **connector name** you configured in the previous section (e.g., xpander-google-calendar).
4. Select the available Google Calendar operations that suit your use case.
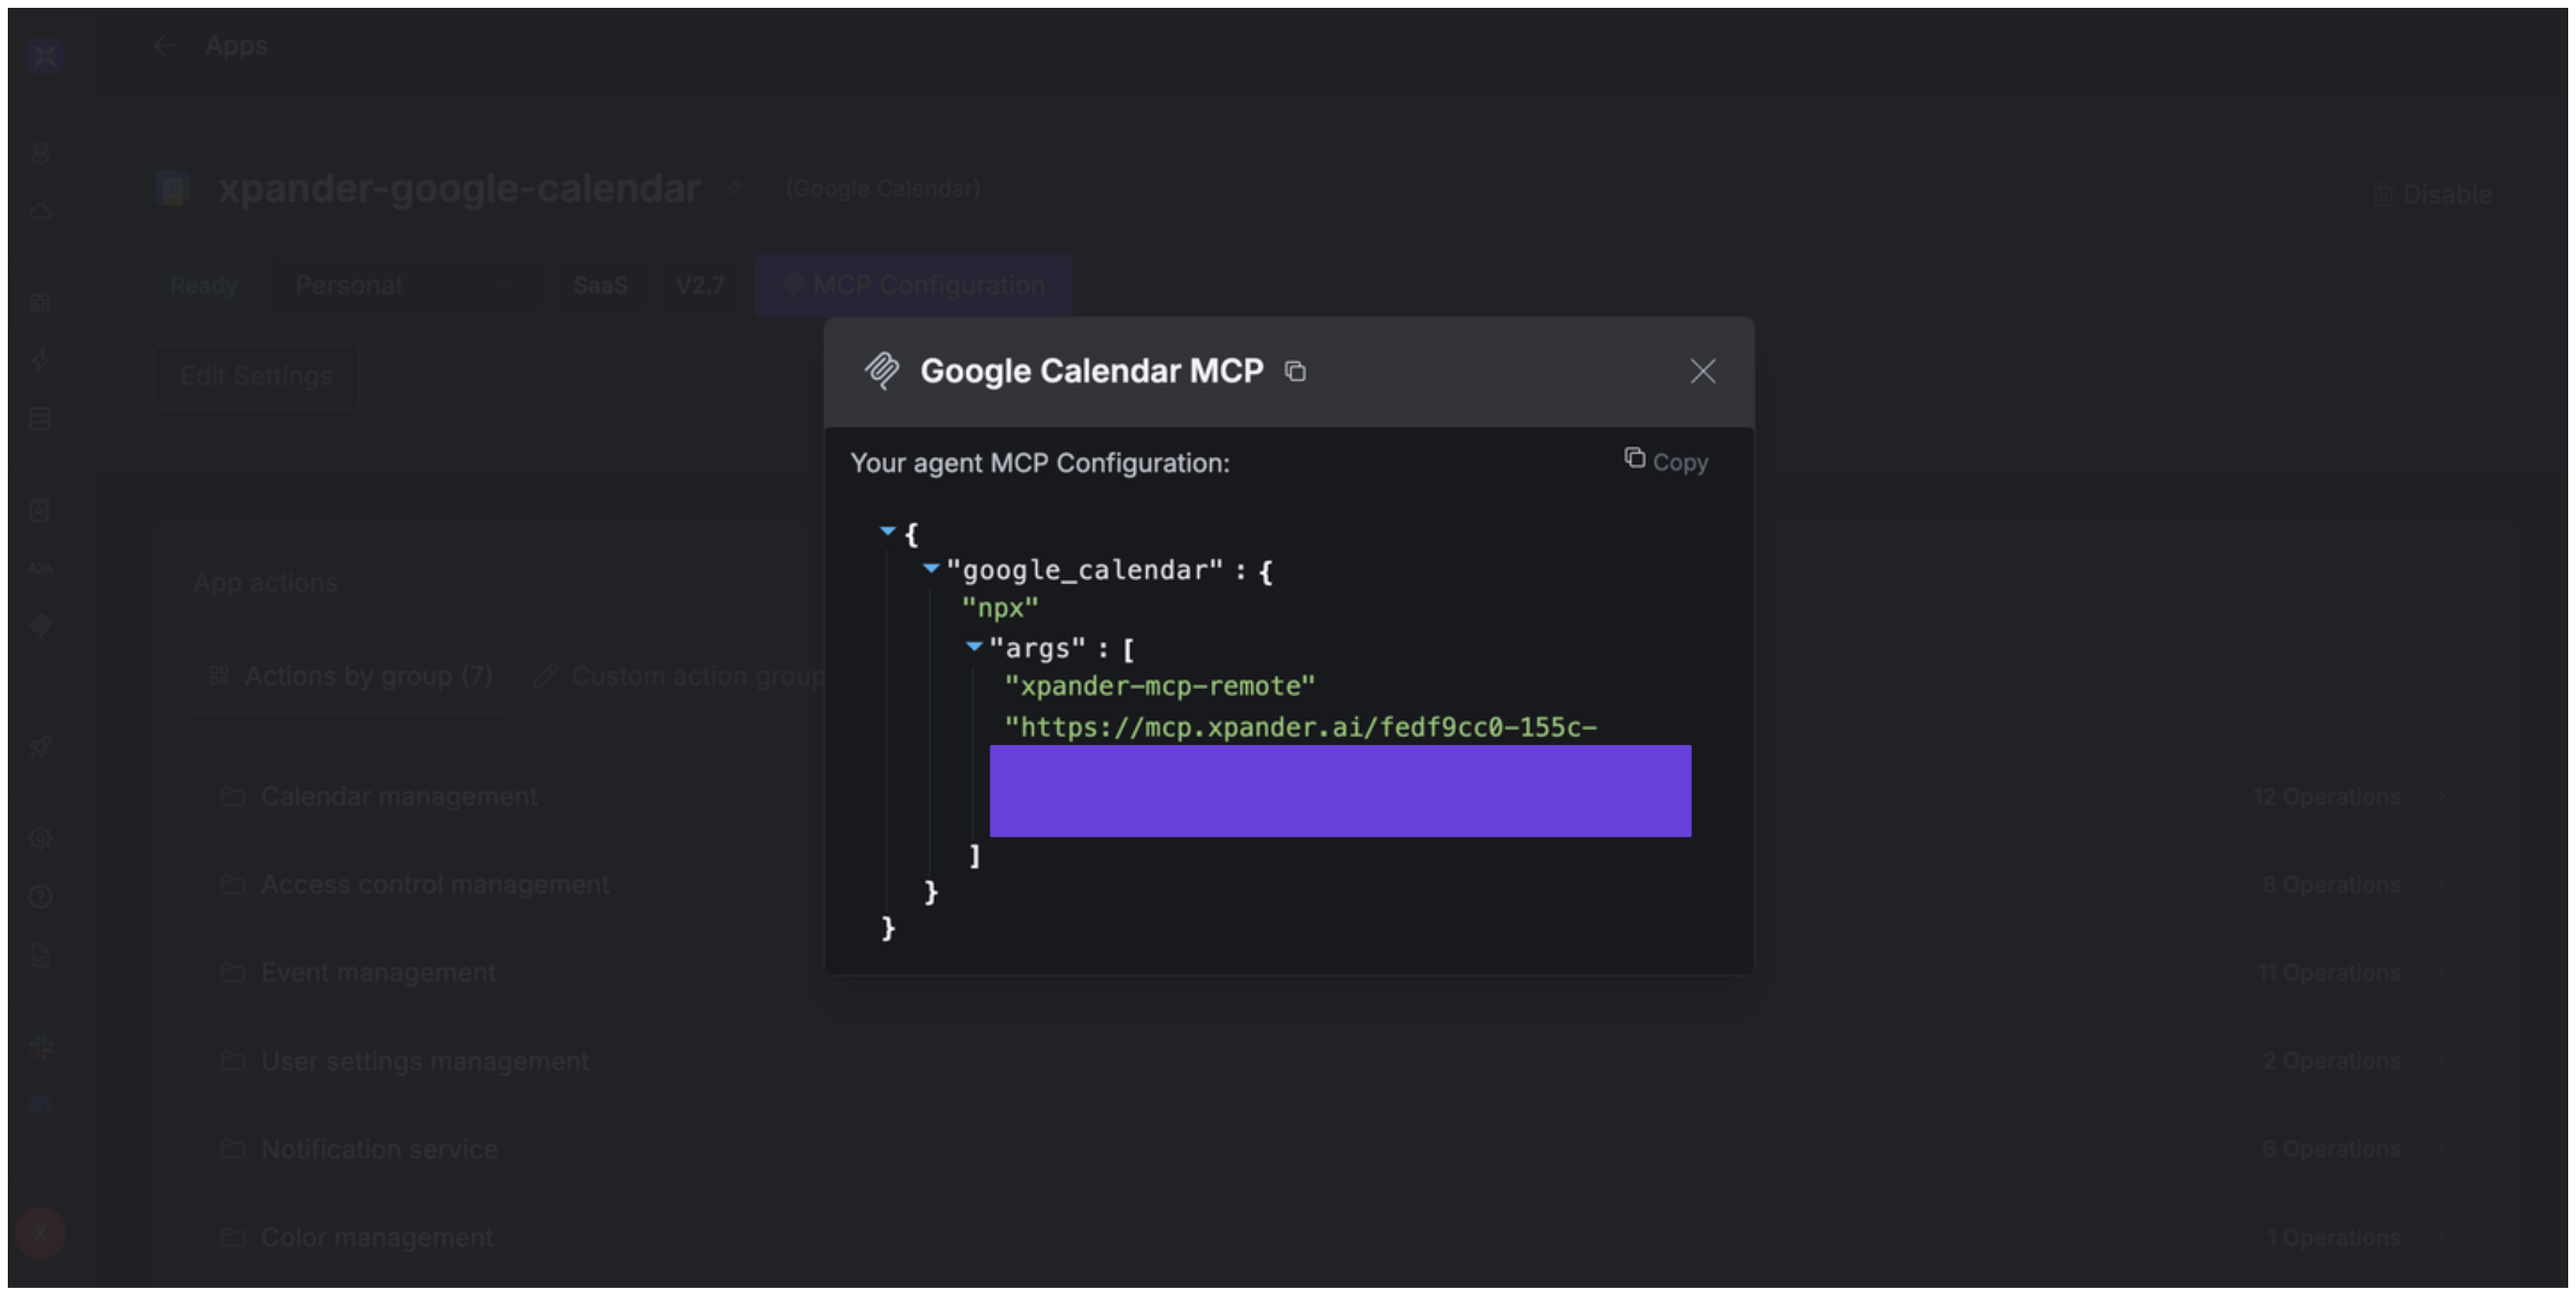
 ## Expose Google Calendar as MCP Server
Alternatively, you can also expose your Google Calendar account as an MCP server. To do so:
1. Go to the **Connectors** section in the sidebar of your xpander.ai dashboard.
2. Select **Google Calendar** with the same **connector name** you configured in the previous section (e.g., xpander-google-calendar).
3. Click **MCP Configuration**.
4. Enter the MCP configuration into the appropriate settings of the client app you want to use (e.g., Cursor, Windsurf, Claude Desktop, etc.).
## Expose Google Calendar as MCP Server
Alternatively, you can also expose your Google Calendar account as an MCP server. To do so:
1. Go to the **Connectors** section in the sidebar of your xpander.ai dashboard.
2. Select **Google Calendar** with the same **connector name** you configured in the previous section (e.g., xpander-google-calendar).
3. Click **MCP Configuration**.
4. Enter the MCP configuration into the appropriate settings of the client app you want to use (e.g., Cursor, Windsurf, Claude Desktop, etc.).
 ## AI Agent Google Calendar Prompt Library
Below are possible prompts or use cases you can try after integrating Google Calendar into your xpander AI agent:
```
Could you create a new dashboard for monitoring {application_name} performance metrics?
```
```
Can you set up a monitor to alert us when {service_name} latency exceeds {threshold_value} milliseconds?
```
```
Could you temporarily mute alerts for {host_name} during our scheduled maintenance window on {date}?
```
```
Could you integrate our AWS {account_name} account to monitor our EC2 and Lambda resources?
```
## Related Resources
* [Understanding Model Context Protocol (MCP)](/guides/deploy/mcp)
* [Google Calendar API Documentation](https://developers.google.com/workspace/calendar/api/guides/overview)
## AI Agent Google Calendar Prompt Library
Below are possible prompts or use cases you can try after integrating Google Calendar into your xpander AI agent:
```
Could you create a new dashboard for monitoring {application_name} performance metrics?
```
```
Can you set up a monitor to alert us when {service_name} latency exceeds {threshold_value} milliseconds?
```
```
Could you temporarily mute alerts for {host_name} during our scheduled maintenance window on {date}?
```
```
Could you integrate our AWS {account_name} account to monitor our EC2 and Lambda resources?
```
## Related Resources
* [Understanding Model Context Protocol (MCP)](/guides/deploy/mcp)
* [Google Calendar API Documentation](https://developers.google.com/workspace/calendar/api/guides/overview)