> ## Documentation Index
> Fetch the complete documentation index at: https://docs.xpander.ai/llms.txt
> Use this file to discover all available pages before exploring further.
# Power BI
> Learn how to integrate AI agents with Power BI using xpander.ai. Create intelligent dashboards that leverage natural language queries, automated insights, and predictive analytics for real-time, data-driven decision-making.
## About Power BI
Power BI is Microsoft's cloud-based business intelligence (BI) platform that enables users to connect to a wide range of data sources, transform and model data, and create rich visual reports and dashboards.
Key features include:
* **Data connectivity**: Connect to 100+ data sources including Excel, SQL, Azure, Google BigQuery, Snowflake, Salesforce, PDFs, and more.
* **Power Query**: Integrated ETL engine (also in Excel/Dataflows) to clean, transform, and mash up data using M‑code.
* **Data modeling with DAX**: Use Data Analysis Expressions (DAX) to build measures, calculated columns, dynamic filters, and power calculations.
* **Visualizatio**: Drag‑and‑drop visuals, custom visuals via Marketplace, interactive dashboards, report page, Q\&A (natural‑language querying), paginated reports, goals/KPI tracking.
## Authentication Options
Below are possible authentication options you can choose:
The simplest way to connect Power BI is by using xpander.ai's built-in authentication:
1. Go to the **Connectors** section in the sidebar of your xpander.ai dashboard.
2. Select **Power BI** from the available integrations.
3. Click **Sign in with Power BI**.
4. Grant xpander.ai permission to access your account.
5. Your Power BI integration is now ready to use.
### Generate a Power BI API Token
1. Log in to [Azure Portal](https://portal.azure.com/).
2. Create and register an app to access the Power BI API. To do this, in the sidebar, select **Microsoft Entra ID**.
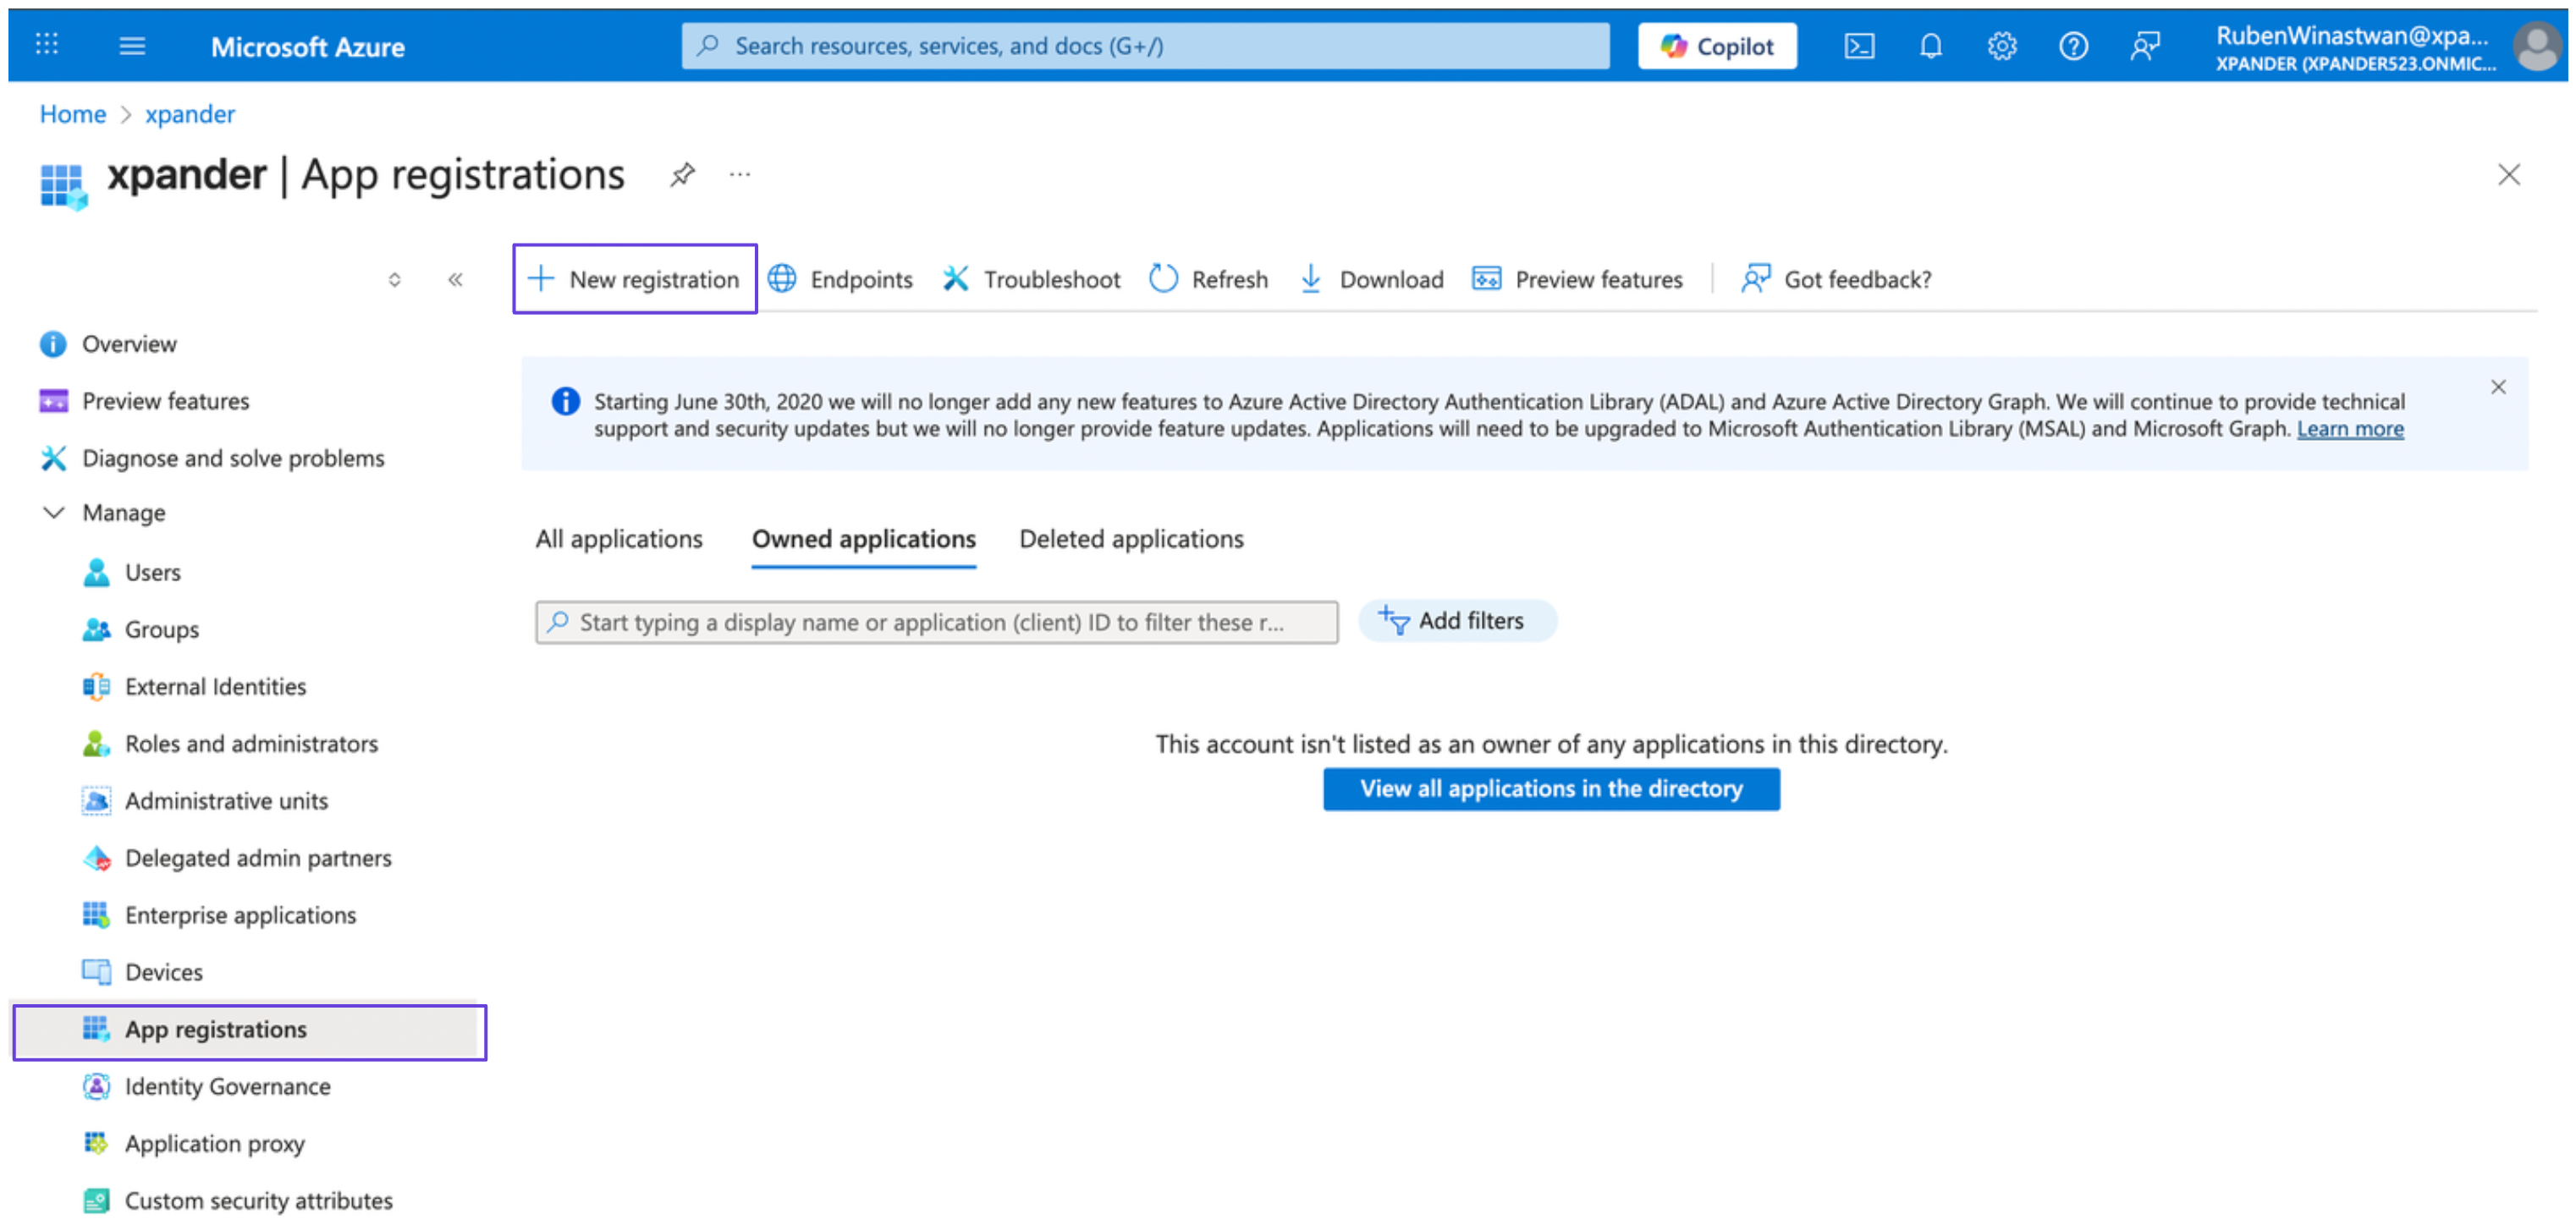
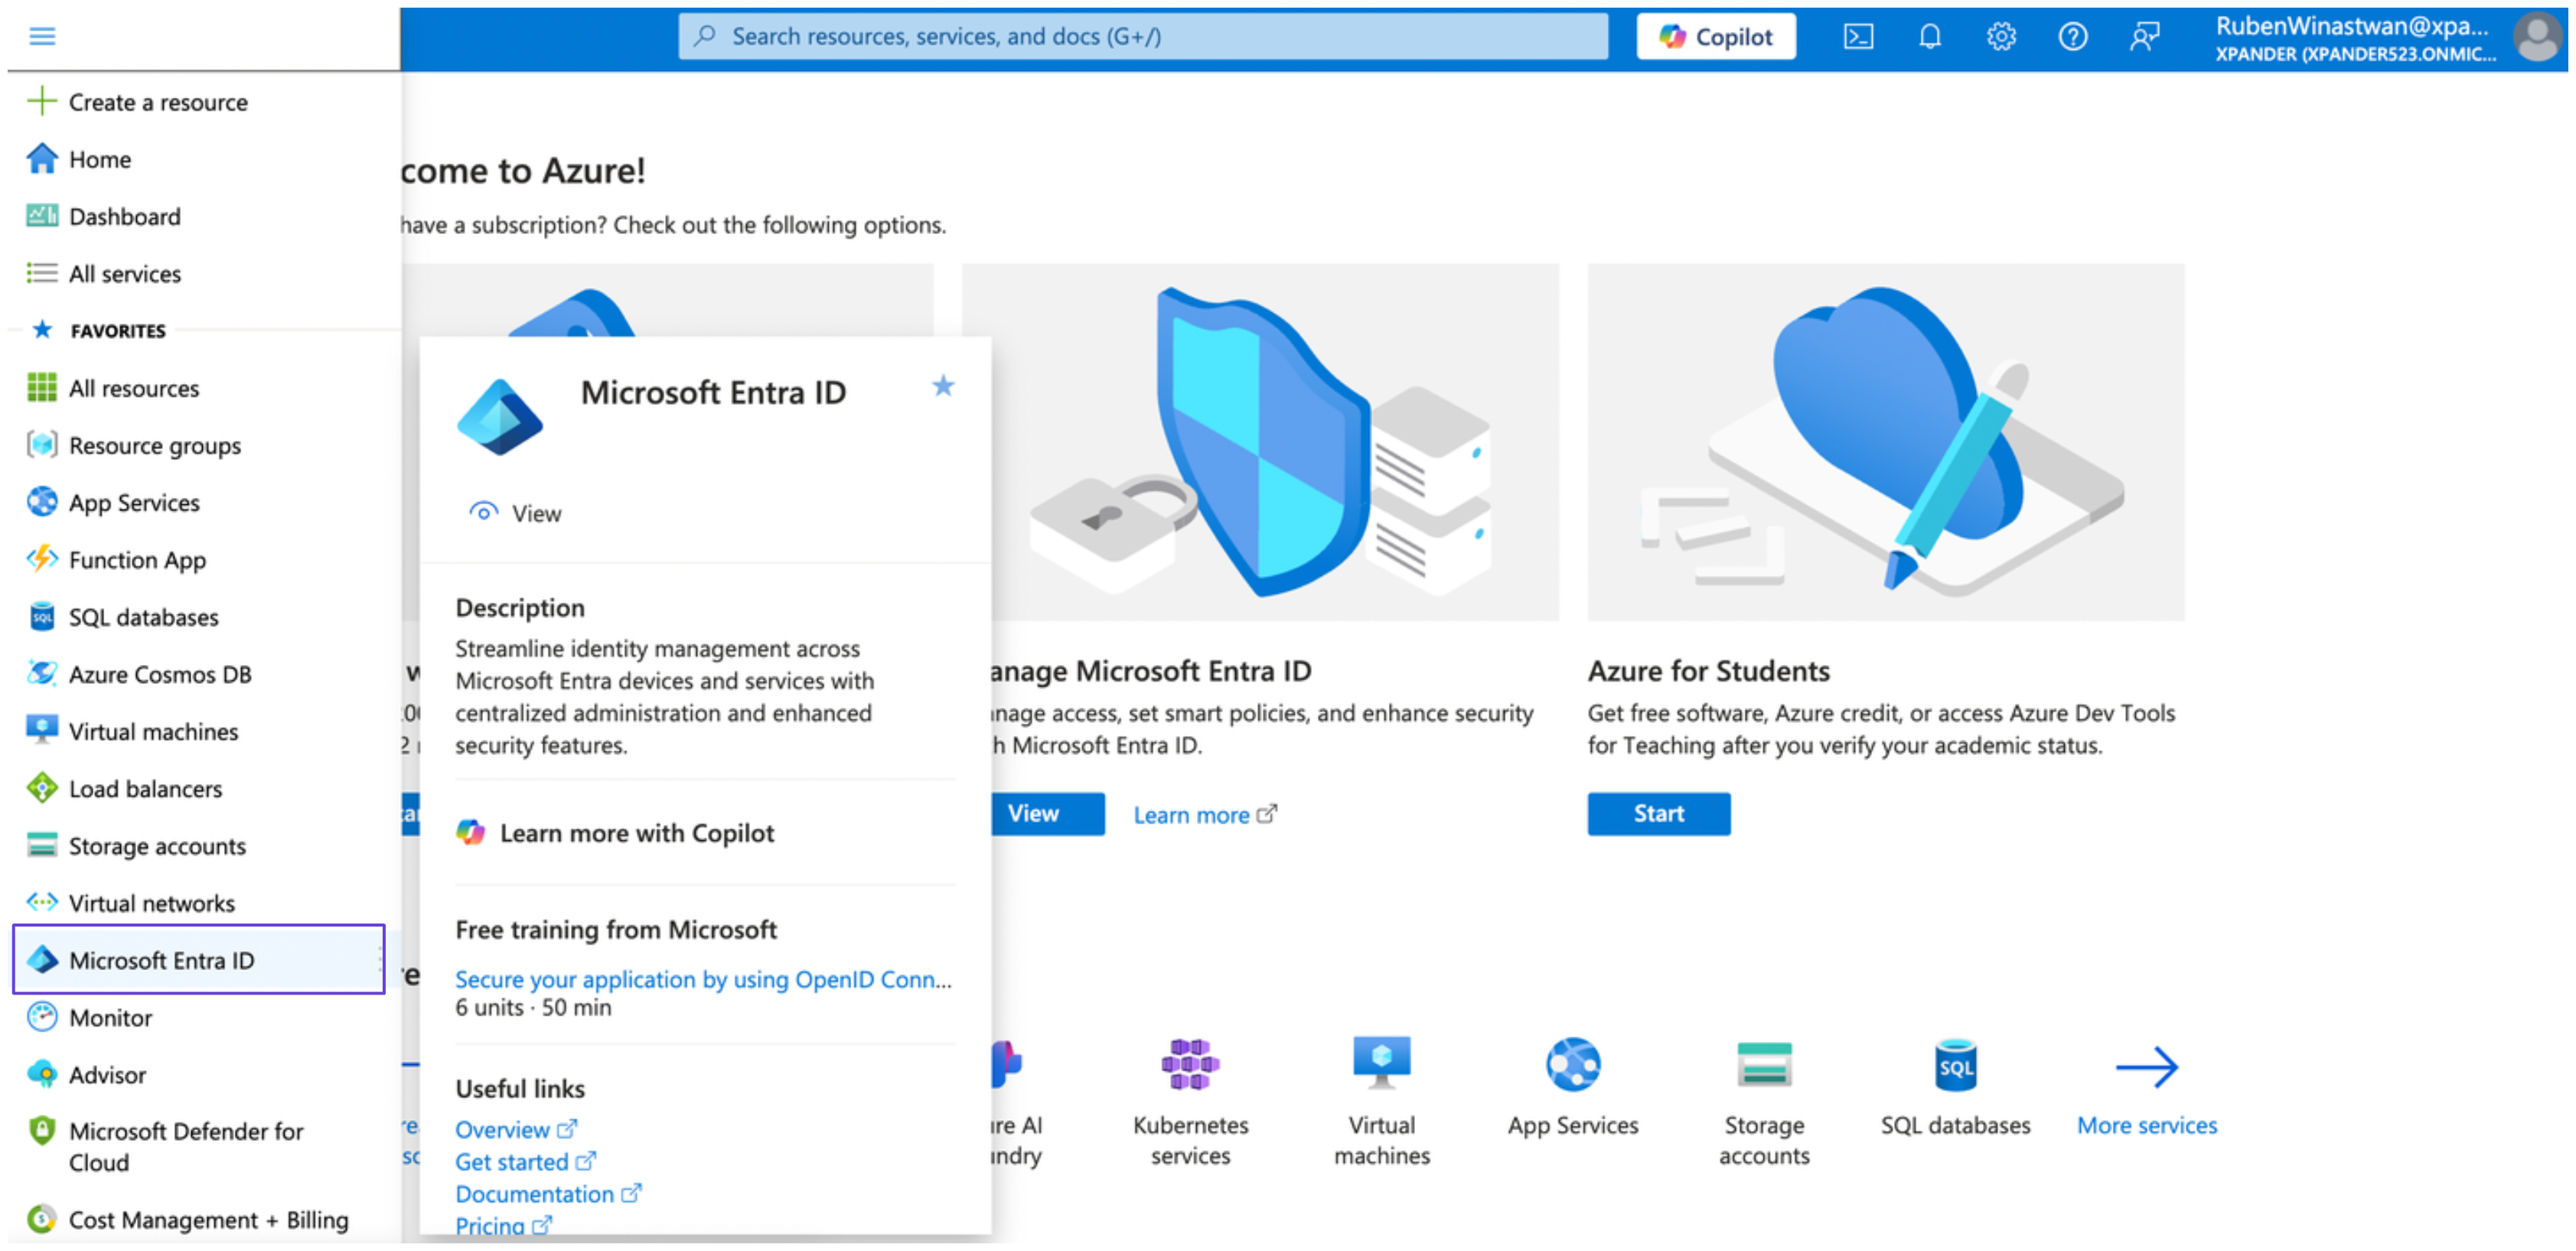 3. Under the **Manage** section, select **App registrations** and click **New registration**.
 4. Provide an app name and choose the **Supported account types** option that fits your use case. Then, click **Register**.
5. After creating the app, note down the **Client ID** and **Tenant ID**. You’ll need these credentials later to obtain an access token.
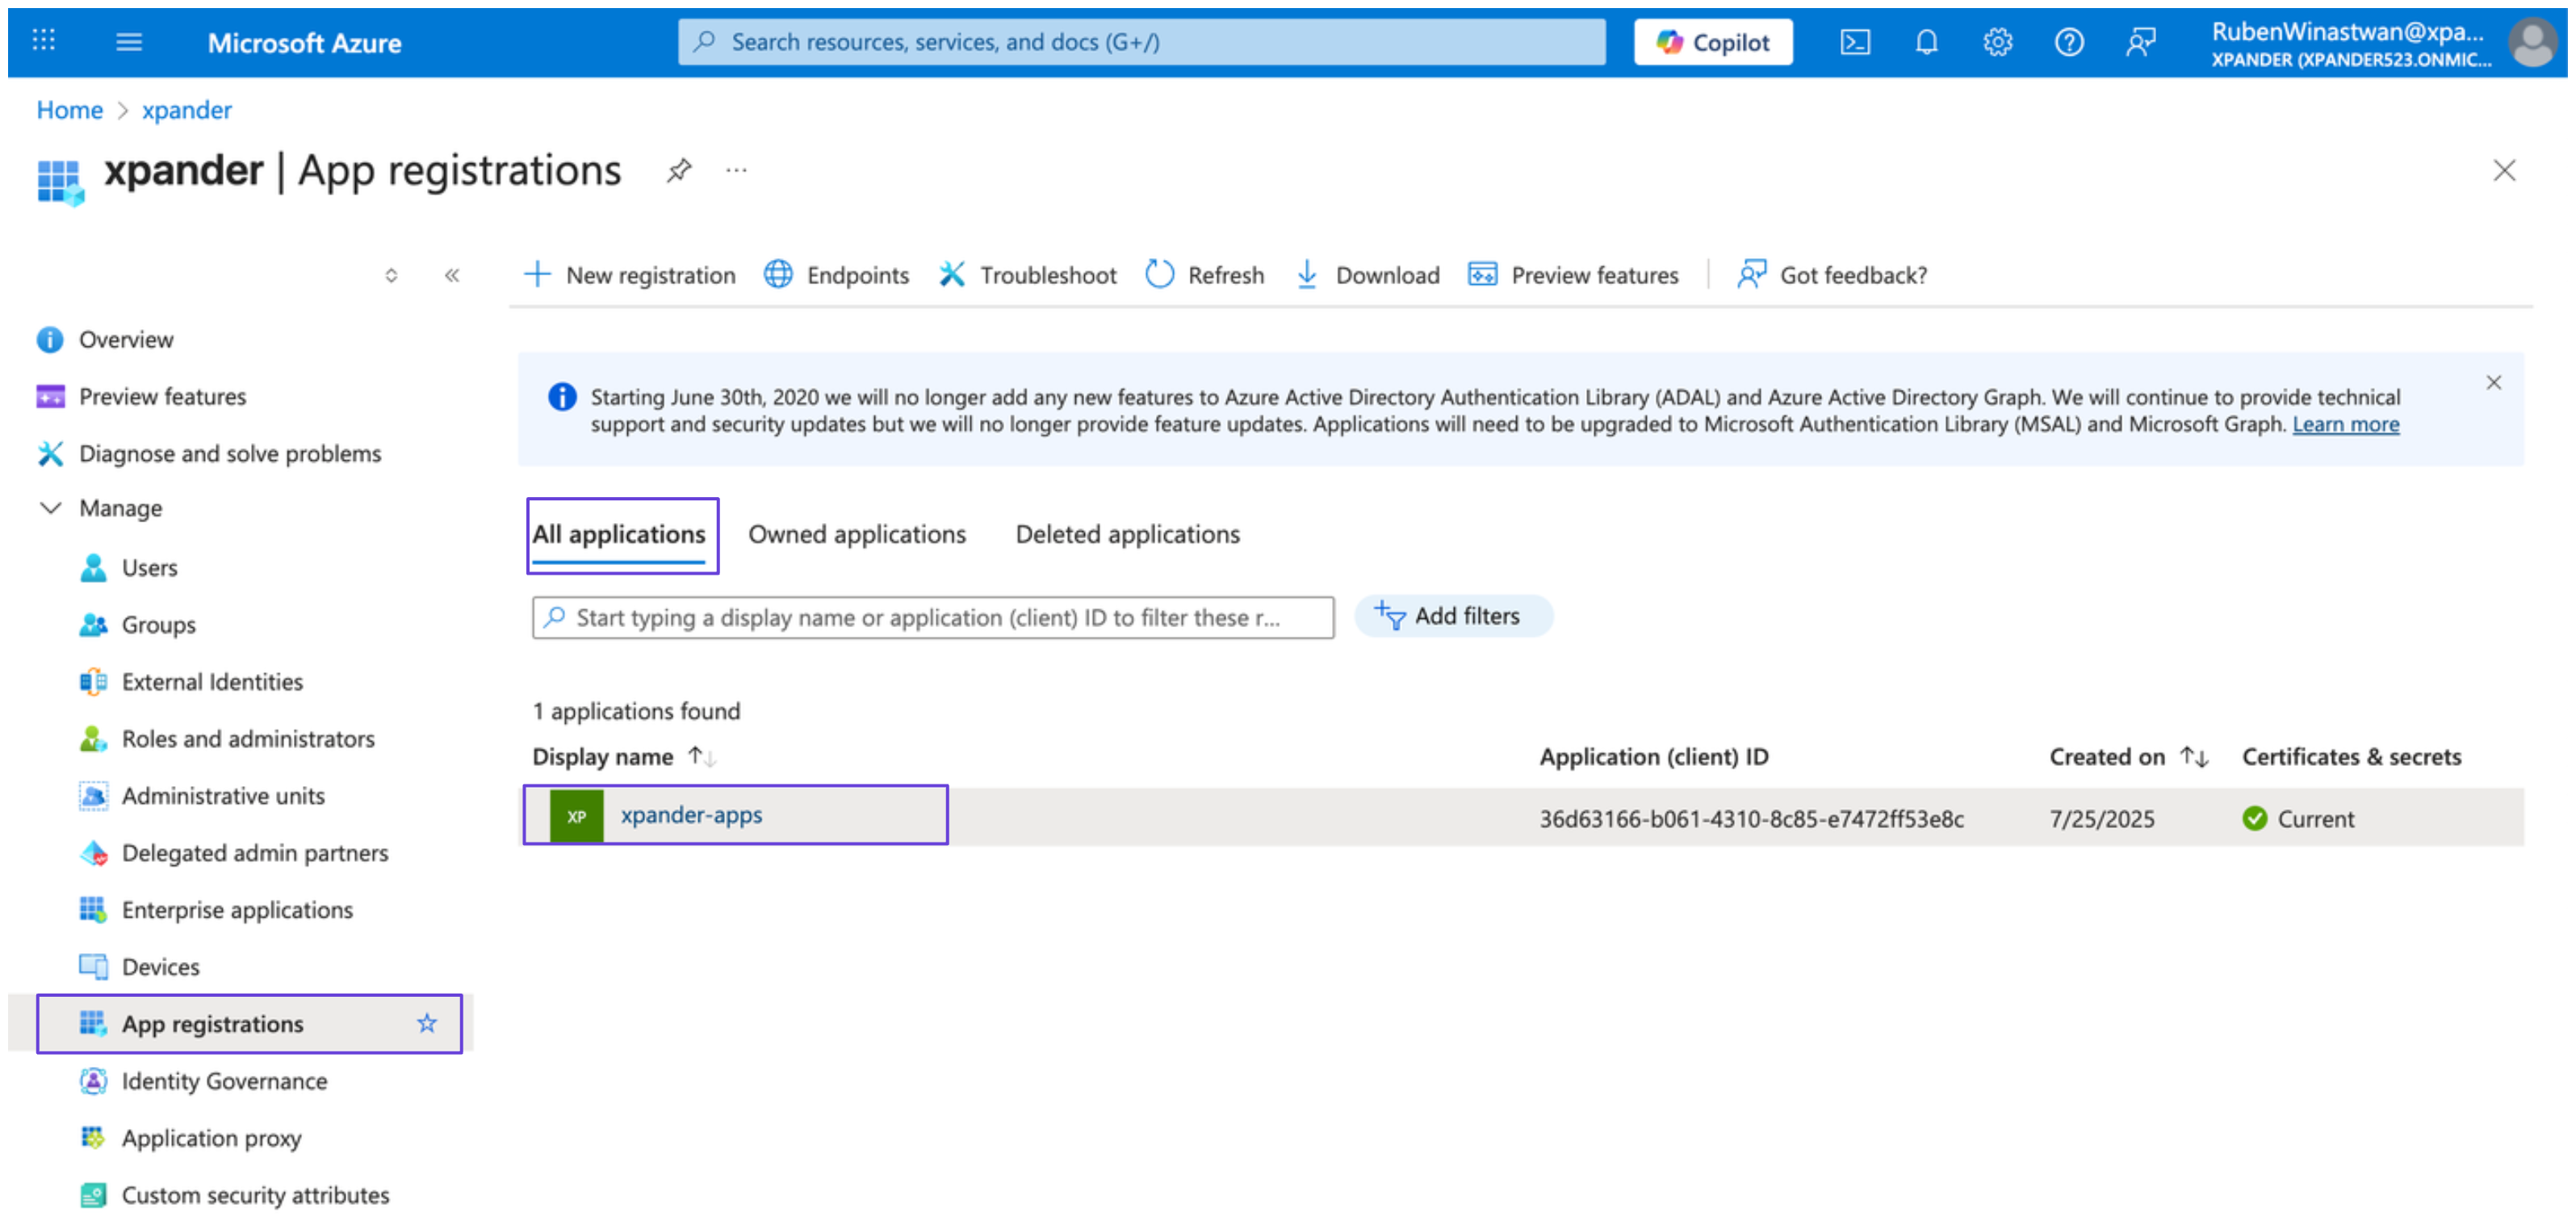
6. In **Microsoft Entra ID**, go to **App registrations** > **All applications**, and select your newly created app.
4. Provide an app name and choose the **Supported account types** option that fits your use case. Then, click **Register**.
5. After creating the app, note down the **Client ID** and **Tenant ID**. You’ll need these credentials later to obtain an access token.
6. In **Microsoft Entra ID**, go to **App registrations** > **All applications**, and select your newly created app.
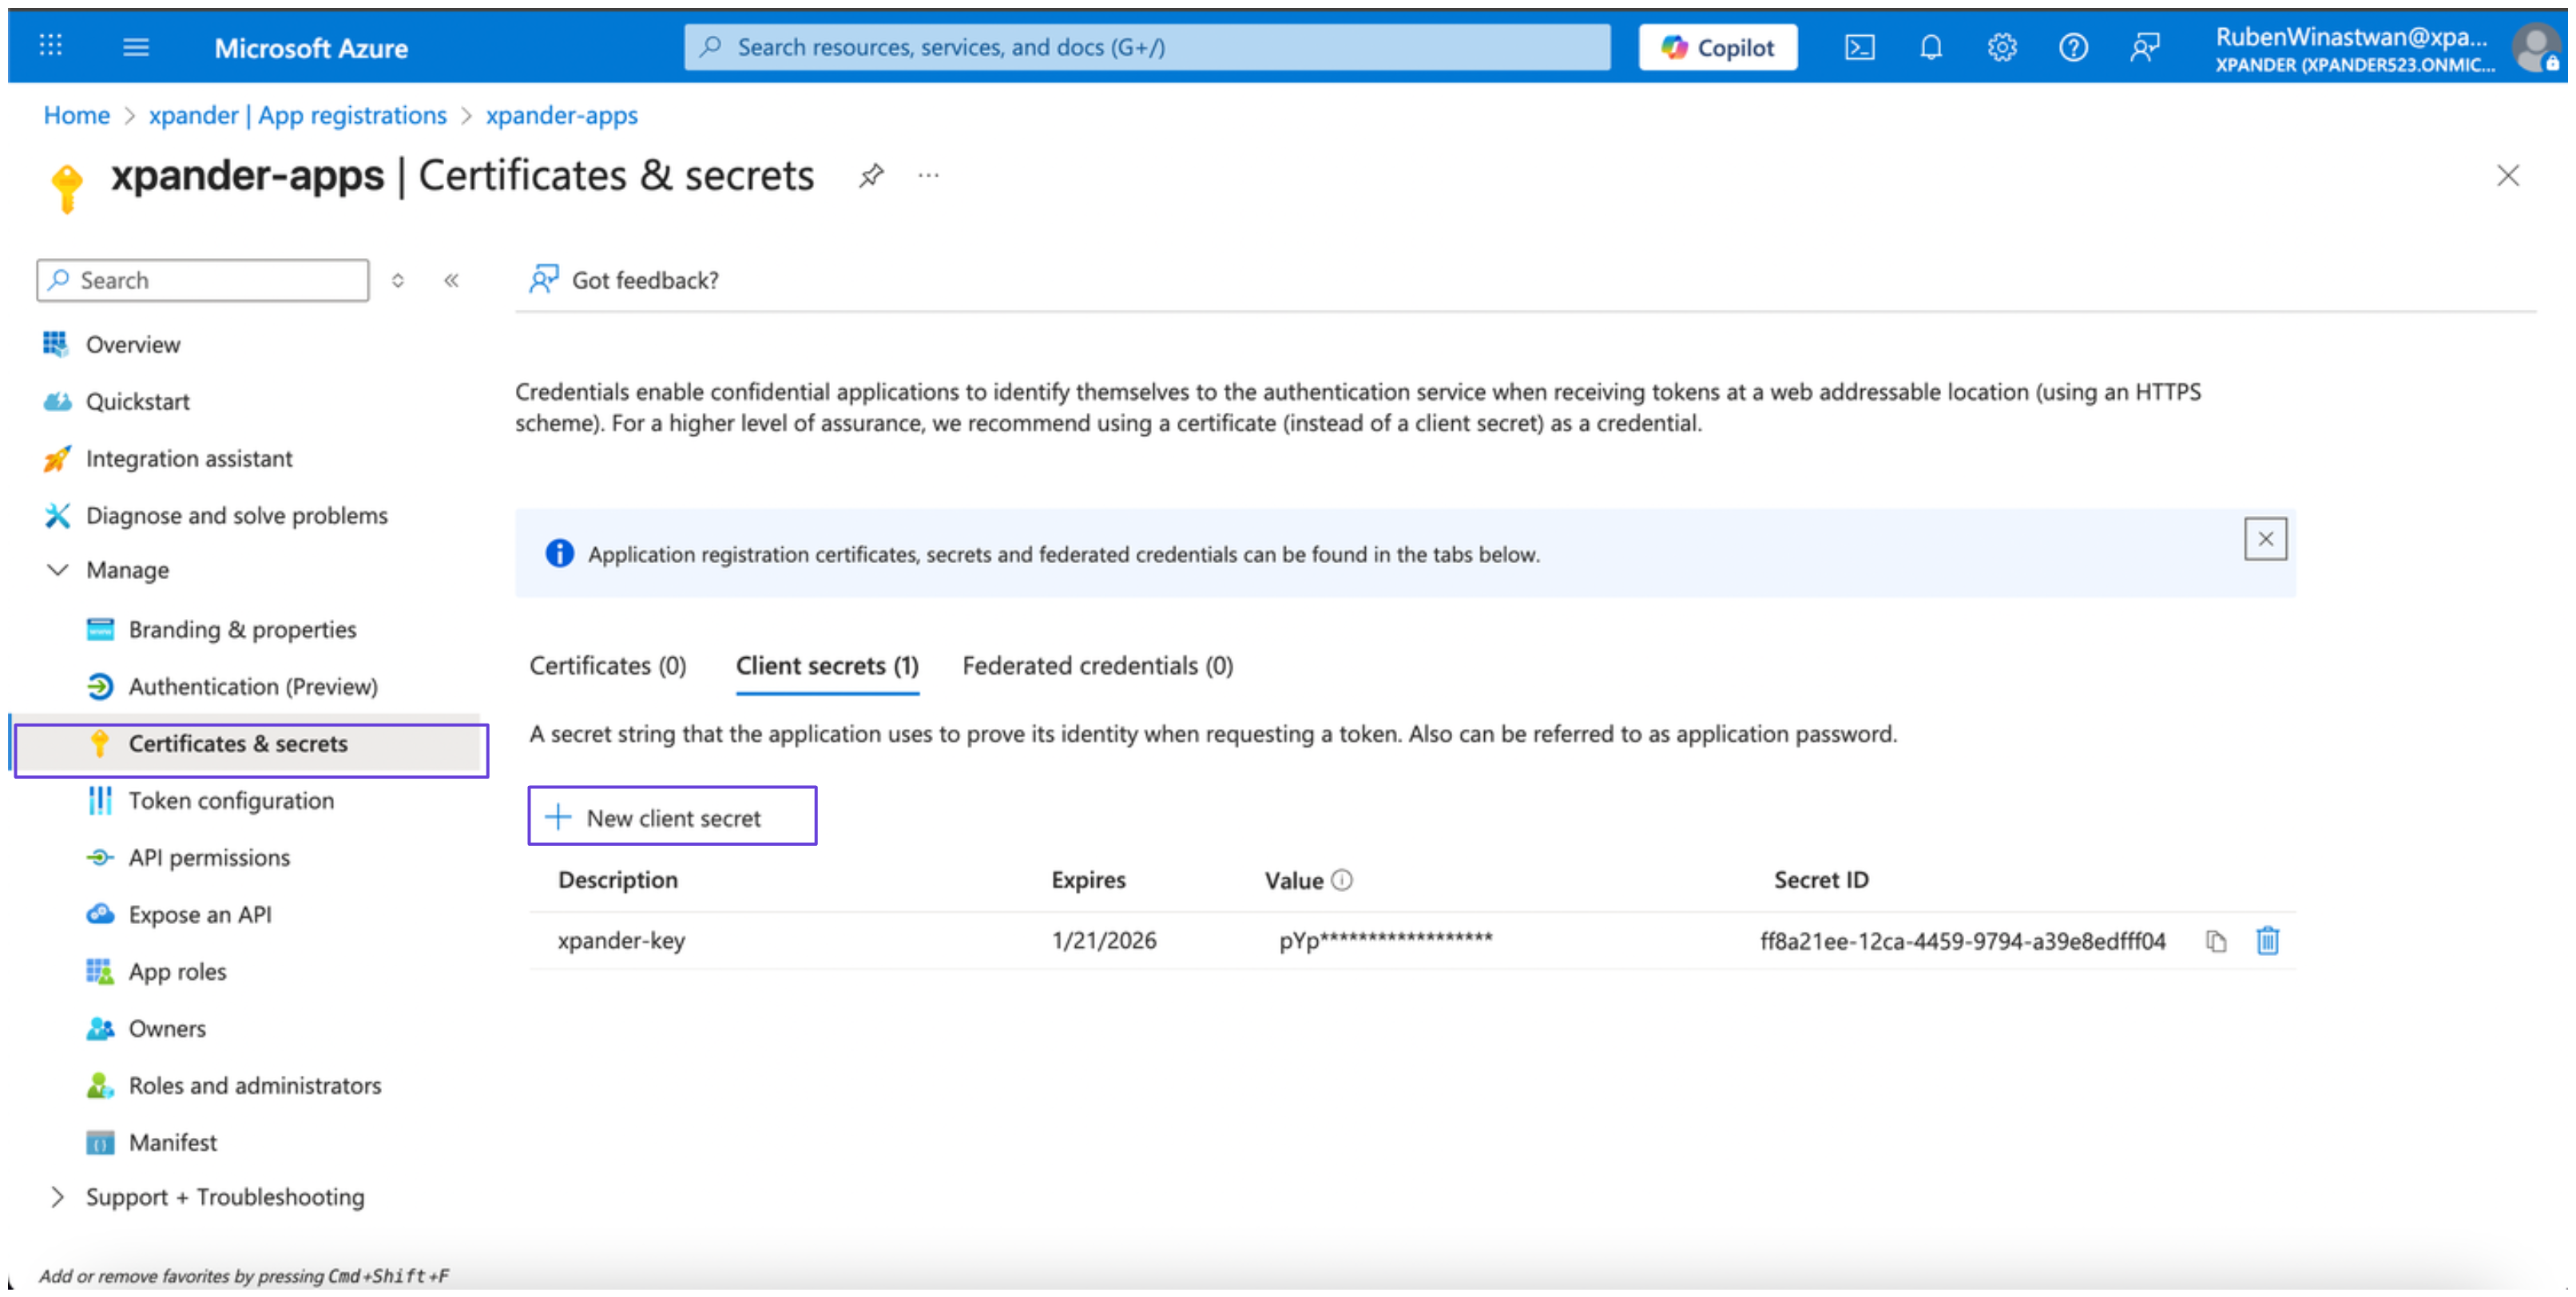
 7. Under **Manage**, select **Certificates & secrets**, then click **New client secret**. Save the secret value securely.
 8. Ensure your app does **not** have any admin-consent-required permissions. Follow [these steps in the Azure documentation](https://learn.microsoft.com/en-us/fabric/admin/enable-service-principal-admin-apis#how-to-check-if-your-app-has-admin-consent-required-permissions) to verify.
9. In your Power BI account, enable the Power BI Service admin settings by following [Step 3 in this guide](https://learn.microsoft.com/en-us/power-bi/developer/embedded/embed-service-principal?tabs=azure-portal#step-3---enable-the-power-bi-service-admin-settings).
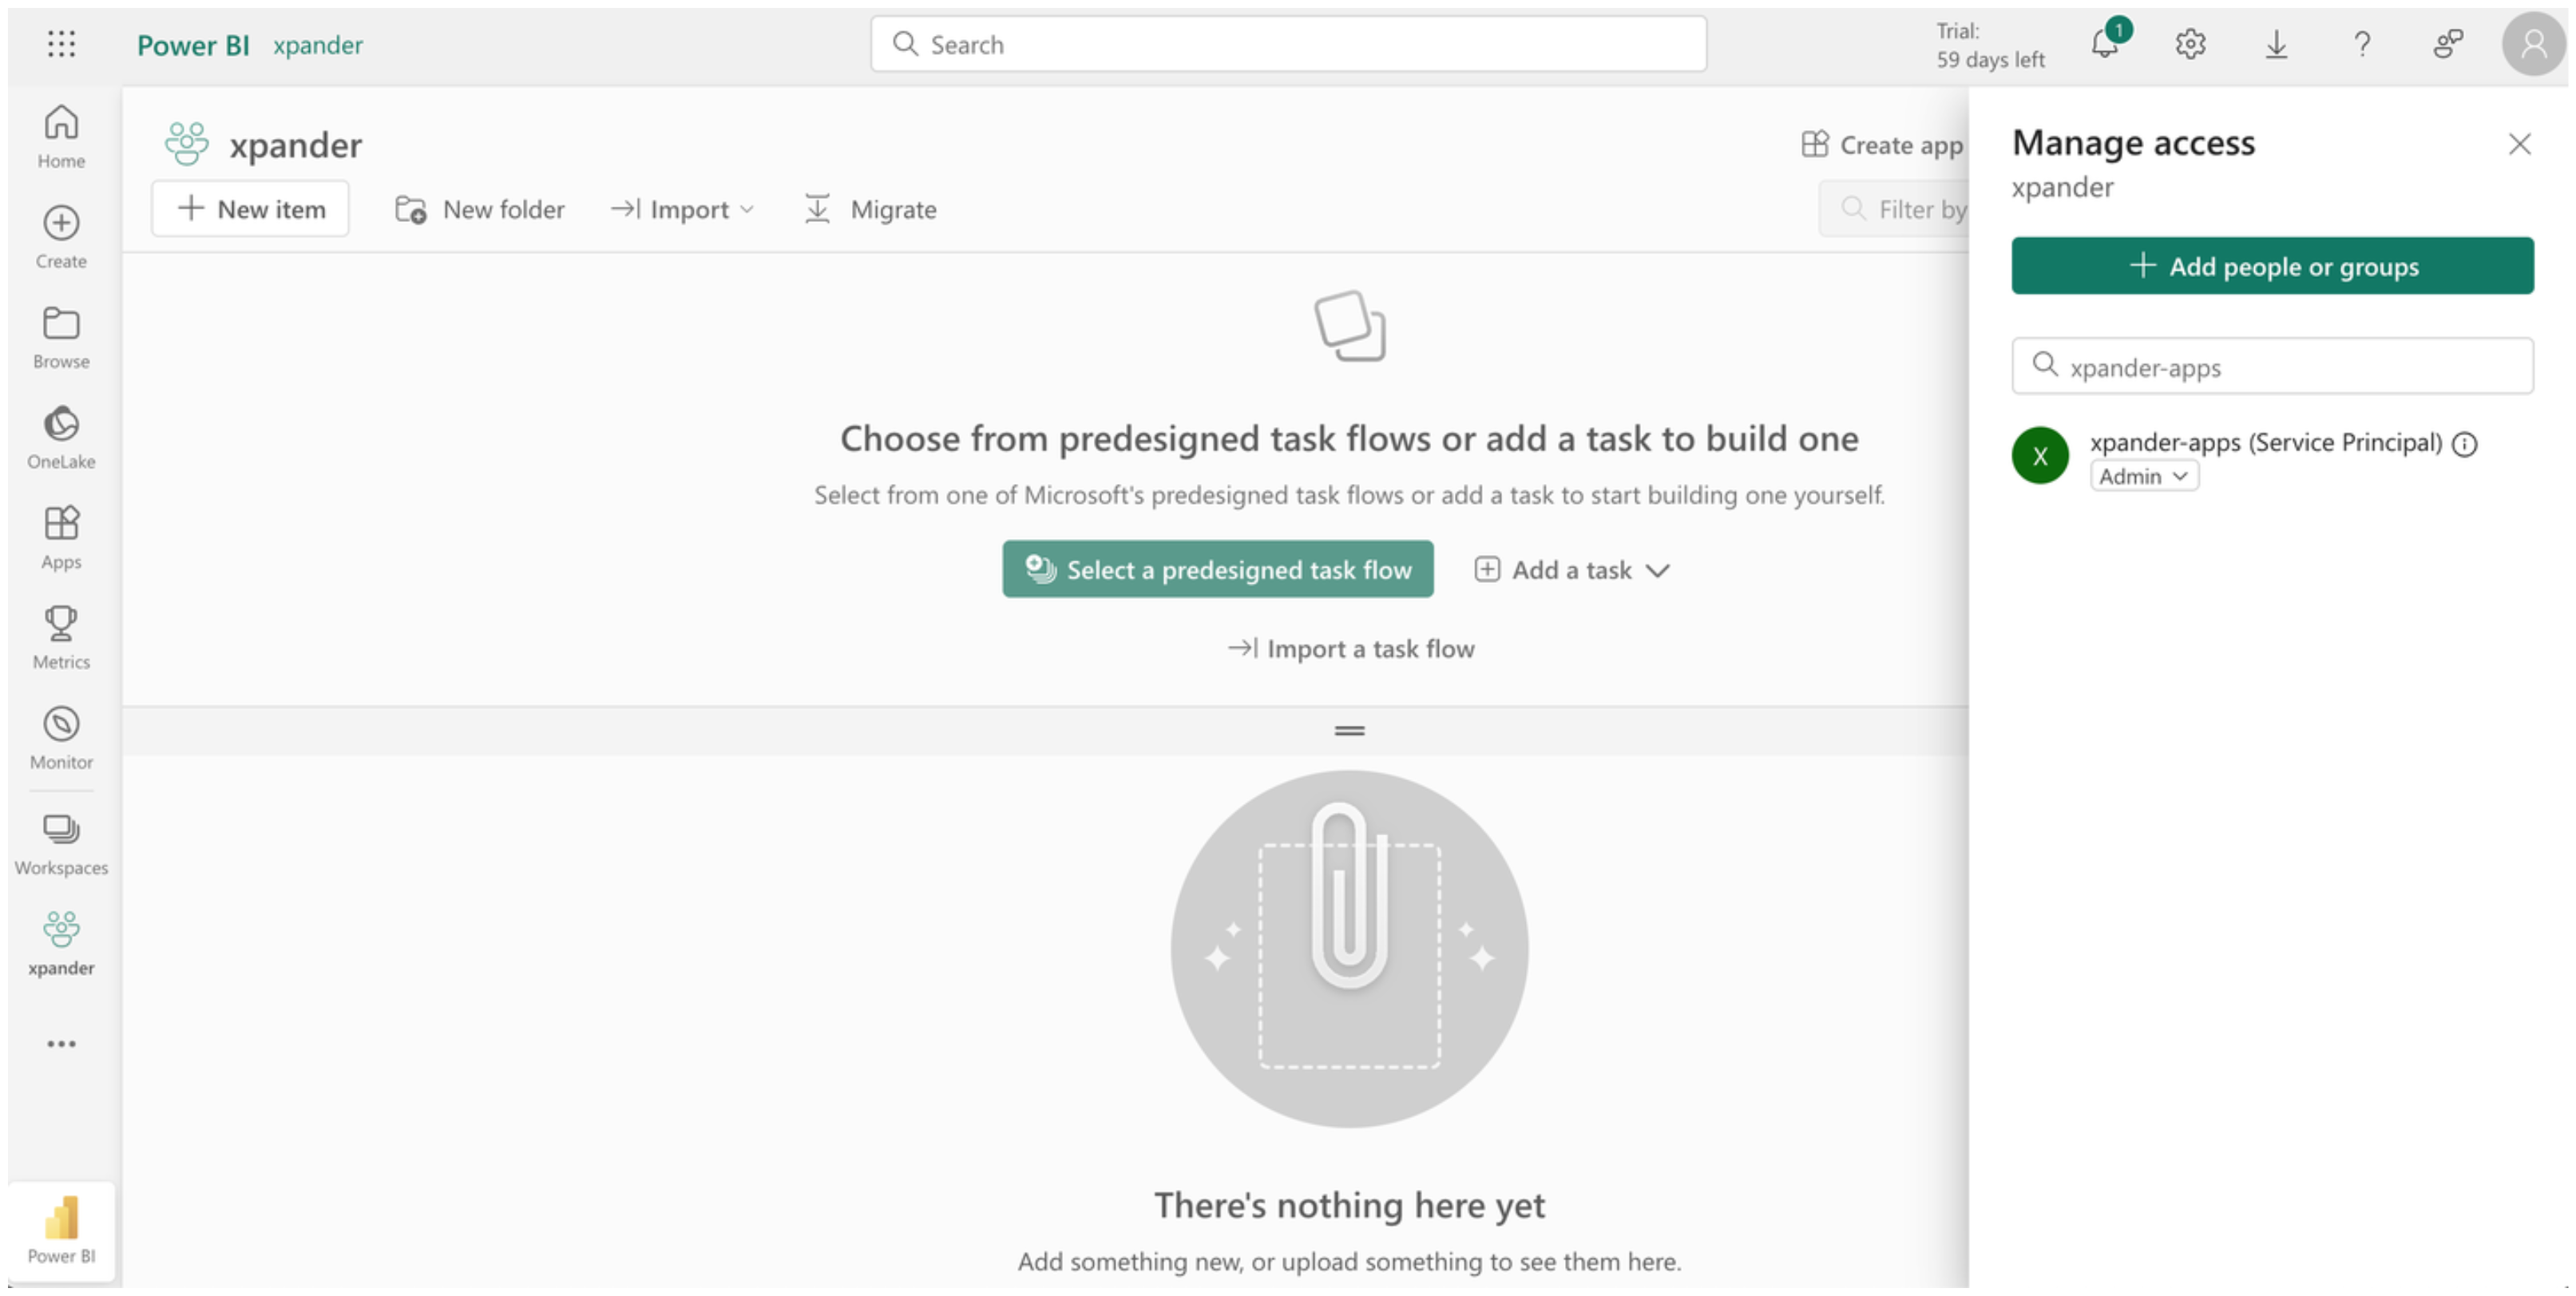
10. In the dashboard of your desired Power BI workspace, go to **Manage access** and add your newly created app as a **Member** or **Admin** by searching for its name.
8. Ensure your app does **not** have any admin-consent-required permissions. Follow [these steps in the Azure documentation](https://learn.microsoft.com/en-us/fabric/admin/enable-service-principal-admin-apis#how-to-check-if-your-app-has-admin-consent-required-permissions) to verify.
9. In your Power BI account, enable the Power BI Service admin settings by following [Step 3 in this guide](https://learn.microsoft.com/en-us/power-bi/developer/embedded/embed-service-principal?tabs=azure-portal#step-3---enable-the-power-bi-service-admin-settings).
10. In the dashboard of your desired Power BI workspace, go to **Manage access** and add your newly created app as a **Member** or **Admin** by searching for its name.
 11. Finally, obtain your access token by executing the following request:
```bash theme={"dark"}
curl -X POST \
-H "Content-Type: application/x-www-form-urlencoded" \
-d "grant_type=client_credentials" \
-d "client_id=" \
-d "client_secret=" \
-d "scope=https://analysis.windows.net/powerbi/api/.default" \
https://login.microsoftonline.com//oauth2/v2.0/token
```
Replace the placeholders with your credentials from previous steps, and store the access token securely.
### Integrate Power BI into xpander.ai
1. In your xpander.ai dashboard, go to the **Connectors** section in the sidebar.
2. Select **Power BI** from the available integrations.
3. Click **Other auth options**.
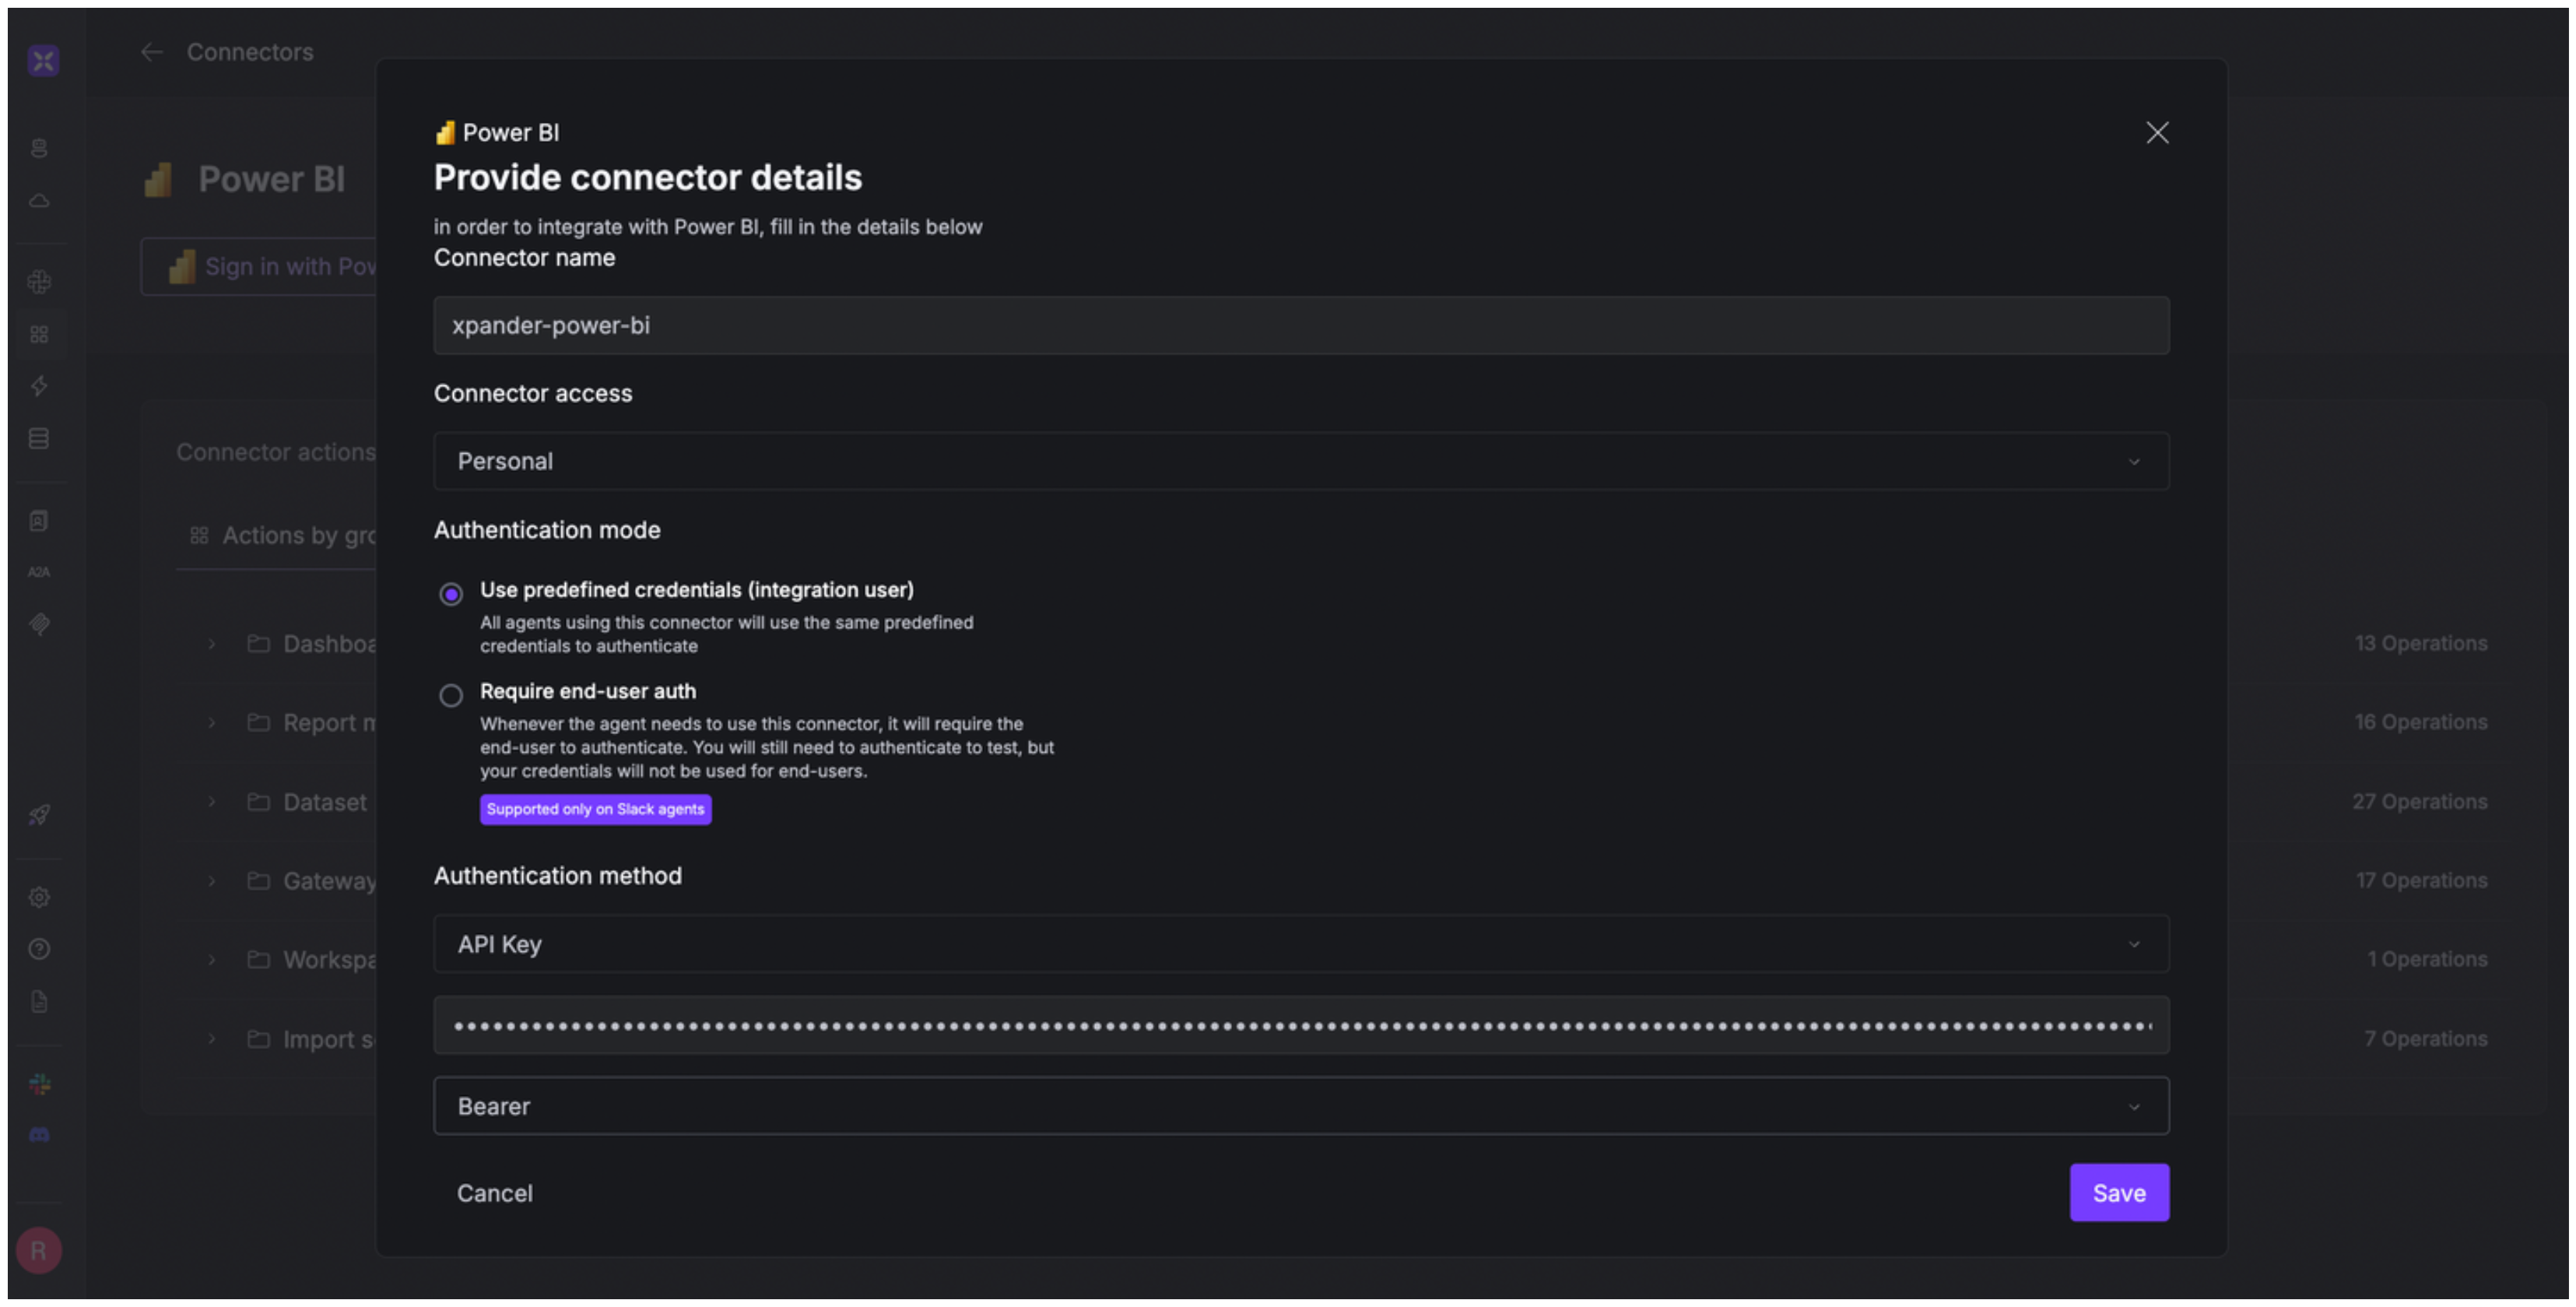
4. Enter a **connector name**, e.g., "xpander-power-bi".
5. Choose **Integration User** as the authentication mode.
6. Select **API Key** as the authentication method.
7. Paste your Power BI access token into the provided field.
8. Set the **Auth Type** to **Bearer**.
9. Save the configuration.
11. Finally, obtain your access token by executing the following request:
```bash theme={"dark"}
curl -X POST \
-H "Content-Type: application/x-www-form-urlencoded" \
-d "grant_type=client_credentials" \
-d "client_id=" \
-d "client_secret=" \
-d "scope=https://analysis.windows.net/powerbi/api/.default" \
https://login.microsoftonline.com//oauth2/v2.0/token
```
Replace the placeholders with your credentials from previous steps, and store the access token securely.
### Integrate Power BI into xpander.ai
1. In your xpander.ai dashboard, go to the **Connectors** section in the sidebar.
2. Select **Power BI** from the available integrations.
3. Click **Other auth options**.
4. Enter a **connector name**, e.g., "xpander-power-bi".
5. Choose **Integration User** as the authentication mode.
6. Select **API Key** as the authentication method.
7. Paste your Power BI access token into the provided field.
8. Set the **Auth Type** to **Bearer**.
9. Save the configuration.
 ## Integration of Power BI into AI Agent
Once you've configured your Power BI account with the authentication option(s) described above, you can integrate it into your AI agent with xpander.ai:
1. In your xpander.ai dashboard, go to the **Agent Configuration** tab and select **Tools**, then click **Add Tools**.
2. Select **Connectors**.
3. Choose **Power BI** with the same **connector name** you configured in the previous section (e.g., xpander-power-bi).
4. Select the available Power BI operations that suit your use case.
## Integration of Power BI into AI Agent
Once you've configured your Power BI account with the authentication option(s) described above, you can integrate it into your AI agent with xpander.ai:
1. In your xpander.ai dashboard, go to the **Agent Configuration** tab and select **Tools**, then click **Add Tools**.
2. Select **Connectors**.
3. Choose **Power BI** with the same **connector name** you configured in the previous section (e.g., xpander-power-bi).
4. Select the available Power BI operations that suit your use case.
 ## Expose Power BI as MCP Server
Alternatively, you can also expose your Power BI account as an MCP server. To do so:
1. Go to the **Connectors** section in the sidebar of your xpander.ai dashboard.
2. Select **Power BI** with the same **connector name** you configured in the previous section (e.g., xpander-power-bi).
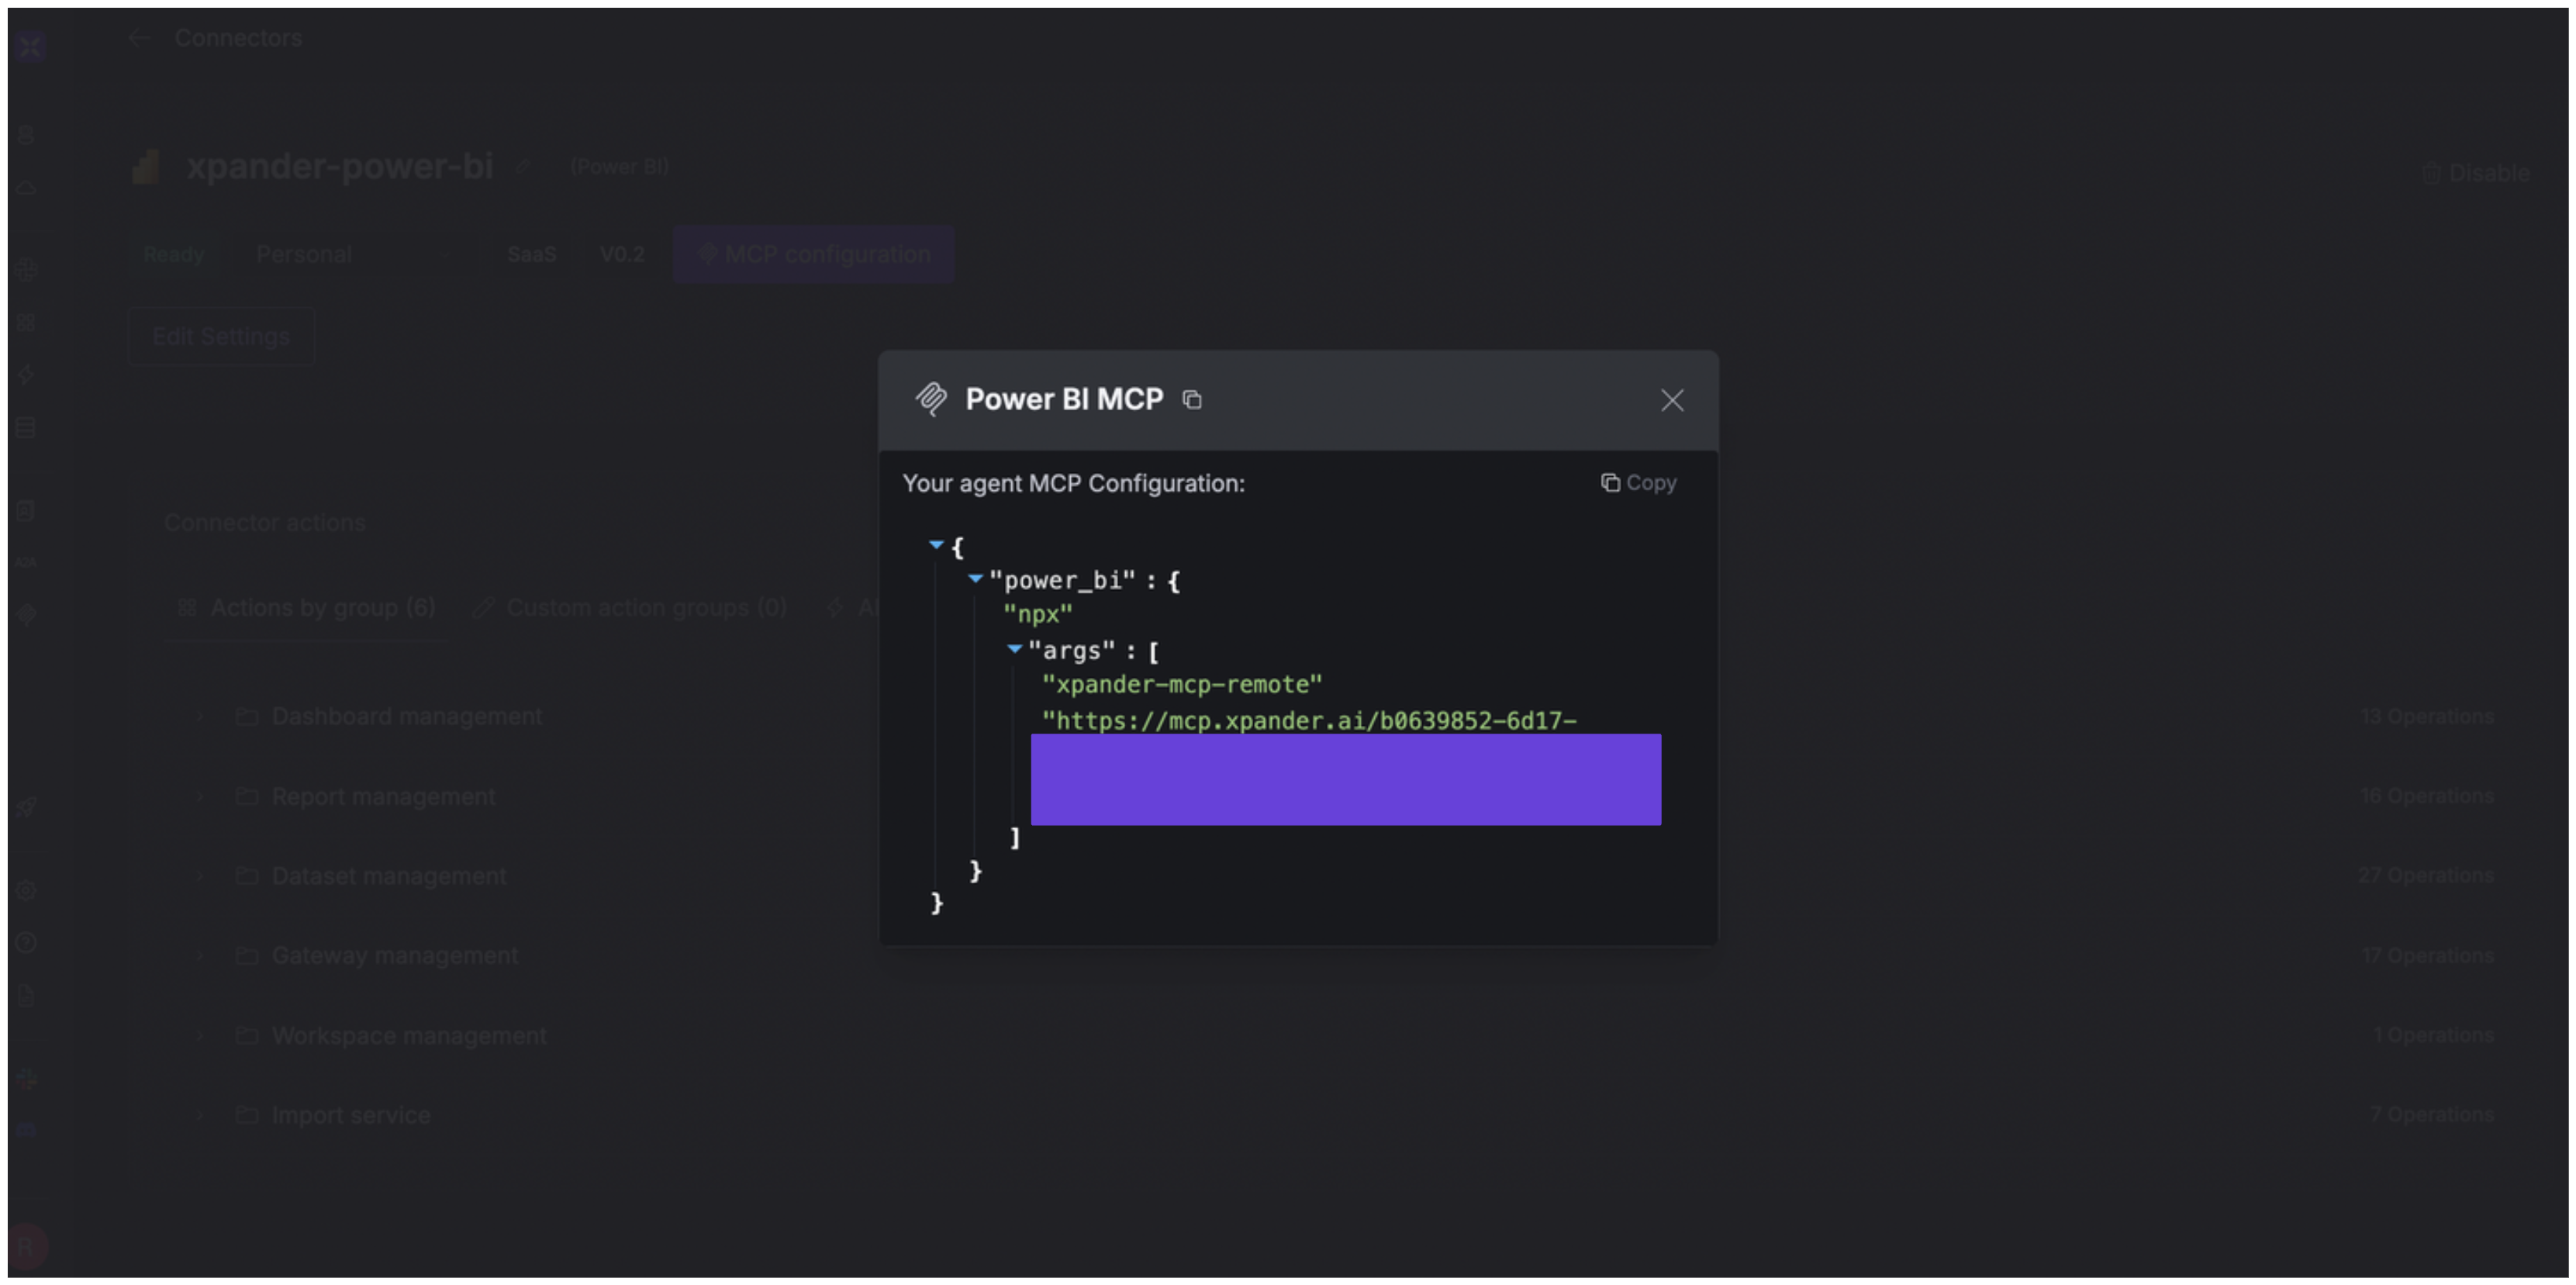
3. Click **MCP Configuration**.
4. Enter the MCP configuration into the appropriate settings of the client app you want to use (e.g., Cursor, Windsurf, Claude Desktop, etc.).
## Expose Power BI as MCP Server
Alternatively, you can also expose your Power BI account as an MCP server. To do so:
1. Go to the **Connectors** section in the sidebar of your xpander.ai dashboard.
2. Select **Power BI** with the same **connector name** you configured in the previous section (e.g., xpander-power-bi).
3. Click **MCP Configuration**.
4. Enter the MCP configuration into the appropriate settings of the client app you want to use (e.g., Cursor, Windsurf, Claude Desktop, etc.).
 ## AI Agent Power BI Prompt Library
Below are possible prompts or use cases you can try after integrating Power BI into your xpander AI agent:
```
Can you show me all available dashboards in the system?
```
```
Create a new dataset with name {dataset_name} and connection string {connection_string}.
```
```
Can you add new rows to table {table_name} in dataset {dataset_id}?
```
```
Can you clone report {report_id} in workspace group {group_id} with new name {new_report_name}?
```
## Related Resources
* [Understanding Model Context Protocol (MCP)](/guides/deploy/mcp)
* [Power BI API Documentation](https://learn.microsoft.com/en-us/rest/api/power-bi/)
## AI Agent Power BI Prompt Library
Below are possible prompts or use cases you can try after integrating Power BI into your xpander AI agent:
```
Can you show me all available dashboards in the system?
```
```
Create a new dataset with name {dataset_name} and connection string {connection_string}.
```
```
Can you add new rows to table {table_name} in dataset {dataset_id}?
```
```
Can you clone report {report_id} in workspace group {group_id} with new name {new_report_name}?
```
## Related Resources
* [Understanding Model Context Protocol (MCP)](/guides/deploy/mcp)
* [Power BI API Documentation](https://learn.microsoft.com/en-us/rest/api/power-bi/)