> ## Documentation Index
> Fetch the complete documentation index at: https://docs.xpander.ai/llms.txt
> Use this file to discover all available pages before exploring further.
# Recall.ai
> Learn how to integrate AI agents with Recall.ai using xpander.ai. Create intelligent, real-time meeting assistants that can join calls across Zoom, Google Meet, and Microsoft Teams, transcribe conversations live.
## About Recall.ai
Recall.ai is a developer-focused platform that offers a universal API for accessing and processing data from virtual meetings across platforms like Zoom, Google Meet, Microsoft Teams, Webex, Slack Huddles, and GoTo Meeting. It enables developers to integrate real-time and post-meeting data—such as audio, video, transcripts, and metadata—into their applications with minimal effort.
Key features include:
* **Unified API Across Platforms**: Simplifies integration by providing a single API to access data from various video conferencing platforms, even those without official APIs, requiring only the meeting URL.
* **Real-Time Data Access**: Offers real-time audio and video streams with low latency (approximately 200ms), enabling functionalities like live transcription and speaker identification.
* **Comprehensive Metadata Retrieval**: Provides detailed meeting metadata, including participant names, roles, join times, speaking durations, and screen-sharing events.
* **Rapid Deployment**: Allows developers to deploy meeting bots and integrate functionalities in days rather than months, significantly reducing development time and resources.
## Authentication Options
Below are possible authentication options you can choose:
### Generate a Recall.ai API Key
1. Sign in to your Recall dashboard, where you can manage your API tokens:
* [(US) us-east-1](https://us-east-1.recall.ai/auth/login/?next=/dashboard/api-keys)
* [(Pay-as-you-go) us-west-2](https://us-west-2.recall.ai/auth/login/?next=/dashboard/api-keys)
* [(EU) eu-central-1](https://eu-central-1.recall.ai/auth/login/?next=/dashboard/api-keys)
* [(JP) ap-northeast-1](https://ap-northeast-1.recall.ai/auth/login/?next=/dashboard/api-keys)
2. Create a new API token and copy it to your clipboard.
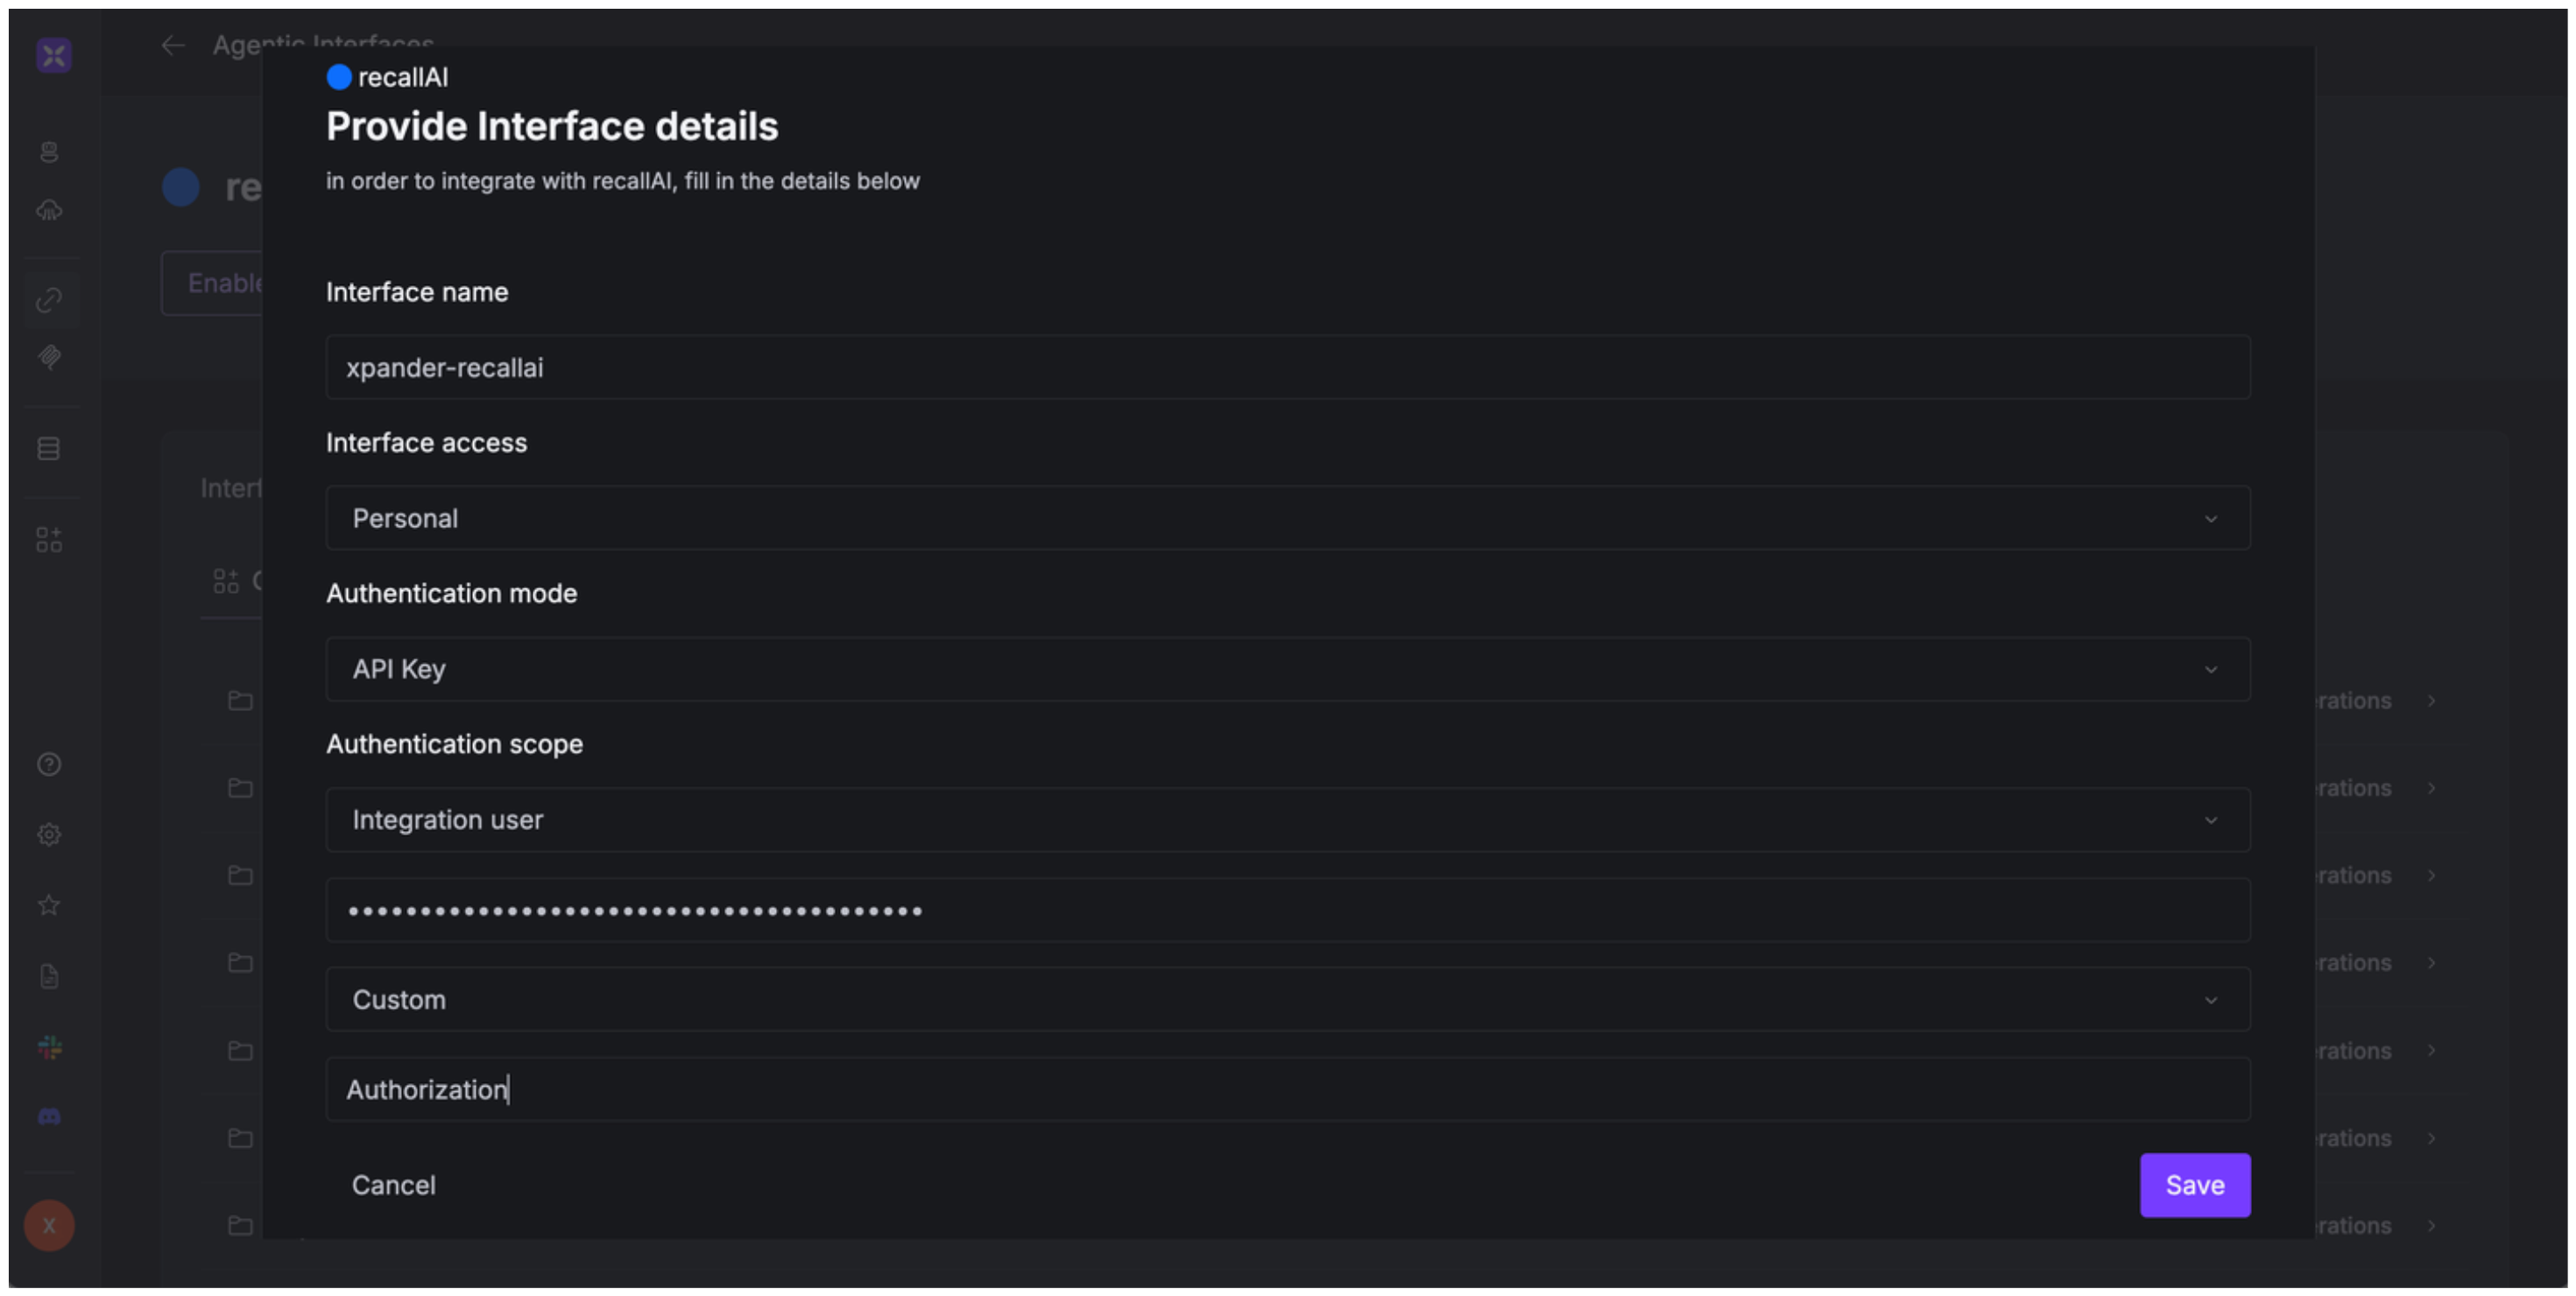
### Integrate Recall.ai into xpander.ai
1. Go to the **Connectors** section in the sidebar of your xpander.ai dashboard.
2. Select **Recall.ai** from the available integrations.
3. Click **Enable**.
4. Enter a **connector name**, e.g., "xpander-recallai".
5. Select **Integration User** as the authentication mode.
6. Select **API Key** as the authentication method.
7. Paste the Recall.ai API key into the provided field using the following format:\
`Token [YOUR_API_KEY]`
8. Choose **Custom** as the **Auth Type**.
9. Under **Custom header name**, type `Authorization`.
10. Save the configuration.
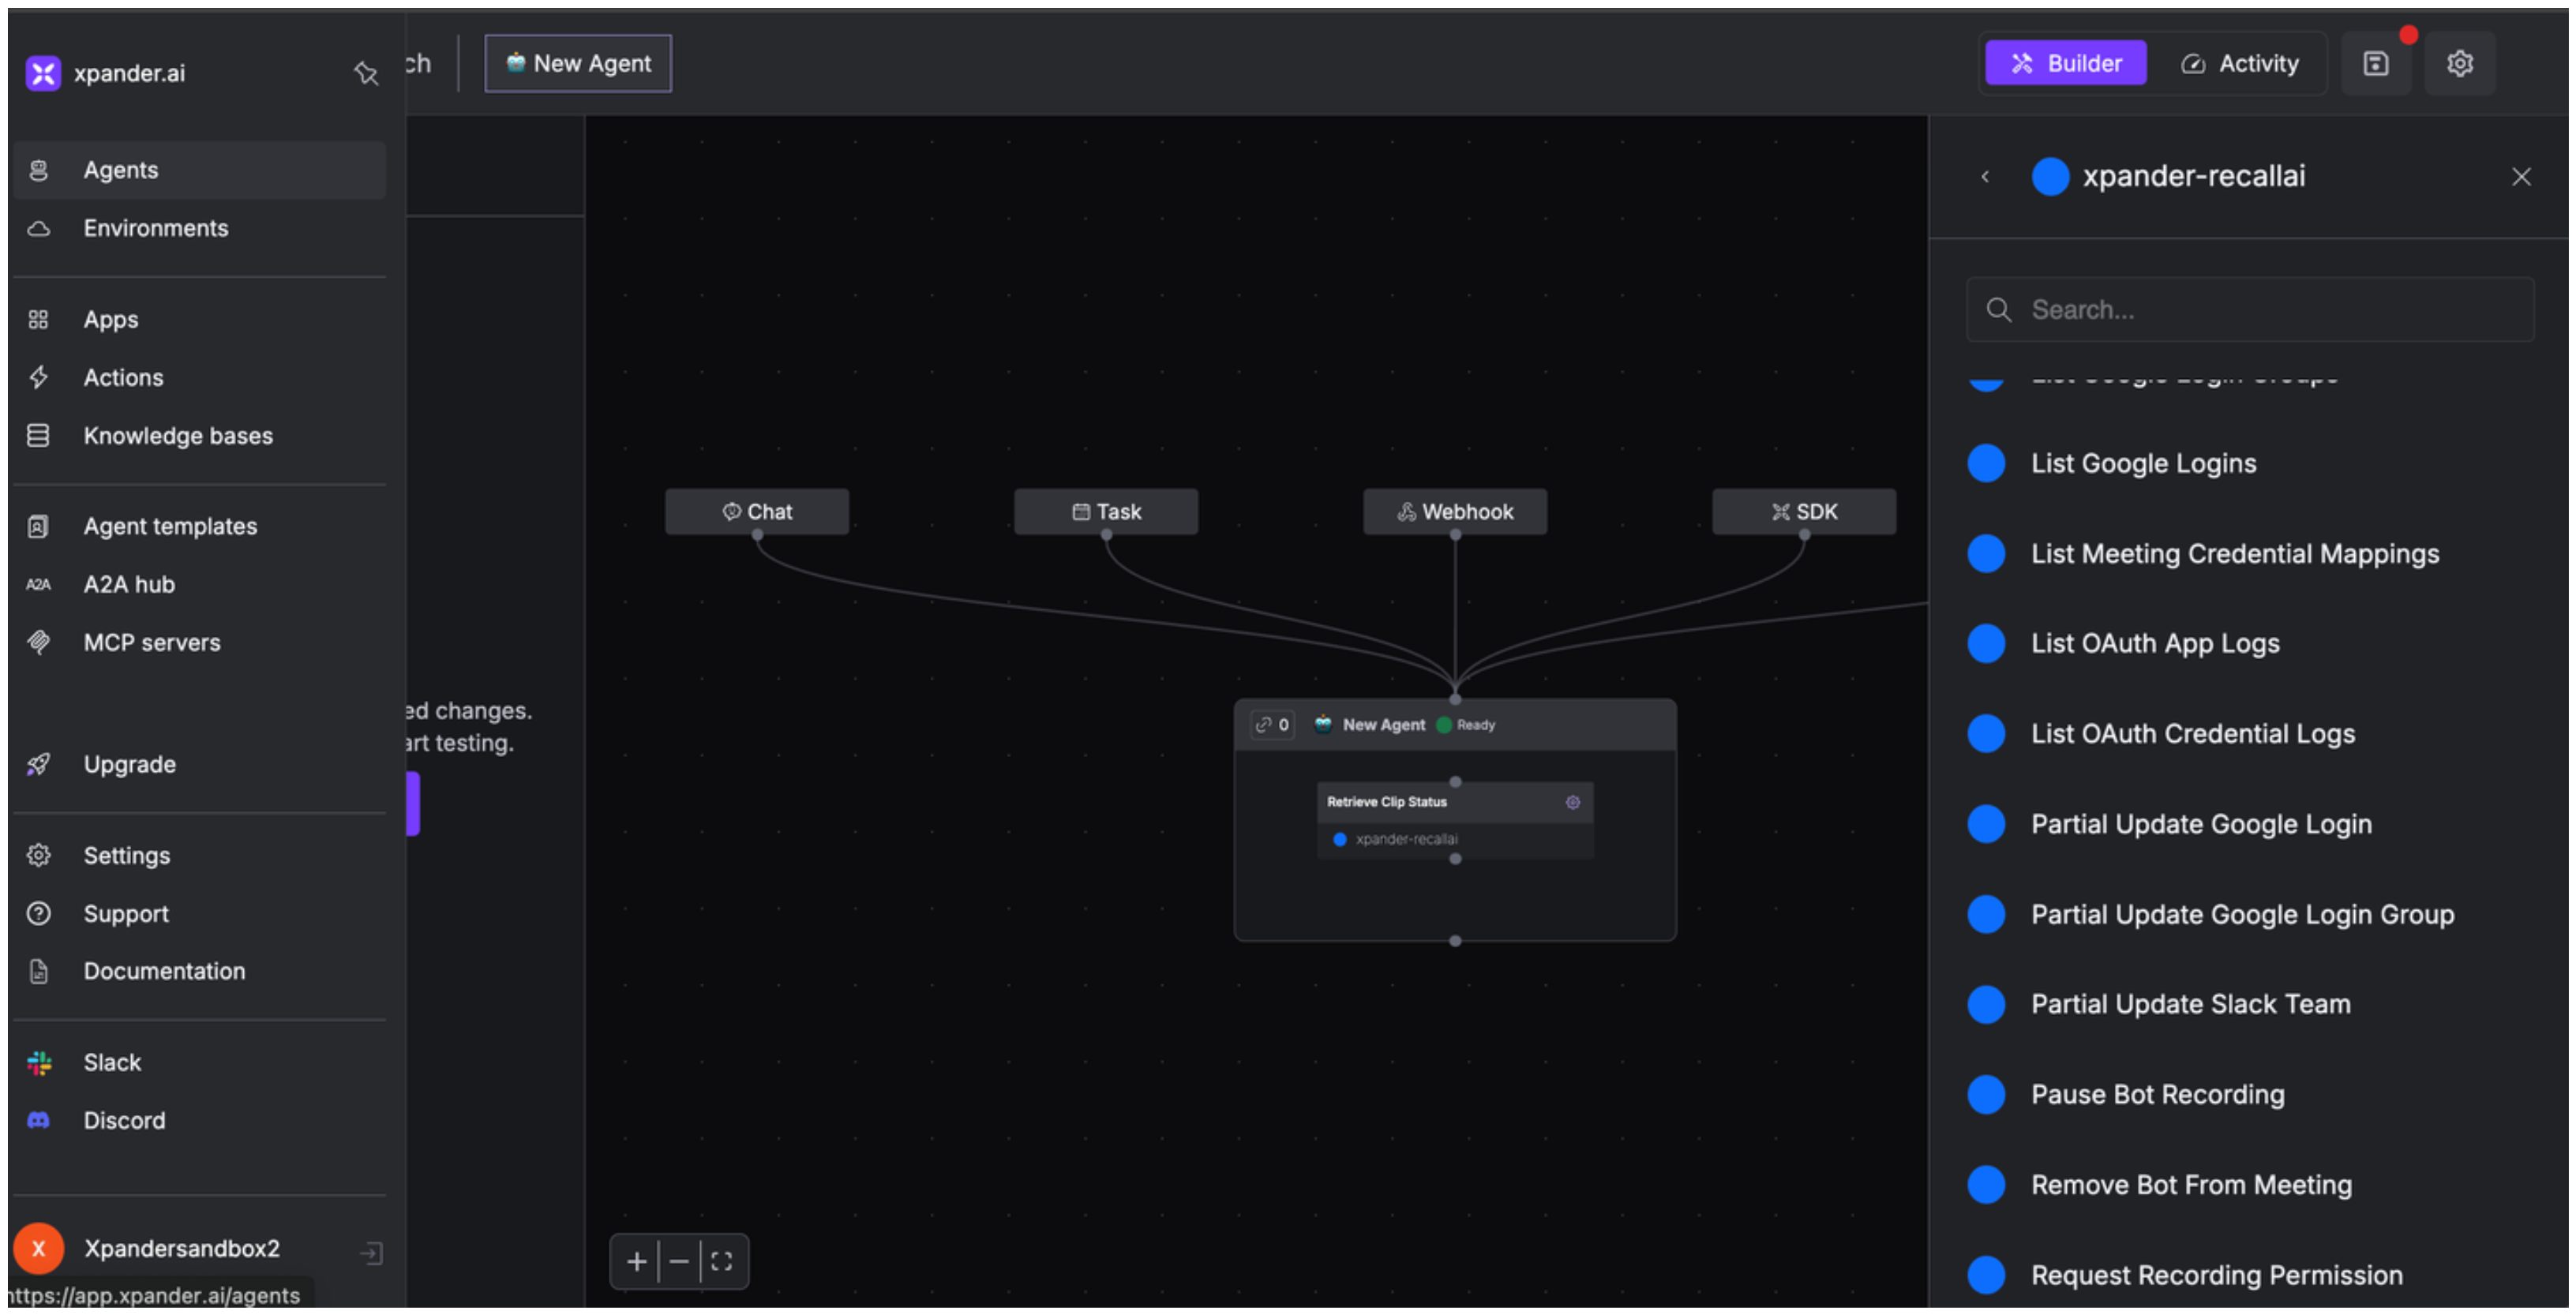
 ## Integration of Recall.ai into AI Agent
Once you've configured your Recall.ai account with the authentication option(s) described above, you can integrate it into your AI agent with xpander.ai:
1. In your xpander.ai dashboard, go to the **Agent Configuration** tab and select **Tools**, then click **Add Tools**.
2. Select **Connectors**.
3. Choose **Recall.ai** with the same **connector name** you configured in the previous section (e.g., xpander-recallai).
4. Select the available Recall.ai operations that suit your use case.
## Integration of Recall.ai into AI Agent
Once you've configured your Recall.ai account with the authentication option(s) described above, you can integrate it into your AI agent with xpander.ai:
1. In your xpander.ai dashboard, go to the **Agent Configuration** tab and select **Tools**, then click **Add Tools**.
2. Select **Connectors**.
3. Choose **Recall.ai** with the same **connector name** you configured in the previous section (e.g., xpander-recallai).
4. Select the available Recall.ai operations that suit your use case.
 ## Expose Recall.ai as MCP Server
Alternatively, you can also expose your Recall.ai account as an MCP server. To do so:
1. Go to the **Connectors** section in the sidebar of your xpander.ai dashboard.
2. Select **Recall.ai** with the same **connector name** you configured in the previous section (e.g., xpander-recallai).
3. Click **MCP Configuration**.
4. Enter the MCP configuration into the appropriate settings of the client app you want to use (e.g., Cursor, Windsurf, Claude Desktop, etc.).
## Expose Recall.ai as MCP Server
Alternatively, you can also expose your Recall.ai account as an MCP server. To do so:
1. Go to the **Connectors** section in the sidebar of your xpander.ai dashboard.
2. Select **Recall.ai** with the same **connector name** you configured in the previous section (e.g., xpander-recallai).
3. Click **MCP Configuration**.
4. Enter the MCP configuration into the appropriate settings of the client app you want to use (e.g., Cursor, Windsurf, Claude Desktop, etc.).
 ## AI Agent Recall.ai Prompt Library
Below are possible prompts or use cases you can try after integrating Recall.ai into your xpander AI agent:
```
Could you retrieve the transcript from yesterday's client presentation recording?
```
```
Could you delete the recording from our internal strategy meeting on {date}?
```
```
Would it be possible to get the bot intelligence analysis for our {customer_interview} from {day}?
```
```
Can you schedule a bot to record our team meeting on {day} with {team_name}?
```
## Related Resources
* [Understanding Model Context Protocol (MCP)](/guides/deploy/mcp)
* [Recall.ai API Documentation](https://docs.recall.ai/reference/authentication)
## AI Agent Recall.ai Prompt Library
Below are possible prompts or use cases you can try after integrating Recall.ai into your xpander AI agent:
```
Could you retrieve the transcript from yesterday's client presentation recording?
```
```
Could you delete the recording from our internal strategy meeting on {date}?
```
```
Would it be possible to get the bot intelligence analysis for our {customer_interview} from {day}?
```
```
Can you schedule a bot to record our team meeting on {day} with {team_name}?
```
## Related Resources
* [Understanding Model Context Protocol (MCP)](/guides/deploy/mcp)
* [Recall.ai API Documentation](https://docs.recall.ai/reference/authentication)