> ## Documentation Index
> Fetch the complete documentation index at: https://docs.xpander.ai/llms.txt
> Use this file to discover all available pages before exploring further.
# Statuspage
> Learn how to integrate AI agents with StatusPage using xpander.ai. Create automated workflows that detect incidents, trigger real-time updates, and communicate seamlessly with users through your customized status page.
## About Statuspage
Statuspage is a communication tool developed by Atlassian that enables organizations to provide real-time updates on the status of their services. It is designed to enhance transparency and trust by keeping users informed during incidents, outages, or scheduled maintenance.
Statuspage key features:
* **Incident Communication**: Allows teams to post timely updates about service disruptions, helping to reduce support inquiries and keep users informed.
* **Customizable Status Pages**: Offers the ability to create public, private, or audience-specific status pages, ensuring that the right information reaches the appropriate audience.
Atlassian Support
* **Notifications**: Supports multiple notification channels, including email, SMS, Slack, and Microsoft Teams, to alert subscribers about incidents and updates.
* **Third-Party Integrations**: Integrates with various monitoring and alerting tools such as DataDog, New Relic, Pingdom, Opsgenie, and PagerDuty, enabling automated status updates based on system metrics.
## Authentication Options
Below are possible authentication options you can choose:
### Generate a StatusPage API Key
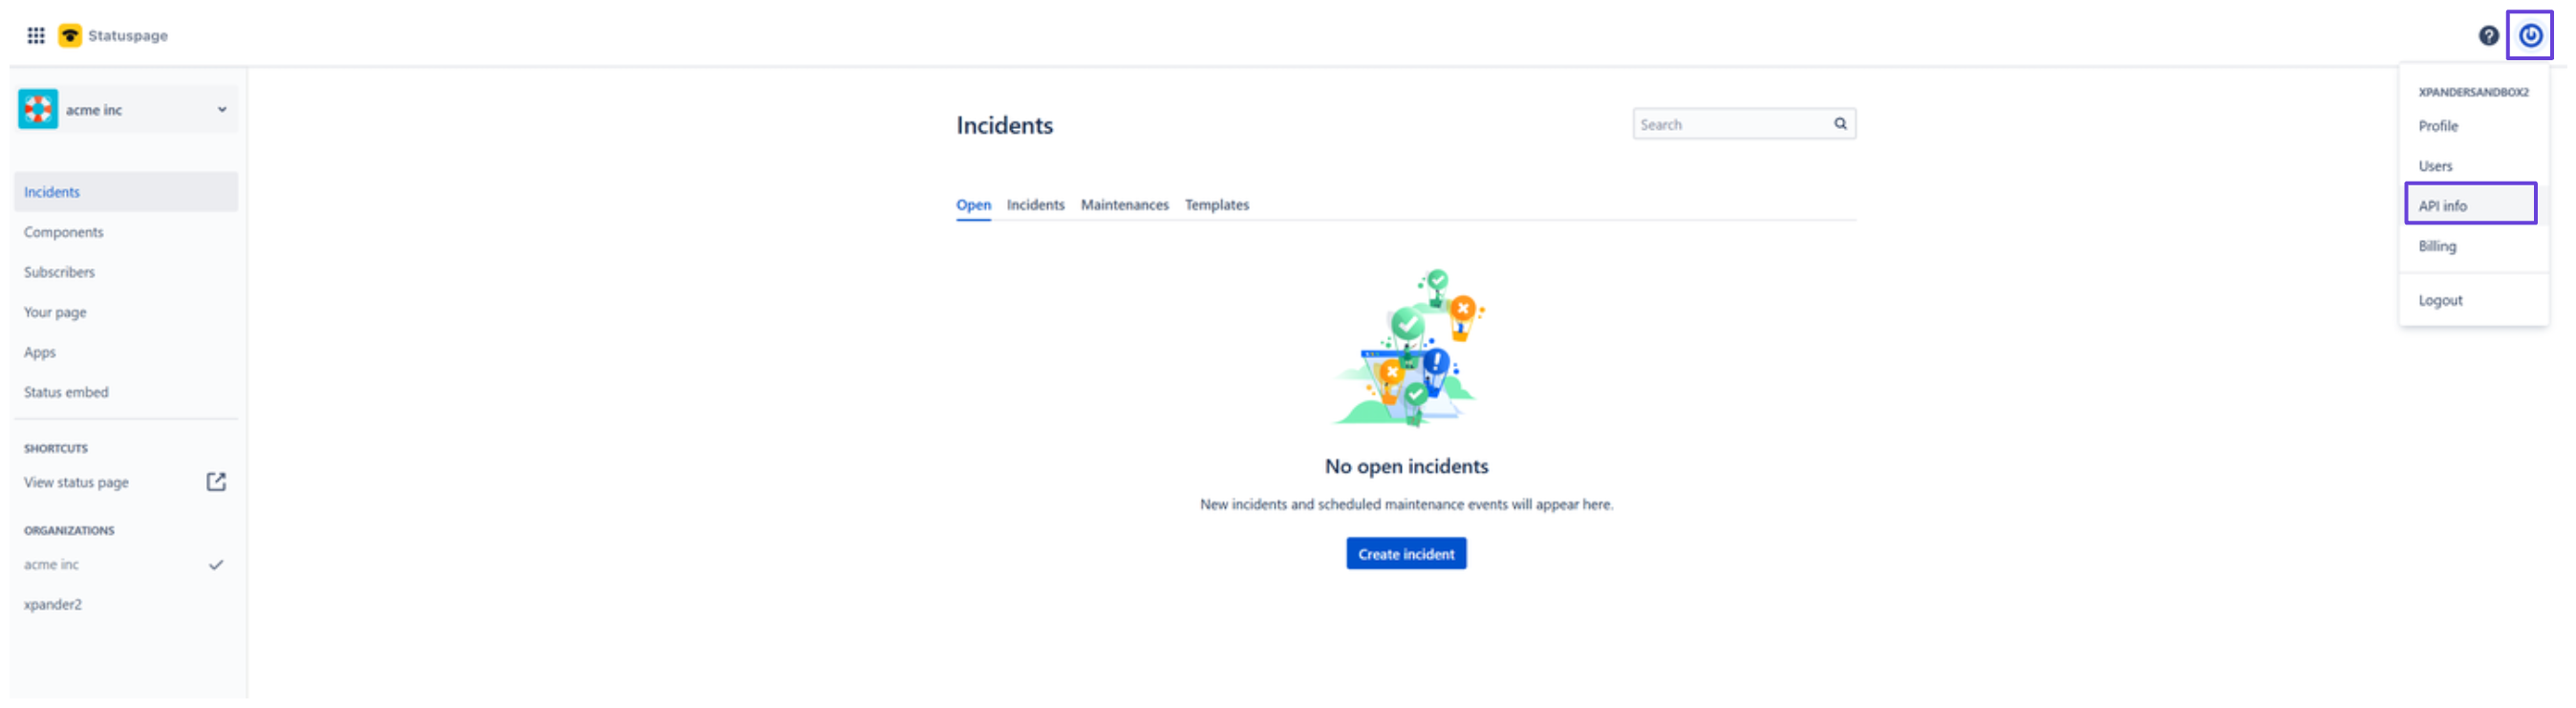
1. Log in to your [StatusPage account](https://manage.statuspage.io/login).
2. Click on your profile icon in the top-right corner, then select **API info**.
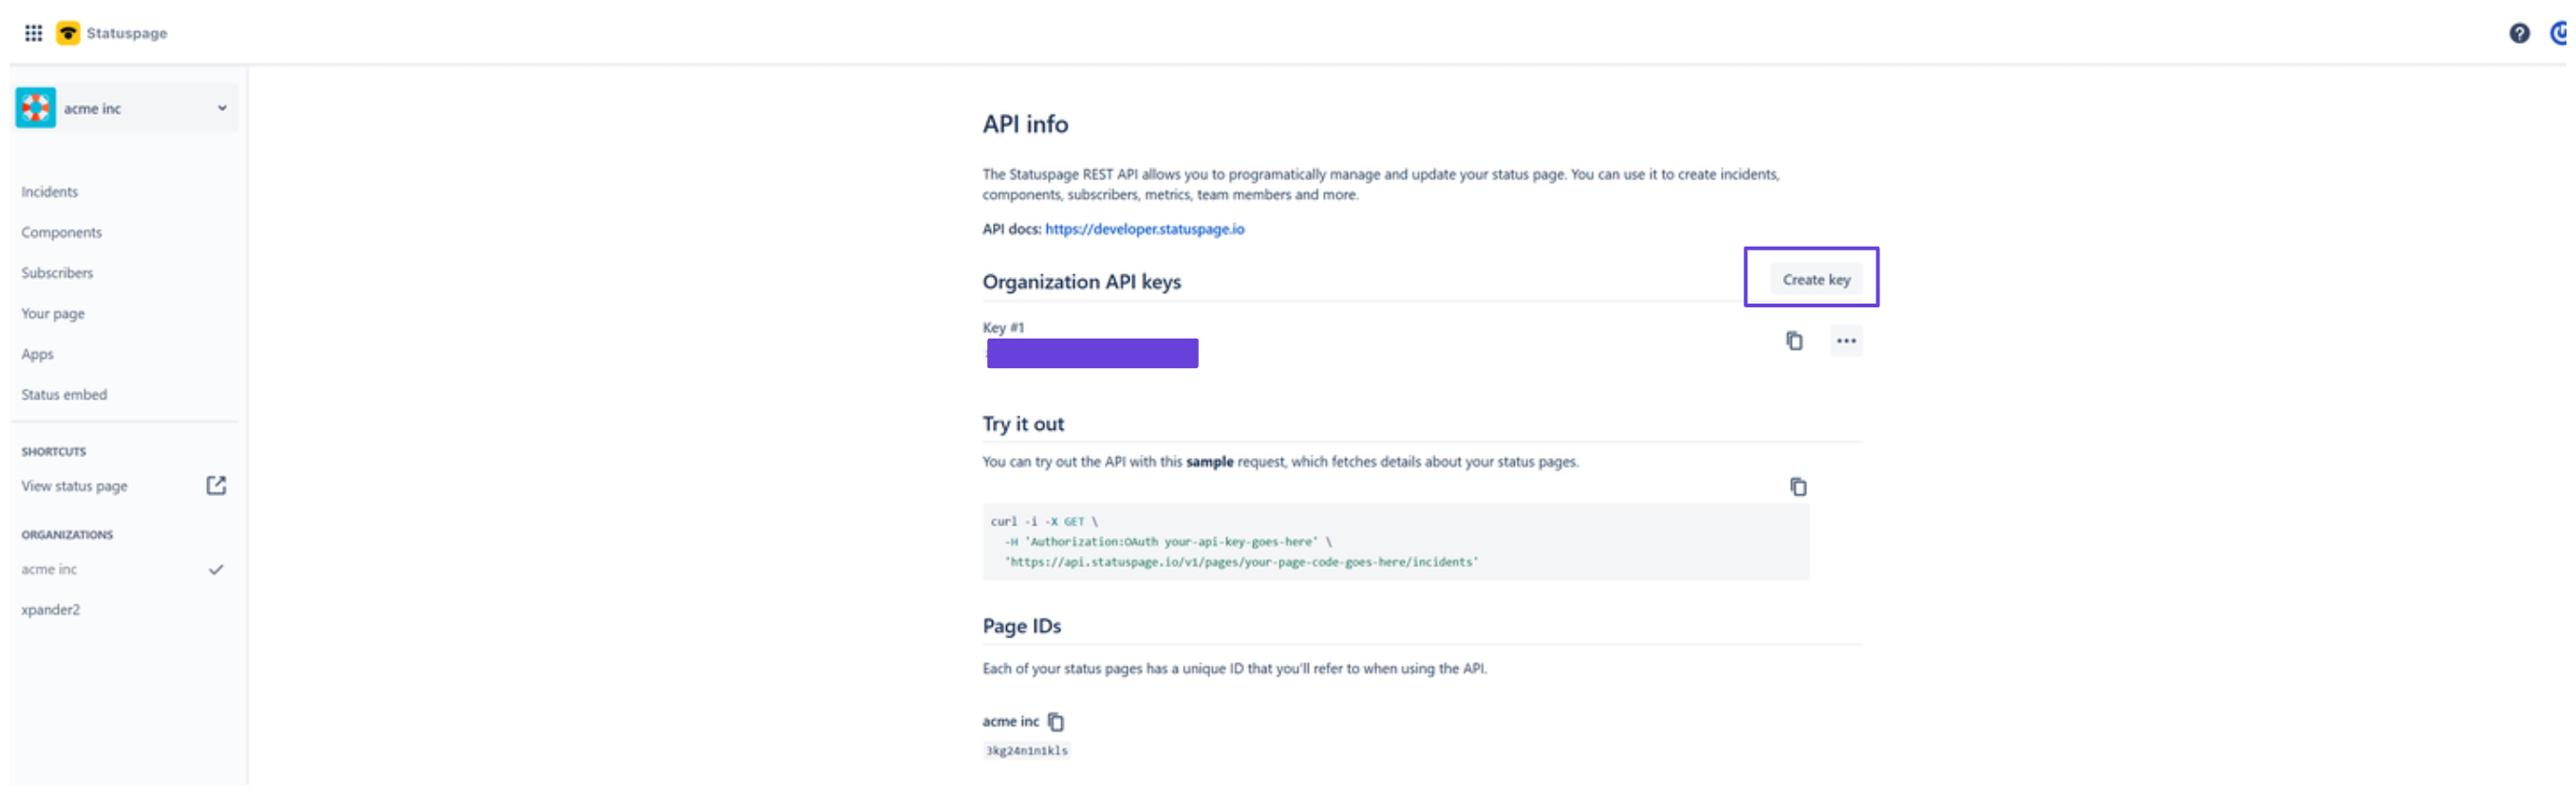
 3. Click **Create key**, give your key a name, and your API key will be displayed.
 ### Integrate StatusPage into xpander.ai
1. In your xpander.ai dashboard, go to the **Connectors** section in the sidebar.
2. Select **StatusPage** from the available integrations.
3. Click **Enable**.
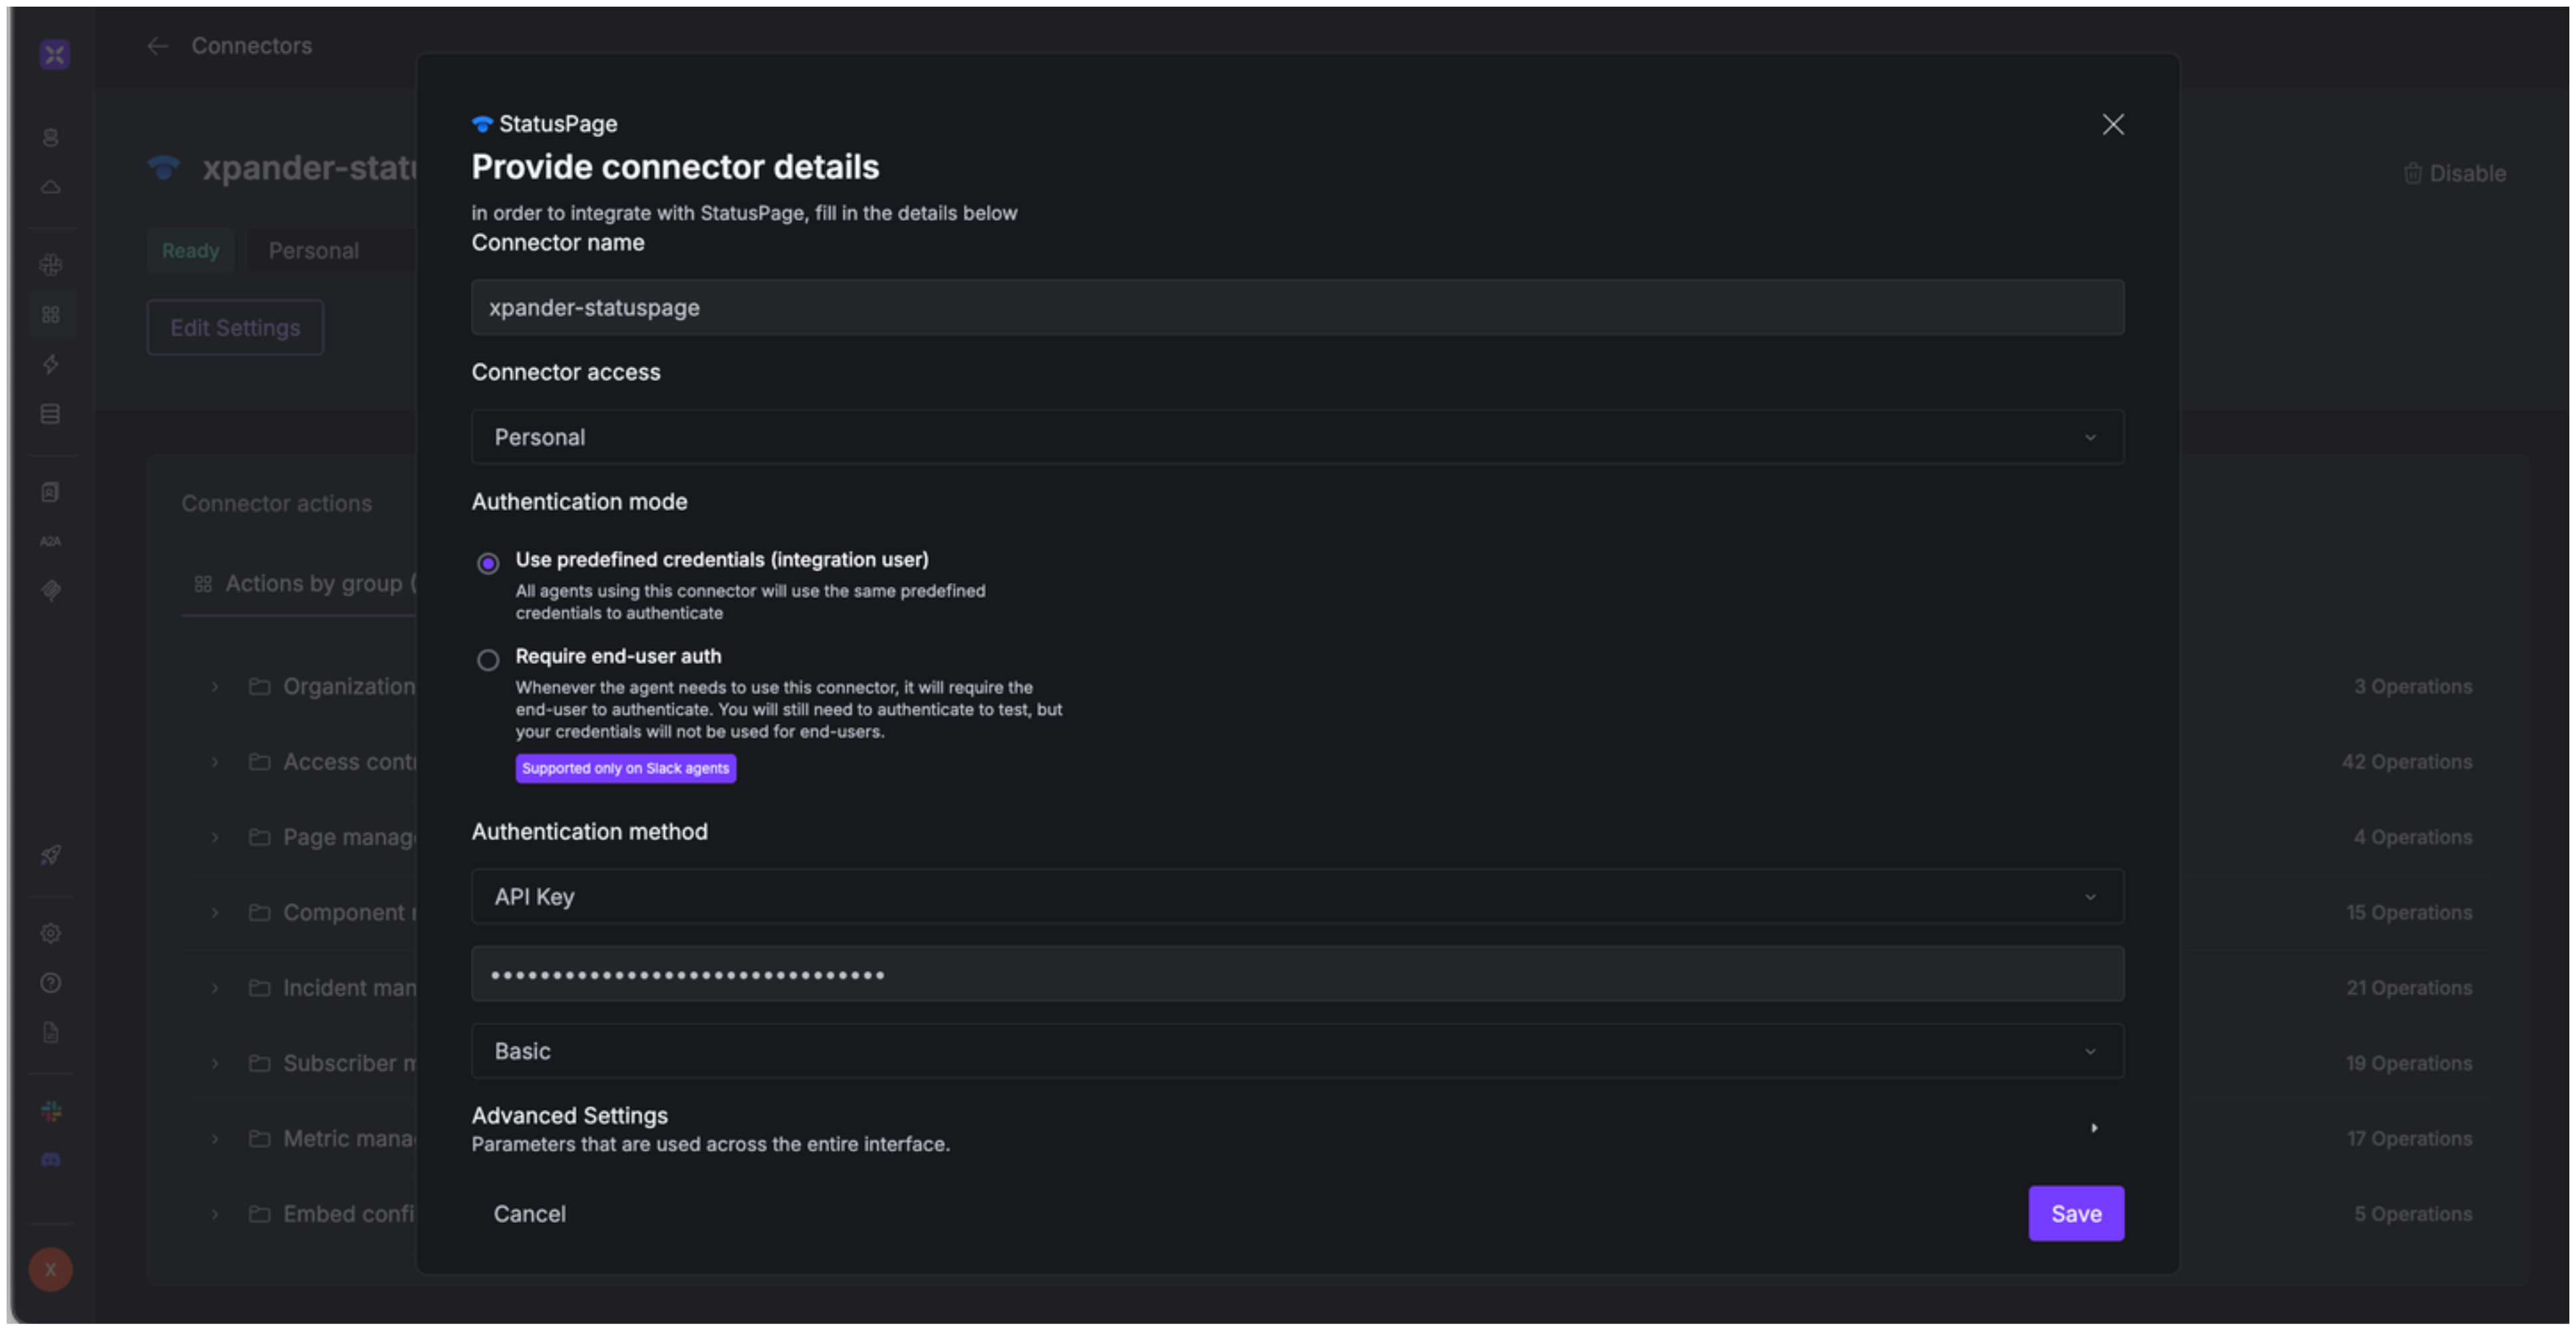
4. Enter a **connector name**, e.g., "xpander-statuspage".
5. Select **Integration User** for the authentication mode.
6. Choose **API Key** as the authentication method.
7. Paste your StatusPage API key into the provided field.
8. Set the **Auth Type** to **Basic**.
9. Save the configuration.
### Integrate StatusPage into xpander.ai
1. In your xpander.ai dashboard, go to the **Connectors** section in the sidebar.
2. Select **StatusPage** from the available integrations.
3. Click **Enable**.
4. Enter a **connector name**, e.g., "xpander-statuspage".
5. Select **Integration User** for the authentication mode.
6. Choose **API Key** as the authentication method.
7. Paste your StatusPage API key into the provided field.
8. Set the **Auth Type** to **Basic**.
9. Save the configuration.
 ## Integration of Statuspage into AI Agent
Once you've configured your Statuspage account with the authentication option(s) described above, you can integrate it into your AI agent with xpander.ai:
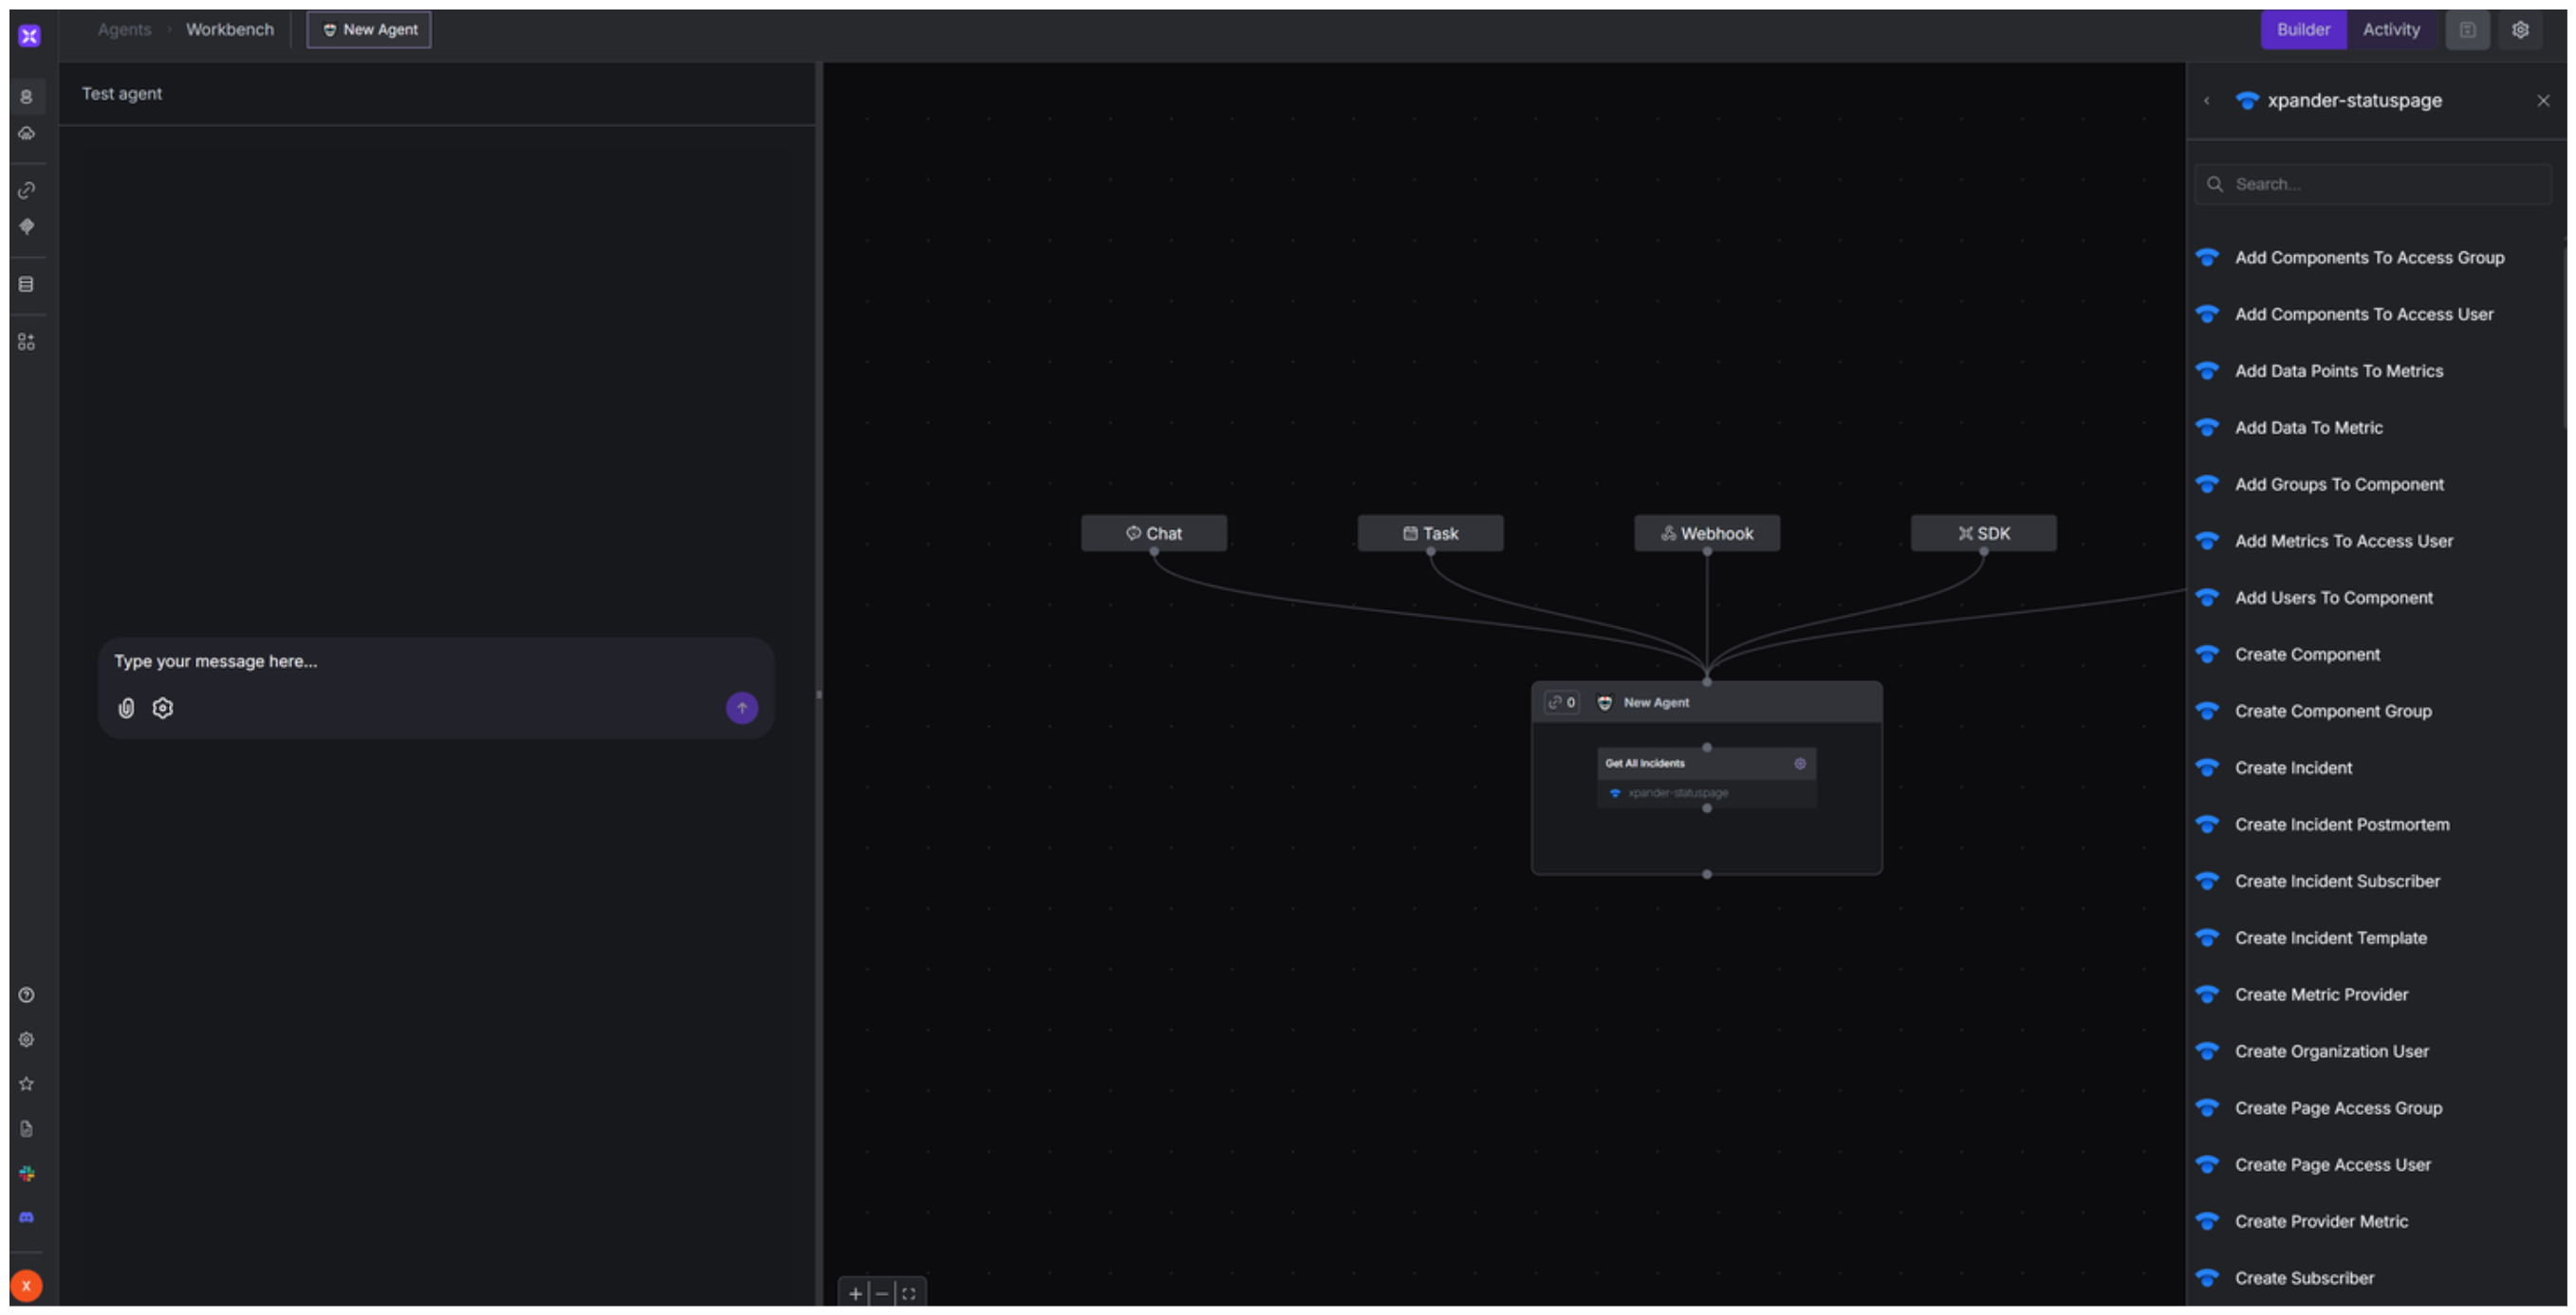
1. In your xpander.ai dashboard, go to the **Agent Configuration** tab and select **Tools**, then click **Add Tools**.
2. Select **Connectors**.
3. Choose **Statuspage** with the same **connector name** you configured in the previous section (e.g., xpander-statuspage).
4. Select the available Statuspage operations that suit your use case.
## Integration of Statuspage into AI Agent
Once you've configured your Statuspage account with the authentication option(s) described above, you can integrate it into your AI agent with xpander.ai:
1. In your xpander.ai dashboard, go to the **Agent Configuration** tab and select **Tools**, then click **Add Tools**.
2. Select **Connectors**.
3. Choose **Statuspage** with the same **connector name** you configured in the previous section (e.g., xpander-statuspage).
4. Select the available Statuspage operations that suit your use case.
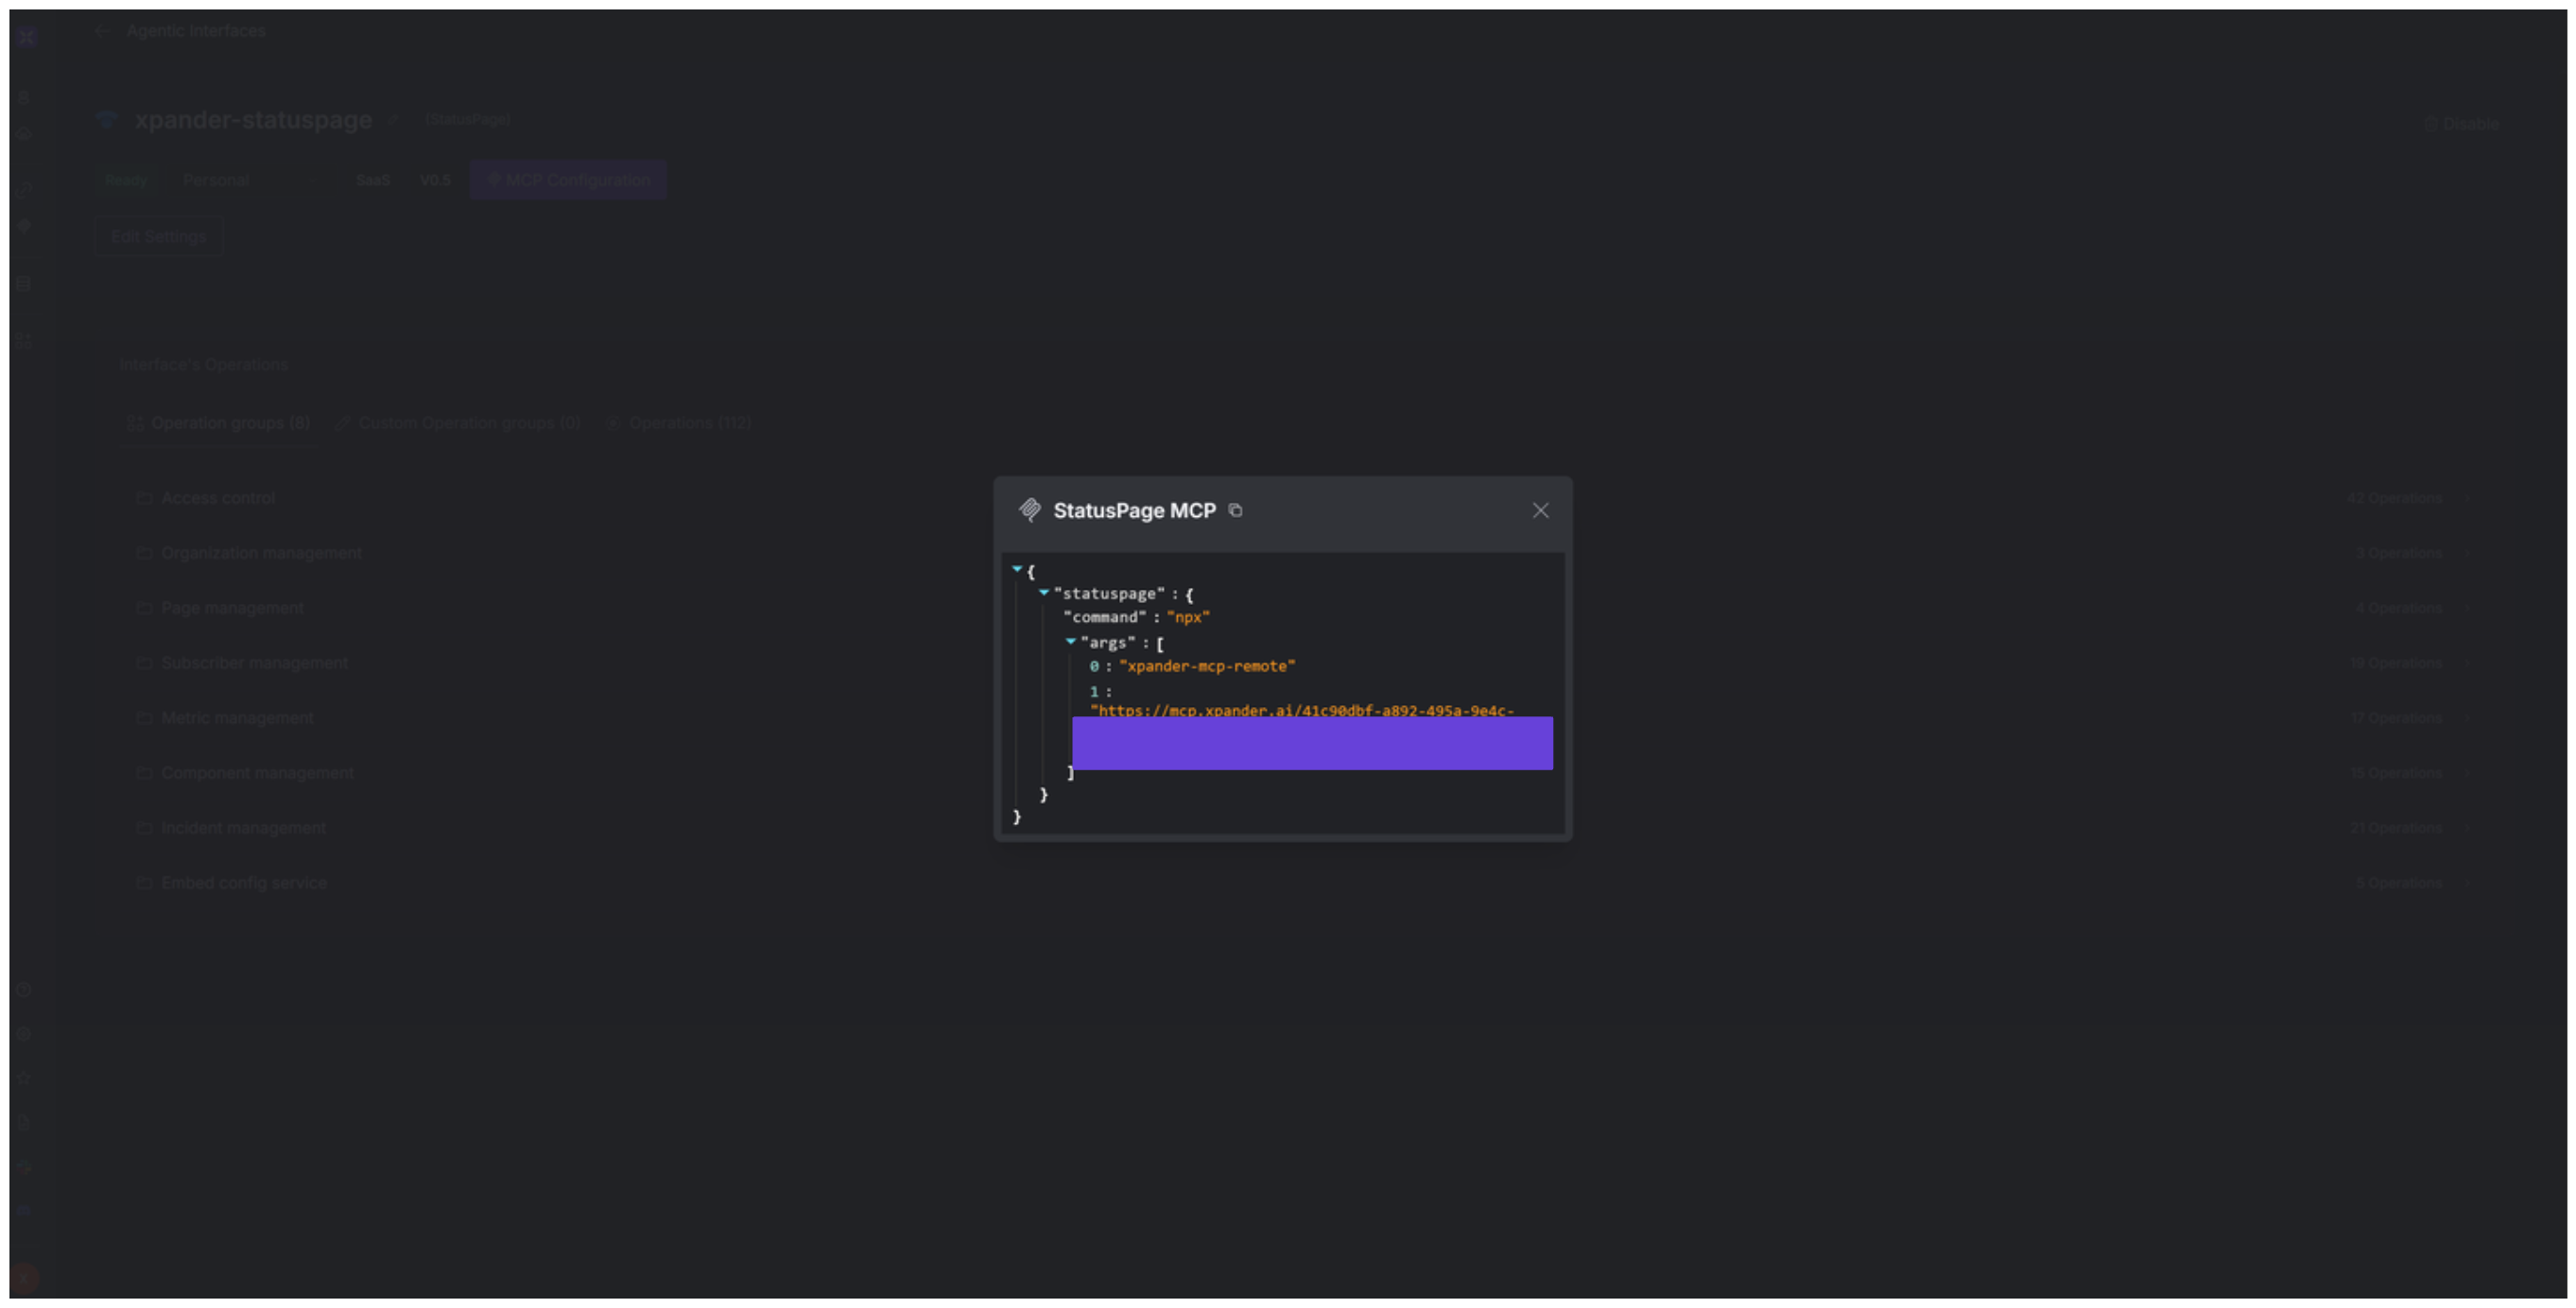
 ## Expose Statuspage as MCP Server
Alternatively, you can also expose your Statuspage account as an MCP server. To do so:
1. Go to the **Connectors** section in the sidebar of your xpander.ai dashboard.
2. Select **Statuspage** with the same **connector name** you configured in the previous section (e.g., xpander-statuspage).
3. Click **MCP Configuration**.
4. Enter the MCP configuration into the appropriate settings of the client app you want to use (e.g., Cursor, Windsurf, Claude Desktop, etc.).
## Expose Statuspage as MCP Server
Alternatively, you can also expose your Statuspage account as an MCP server. To do so:
1. Go to the **Connectors** section in the sidebar of your xpander.ai dashboard.
2. Select **Statuspage** with the same **connector name** you configured in the previous section (e.g., xpander-statuspage).
3. Click **MCP Configuration**.
4. Enter the MCP configuration into the appropriate settings of the client app you want to use (e.g., Cursor, Windsurf, Claude Desktop, etc.).
 ## AI Agent Statuspage Prompt Library
Below are possible prompts or use cases you can try after integrating Statuspage into your xpander AI agent:
```
We need to add the latest performance metrics for our API gateway. Can you update that?
```
```
Could you add {emailAddress} as a subscriber to the current network outage incident?
```
```
We need to schedule maintenance for our database cluster on {date} at {time}. Can you set that up?
```
```
Can you retrieve all current incidents affecting our services?
```
## Related Resources
* [Understanding Model Context Protocol (MCP)](/guides/deploy/mcp)
* [Statuspage API Documentation](https://developer.statuspage.io/#operation/getPages)
## AI Agent Statuspage Prompt Library
Below are possible prompts or use cases you can try after integrating Statuspage into your xpander AI agent:
```
We need to add the latest performance metrics for our API gateway. Can you update that?
```
```
Could you add {emailAddress} as a subscriber to the current network outage incident?
```
```
We need to schedule maintenance for our database cluster on {date} at {time}. Can you set that up?
```
```
Can you retrieve all current incidents affecting our services?
```
## Related Resources
* [Understanding Model Context Protocol (MCP)](/guides/deploy/mcp)
* [Statuspage API Documentation](https://developer.statuspage.io/#operation/getPages)