> ## Documentation Index
> Fetch the complete documentation index at: https://docs.xpander.ai/llms.txt
> Use this file to discover all available pages before exploring further.
# AI Models & Intelligence
> Choose your LLM provider, configure intelligence features, and define your agent personality
Every Xpander agent is powered by a large language model. The model determines how your agent thinks, how it writes, how much it costs, and how fast it responds.
This page covers:
* [Models](#models): choose a provider, bring your own keys, configure extra headers
* [Model Settings](#model-settings): temperature and reasoning effort
* [Planning Mode](#planning-mode): structured task decomposition and progress tracking
* [Reasoning Mode](#reasoning-mode): extended thinking for complex problems
* [Multi-Agent Orchestration](#multi-agent-orchestration): delegate tasks to specialized agents
## Models
To change what model your agent uses:
In the Agent Studio, click the **gear** icon and go to **General** → **LLM Settings**.
Select your provider from the dropdown. If using built-in keys, you're done. Xpander handles billing. If using your own keys, enter them in the API key field.
Pick from the **Featured** models list, or toggle to **Custom** and enter any model ID your provider supports. Custom mode is useful for fine-tuned models, newly released models, or provider-specific variants.
Click **Publish** to apply the new model. Your agent will use it for all subsequent conversations.
### Supported Providers
**Built-in access (pay-as-you-go) or BYOK**
* GPT-5.4, GPT-5.3 Chat, GPT-5.2, GPT-5.1, GPT-5 Nano, GPT-5, GPT-5 Mini
* GPT-4.1, GPT-4.1-mini
* GPT-4o, GPT-4o Mini, GPT-4 Turbo
* GPT-3.5 Turbo
**Built-in access (pay-as-you-go) or BYOK**
* Claude Sonnet 4.6, Claude Opus 4.6
* Claude Sonnet 4.5, Claude Opus 4.5
* Claude Opus 4, Claude Sonnet 4
* Claude Sonnet 3.7, Claude Sonnet 3.5
**BYOK: requires AWS credentials with Bedrock access**
* Claude Sonnet 4.6, Claude Opus 4.6
* Claude Sonnet 4.5, Claude Opus 4
* Claude Sonnet 4, Claude Sonnet 3.7, Claude Sonnet 3.5
* Claude Haiku 3.5
* Amazon Titan Text Express
**BYOK: requires Azure AI Foundry credentials**
Azure AI Foundry provides access to OpenAI models through Azure's infrastructure.
* GPT-5.2, GPT-5.1, GPT-5 Nano, GPT-5, GPT-5 Mini
* GPT-4.1, GPT-4.1-mini
* GPT-4o, GPT-4o Mini
* GPT-4 Turbo, GPT-3.5 Turbo
Set the API Base URL to include your deployment name without the completions path:
`https://your-resource.openai.azure.com/openai/deployments/gpt-4o`
Do NOT include `/completions?api-version=...` at the end.
**BYOK: requires ByteDance ModelArk API key**
No featured models. Custom model identifier only. Access ByteDance's model inference platform by entering your model ID in Custom mode.
**BYOK: requires Fireworks AI API key**
* GLM-4.6
* Kimi K2 Instruct 0905
* DeepSeek V3.1
* OpenAI gpt-oss-120b, OpenAI gpt-oss-20b
* Qwen3 235B A22B Thinking 2507, Qwen3 235B A22B Instruct 2507
**BYOK: requires Google AI Studio API key**
* Gemini 2.0 Flash, Gemini 2.0 Flash Lite
* Gemini 2.5 Pro, Gemini 3 Pro
**BYOK: requires NVIDIA API key**
**Meta Llama Models:**
* Llama 3.1 8B Instruct, Llama 3.1 70B Instruct, Llama 3.1 405B Instruct
* Llama 3.2 1B Instruct, Llama 3.2 3B Instruct
* Llama 3.3 70B Instruct
* Llama 4 Scout 17B, Llama 4 Maverick 17B
**Mistral Models:**
* Mistral 7B Instruct v0.3, Mistral Small 3.2 24B Instruct
**NVIDIA Nemotron:**
* Nemotron Nano 4B v1.1, Nemotron Nano 8B v1, Nemotron Ultra 253B v1
### Supported Gateways
**BYOK: requires Cloudflare API key + base URL**
No featured models. Requires a custom model identifier, API key, and base URL. Cloudflare AI Gateway provides caching, rate limiting, and observability for LLM requests.
**BYOK: requires Nebius API key**
Nebius provides inference for open-source models.
**Meta Llama:**
* Meta-Llama-3.1-8B-Instruct-fast, Meta-Llama-3.1-8B-Instruct, Llama-Guard-3-8B
**NVIDIA:**
* Llama-3.1-Nemotron-Ultra-253B-v1, Nemotron-Nano-V2-12b
**Google Gemma:**
* gemma-2-2b-it, gemma-2-9b-it-fast, gemma-3-27b-it, gemma-3-27b-it-fast
**Qwen:**
* Qwen2.5-Coder-7B-fast, Qwen3-235B-A22B-Instruct-2507, Qwen3-235B-A22B-Thinking-2507
* Qwen3-32B, Qwen3-32B-fast, Qwen2.5-VL-72B-Instruct
* Qwen3-Coder-30B-A3B-Instruct, Qwen3-Coder-480B-A35B-Instruct
**DeepSeek:**
* DeepSeek-R1-0528
**Nous:**
* Hermes-4-70B, Hermes-4-405B
**Others:**
* INTELLECT-3, Kimi-K2-Thinking
**Image Generation:**
* flux-dev, flux-schnell
**BYOK: requires OpenRouter API key**
OpenRouter provides unified access to 200+ models with automatic fallback, load balancing, and unified pricing.
**Featured:**
* Prime Intellect: INTELLECT-3
* TNG: R1T Chimera (free), TNG: R1T Chimera
**Anthropic:**
* Claude Opus 4.5, Claude Sonnet 4.5, Claude Haiku 4.5, Claude Opus 4.1
**AllenAI:**
* OLMo 3 32B Think, OLMo 3 7B Instruct, OLMo 3 7B Think
**LiquidAI:**
* LFM2-8B-A1B, LFM2-2.6B
**IBM:**
* Granite 4.0 Micro
**Deep Cogito:**
* Cogito V2 Preview Llama 405B
**OpenAI:**
* GPT-5 Image Mini, GPT-5 Pro, GPT-4o Audio, gpt-oss-120b, gpt-oss-20b (free), gpt-oss-20b
**Google:**
* Gemini 2.5 Flash Image (Nano Banana), Gemini 2.5 Flash Image Preview (Nano Banana)
**Qwen:**
* Qwen3 VL 8B Thinking, Qwen3 VL 8B Instruct, Qwen3 VL 30B A3B Thinking, Qwen3 VL 30B A3B Instruct
* Qwen3 Coder 30B A3B Instruct, Qwen3 30B A3B Instruct 2507
**Z.AI:**
* GLM 4.6, GLM 4.6 (exacto)
**DeepSeek:**
* DeepSeek V3.2 Exp, DeepSeek V3.1
**Nous:**
* Hermes 4 70B, Hermes 4 405B
**Mistral:**
* Mistral Medium 3.1, Codestral 2508
**Baidu:**
* ERNIE 4.5 21B A3B, ERNIE 4.5 VL 28B A3B
**Bert:**
* Nebulon Alpha
**BYOK: requires Tzafon LightCone API key**
No featured models. Custom model identifier only. Access models through Tzafon's LightCone inference platform by entering your model ID in Custom mode.
### Bring Your Own Keys
Contact Sales to enable Bring your Own LLM Keys for your organization.
When you bring your own keys, you get full control over billing and model access. Enter your provider's API key in the LLM Settings panel. For providers like Azure or AWS Bedrock that need additional configuration (deployment IDs, regions), fill in the extra fields that appear.
You can also set a custom **API Base URL** to route requests through your own AI gateway or proxy.
If your AI Gateway is behind a private subnet or firewall, make sure to run Xpander in the same network with access to those models.
### Use Custom Models
The models listed above are featured models that have been tested with Xpander. To use a different model from your provider, select **"Custom"** in the model dropdown and enter the model name exactly as specified by your provider (e.g., `custom-model-id`). This is particularly useful for:
* Private or fine-tuned models only you have access to
* Newly released models not yet in the dropdown
* Provider-specific model variants with custom endpoints
### Model Settings
Two settings fine-tune how the model generates responses. Configure these in the **General** tab → **LLM Settings** panel.
| Setting | What it does | Range |
| -------------------- | ------------------------------------------------------------------------------------------------------------------------------------------------------------------------------------ | ------------------- |
| **Temperature** | Controls randomness. Lower values (0.0–0.3) give more focused, deterministic responses. Higher values (0.7–1.0) give more creative, varied responses. | 0.0–1.0 |
| **Reasoning Effort** | Controls how much effort the model puts into reasoning before responding. Higher effort means slower but more thorough answers. Currently only visible when using **OpenAI** models. | Low / Medium / High |
### LLM Extra Headers
You can configure custom HTTP headers to be sent with every LLM request. This is useful for:
* Sending custom authentication tokens to AI Gateways
* Adding tracking or metadata headers (e.g., `X-Request-ID`, `X-Organization-ID`)
* Passing compliance or security headers required by your infrastructure
* Integration with observability platforms like Helicone, LangSmith, or custom proxies
**Configuration levels:**
1. **Organization Default Headers**: Set default headers at the organization level in [**Admin Settings → LLM Settings**](http://app.xpander.ai/admin_settings#llm_settings) that apply to all agents
2. **Agent-Specific Override**: Override organization defaults with agent-specific headers in the Agent Studio **General** → **LLM Settings** panel
Agent-level headers take precedence and merge with organization defaults (agent headers override matching keys).
**Supported Providers:** Extra headers are currently supported for OpenAI, Helicone, Nebius, OpenRouter, Fireworks, and NVIDIA NIM providers. For Anthropic, headers are sent as `default_headers`. Google AI Studio and Amazon Bedrock don't support custom headers.
Track and monitor all LLM requests through Helicone:
```json Organization Headers (Admin Settings) theme={"dark"}
{
"Helicone-Auth": "Bearer sk-helicone-xxx",
"Helicone-Property-Environment": "production"
}
```
```json Agent Headers (Agent Studio) theme={"dark"}
{
"Helicone-Property-Agent": "support-agent",
"Helicone-User-Id": "team-support"
}
```
Route requests through your internal AI Gateway with authentication:
```json Organization Headers theme={"dark"}
{
"X-Gateway-Token": "your-gateway-token",
"X-Tenant-ID": "company-prod"
}
```
Add tracking and compliance headers for audit logs:
```json Organization Headers theme={"dark"}
{
"X-Request-Source": "xpander-platform",
"X-Compliance-Level": "gdpr-compliant",
"X-Data-Region": "eu-west-1"
}
```
Differentiate between development and production environments:
**Production Org Headers:**
```json theme={"dark"}
{
"X-Environment": "production",
"X-Rate-Limit-Tier": "premium"
}
```
**Dev Agent Override:**
```json theme={"dark"}
{
"X-Environment": "development",
"X-Debug-Mode": "enabled"
}
```
## Planning Mode
Planning Mode gives your agent the ability to break complex tasks into structured, trackable steps. When enabled, the agent receives a set of to-do list tools and is nudged to create a checklist before starting work. It then works through the items one by one, marking each complete and reporting progress along the way.
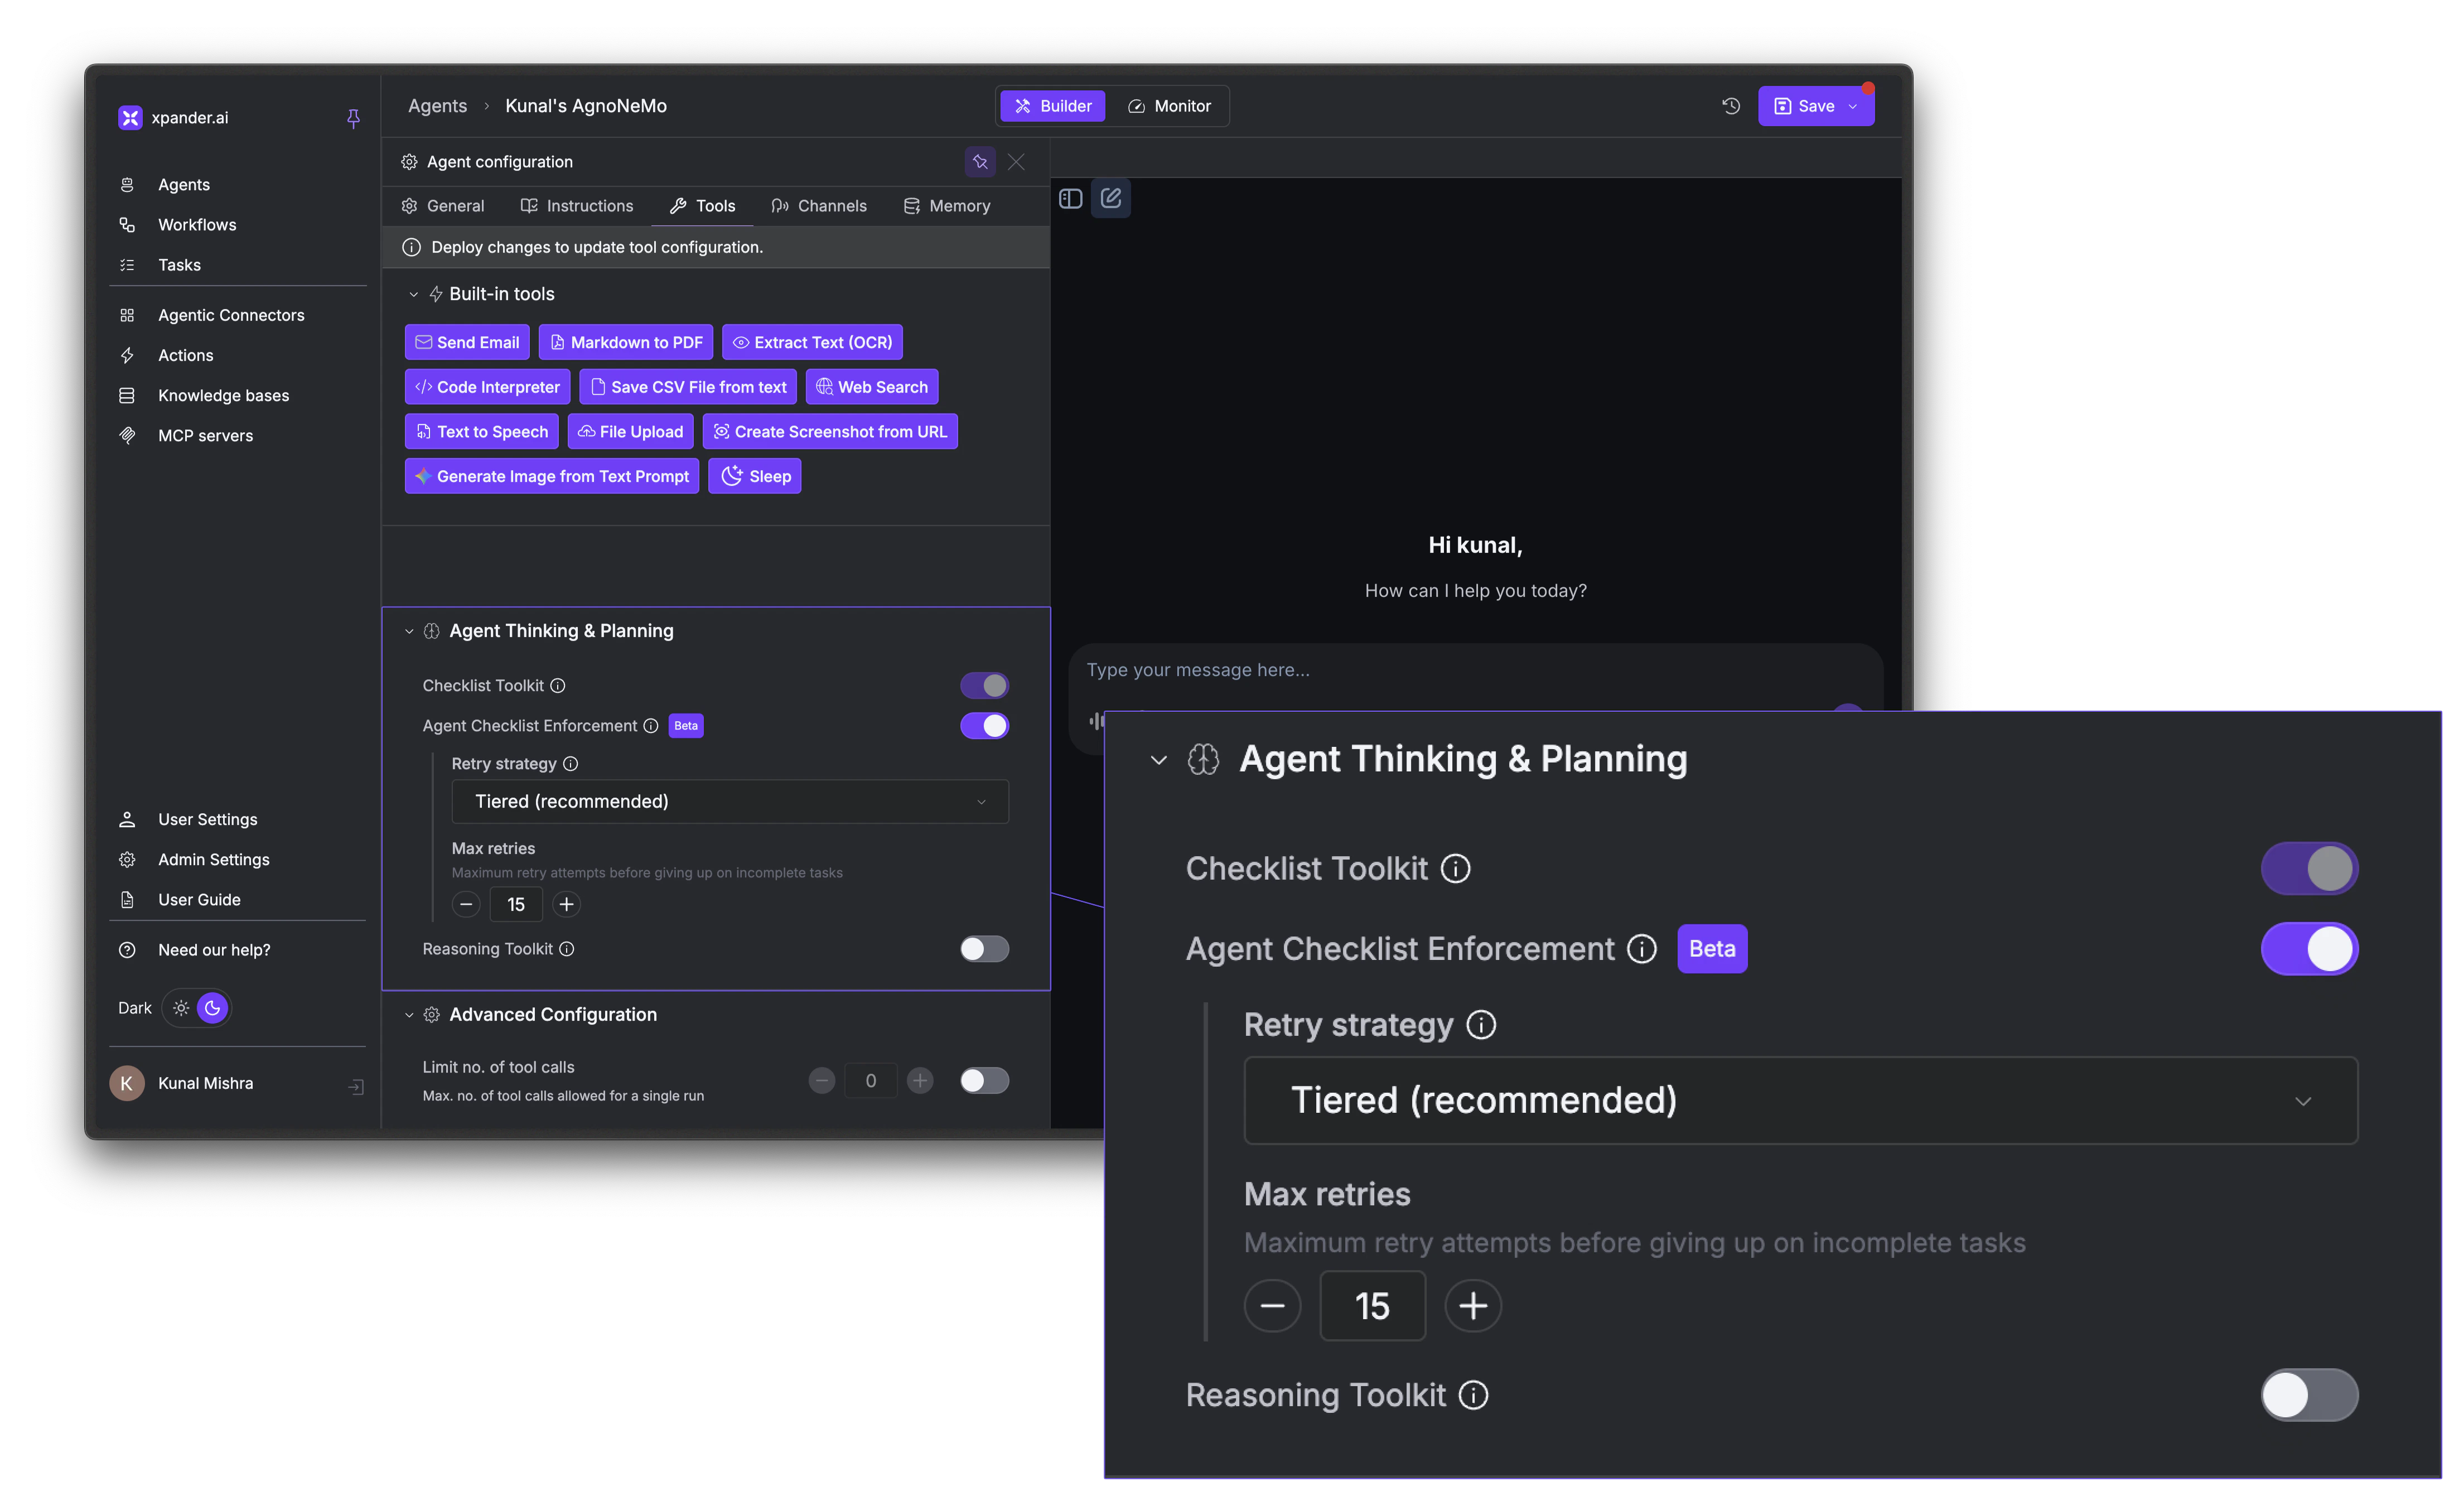
### How to Enable
In the Agent Studio, go to the **Tools** tab → **Agent Thinking & Planning** section:
* **Checklist Toolkit**: Toggle this on to give the agent planning tools. The agent will be nudged to create a plan and work through it.
* **Agent Checklist Enforcement** (Beta): When enabled, execution blocks entirely until the agent creates a plan. Without this, the agent is encouraged to plan but not forced to.
 ### How It Works
Planning Mode gives the agent tools to create, update, and manage a to-do list. The typical flow looks like this:
1. The agent receives a prompt and creates a checklist of steps it needs to complete
2. It works through each item, using its tools and marking tasks done as it goes
3. If it discovers new work along the way, it adds items to the list dynamically
4. The checklist updates in real-time in both the chat interface and the Monitor tab
5. If tasks remain incomplete after a run, the system retries automatically based on the configured retry strategy
The agent can also remove tasks that turn out to be unnecessary, or update task descriptions as requirements become clearer during execution.
### Retry Strategies
Planning Mode also nudges the Agent to complete its checklist before finishing its response. If some tasks remain incomplete, it prompts the agent to retry.
| Strategy | Behavior |
| -------------- | ----------------------------------------------------------------------------------------------------- |
| **Tiered** | Lightweight nudge first (retries 1–3), then full context compaction on retry 4+. This is the default. |
| **Aggressive** | Always compacts context on every retry. Use when the agent consistently fails due to long context. |
| **Disabled** | No automatic retries. The execution ends after the first attempt, even if tasks are incomplete. |
**Tiered** is the best default for most agents. It gives the agent a chance to finish naturally before resorting to context compaction, which can lose some detail from earlier in the conversation.
### When to Use Planning Mode
| Good fit | Not a good fit |
| ------------------------------------------------------------- | ---------------------------------- |
| Multi-step workflows (research → draft → review) | Simple Q\&A |
| Tasks requiring coordinated actions across tools | Single tool calls |
| Audit trails where you need to see exactly what the agent did | Real-time chat where speed matters |
| Complex implementations or migrations | Quick lookups |
## Reasoning Mode
Reasoning Mode exposes a `think` tool that gives the agent a private scratchpad for extended thinking. Instead of responding immediately, the agent can reason through the problem step-by-step, considering multiple approaches, evaluating tradeoffs, and self-correcting before delivering a final answer.
Reasoning steps are visible in the activity log and the chat interface, and are delivered in real-time as `think` events when streaming.
To enable it, go to the **Tools** tab → **Agent Thinking & Planning** section and toggle on **Reasoning Toolkit**. No additional configuration is needed.
### How It Works
Planning Mode gives the agent tools to create, update, and manage a to-do list. The typical flow looks like this:
1. The agent receives a prompt and creates a checklist of steps it needs to complete
2. It works through each item, using its tools and marking tasks done as it goes
3. If it discovers new work along the way, it adds items to the list dynamically
4. The checklist updates in real-time in both the chat interface and the Monitor tab
5. If tasks remain incomplete after a run, the system retries automatically based on the configured retry strategy
The agent can also remove tasks that turn out to be unnecessary, or update task descriptions as requirements become clearer during execution.
### Retry Strategies
Planning Mode also nudges the Agent to complete its checklist before finishing its response. If some tasks remain incomplete, it prompts the agent to retry.
| Strategy | Behavior |
| -------------- | ----------------------------------------------------------------------------------------------------- |
| **Tiered** | Lightweight nudge first (retries 1–3), then full context compaction on retry 4+. This is the default. |
| **Aggressive** | Always compacts context on every retry. Use when the agent consistently fails due to long context. |
| **Disabled** | No automatic retries. The execution ends after the first attempt, even if tasks are incomplete. |
**Tiered** is the best default for most agents. It gives the agent a chance to finish naturally before resorting to context compaction, which can lose some detail from earlier in the conversation.
### When to Use Planning Mode
| Good fit | Not a good fit |
| ------------------------------------------------------------- | ---------------------------------- |
| Multi-step workflows (research → draft → review) | Simple Q\&A |
| Tasks requiring coordinated actions across tools | Single tool calls |
| Audit trails where you need to see exactly what the agent did | Real-time chat where speed matters |
| Complex implementations or migrations | Quick lookups |
## Reasoning Mode
Reasoning Mode exposes a `think` tool that gives the agent a private scratchpad for extended thinking. Instead of responding immediately, the agent can reason through the problem step-by-step, considering multiple approaches, evaluating tradeoffs, and self-correcting before delivering a final answer.
Reasoning steps are visible in the activity log and the chat interface, and are delivered in real-time as `think` events when streaming.
To enable it, go to the **Tools** tab → **Agent Thinking & Planning** section and toggle on **Reasoning Toolkit**. No additional configuration is needed.
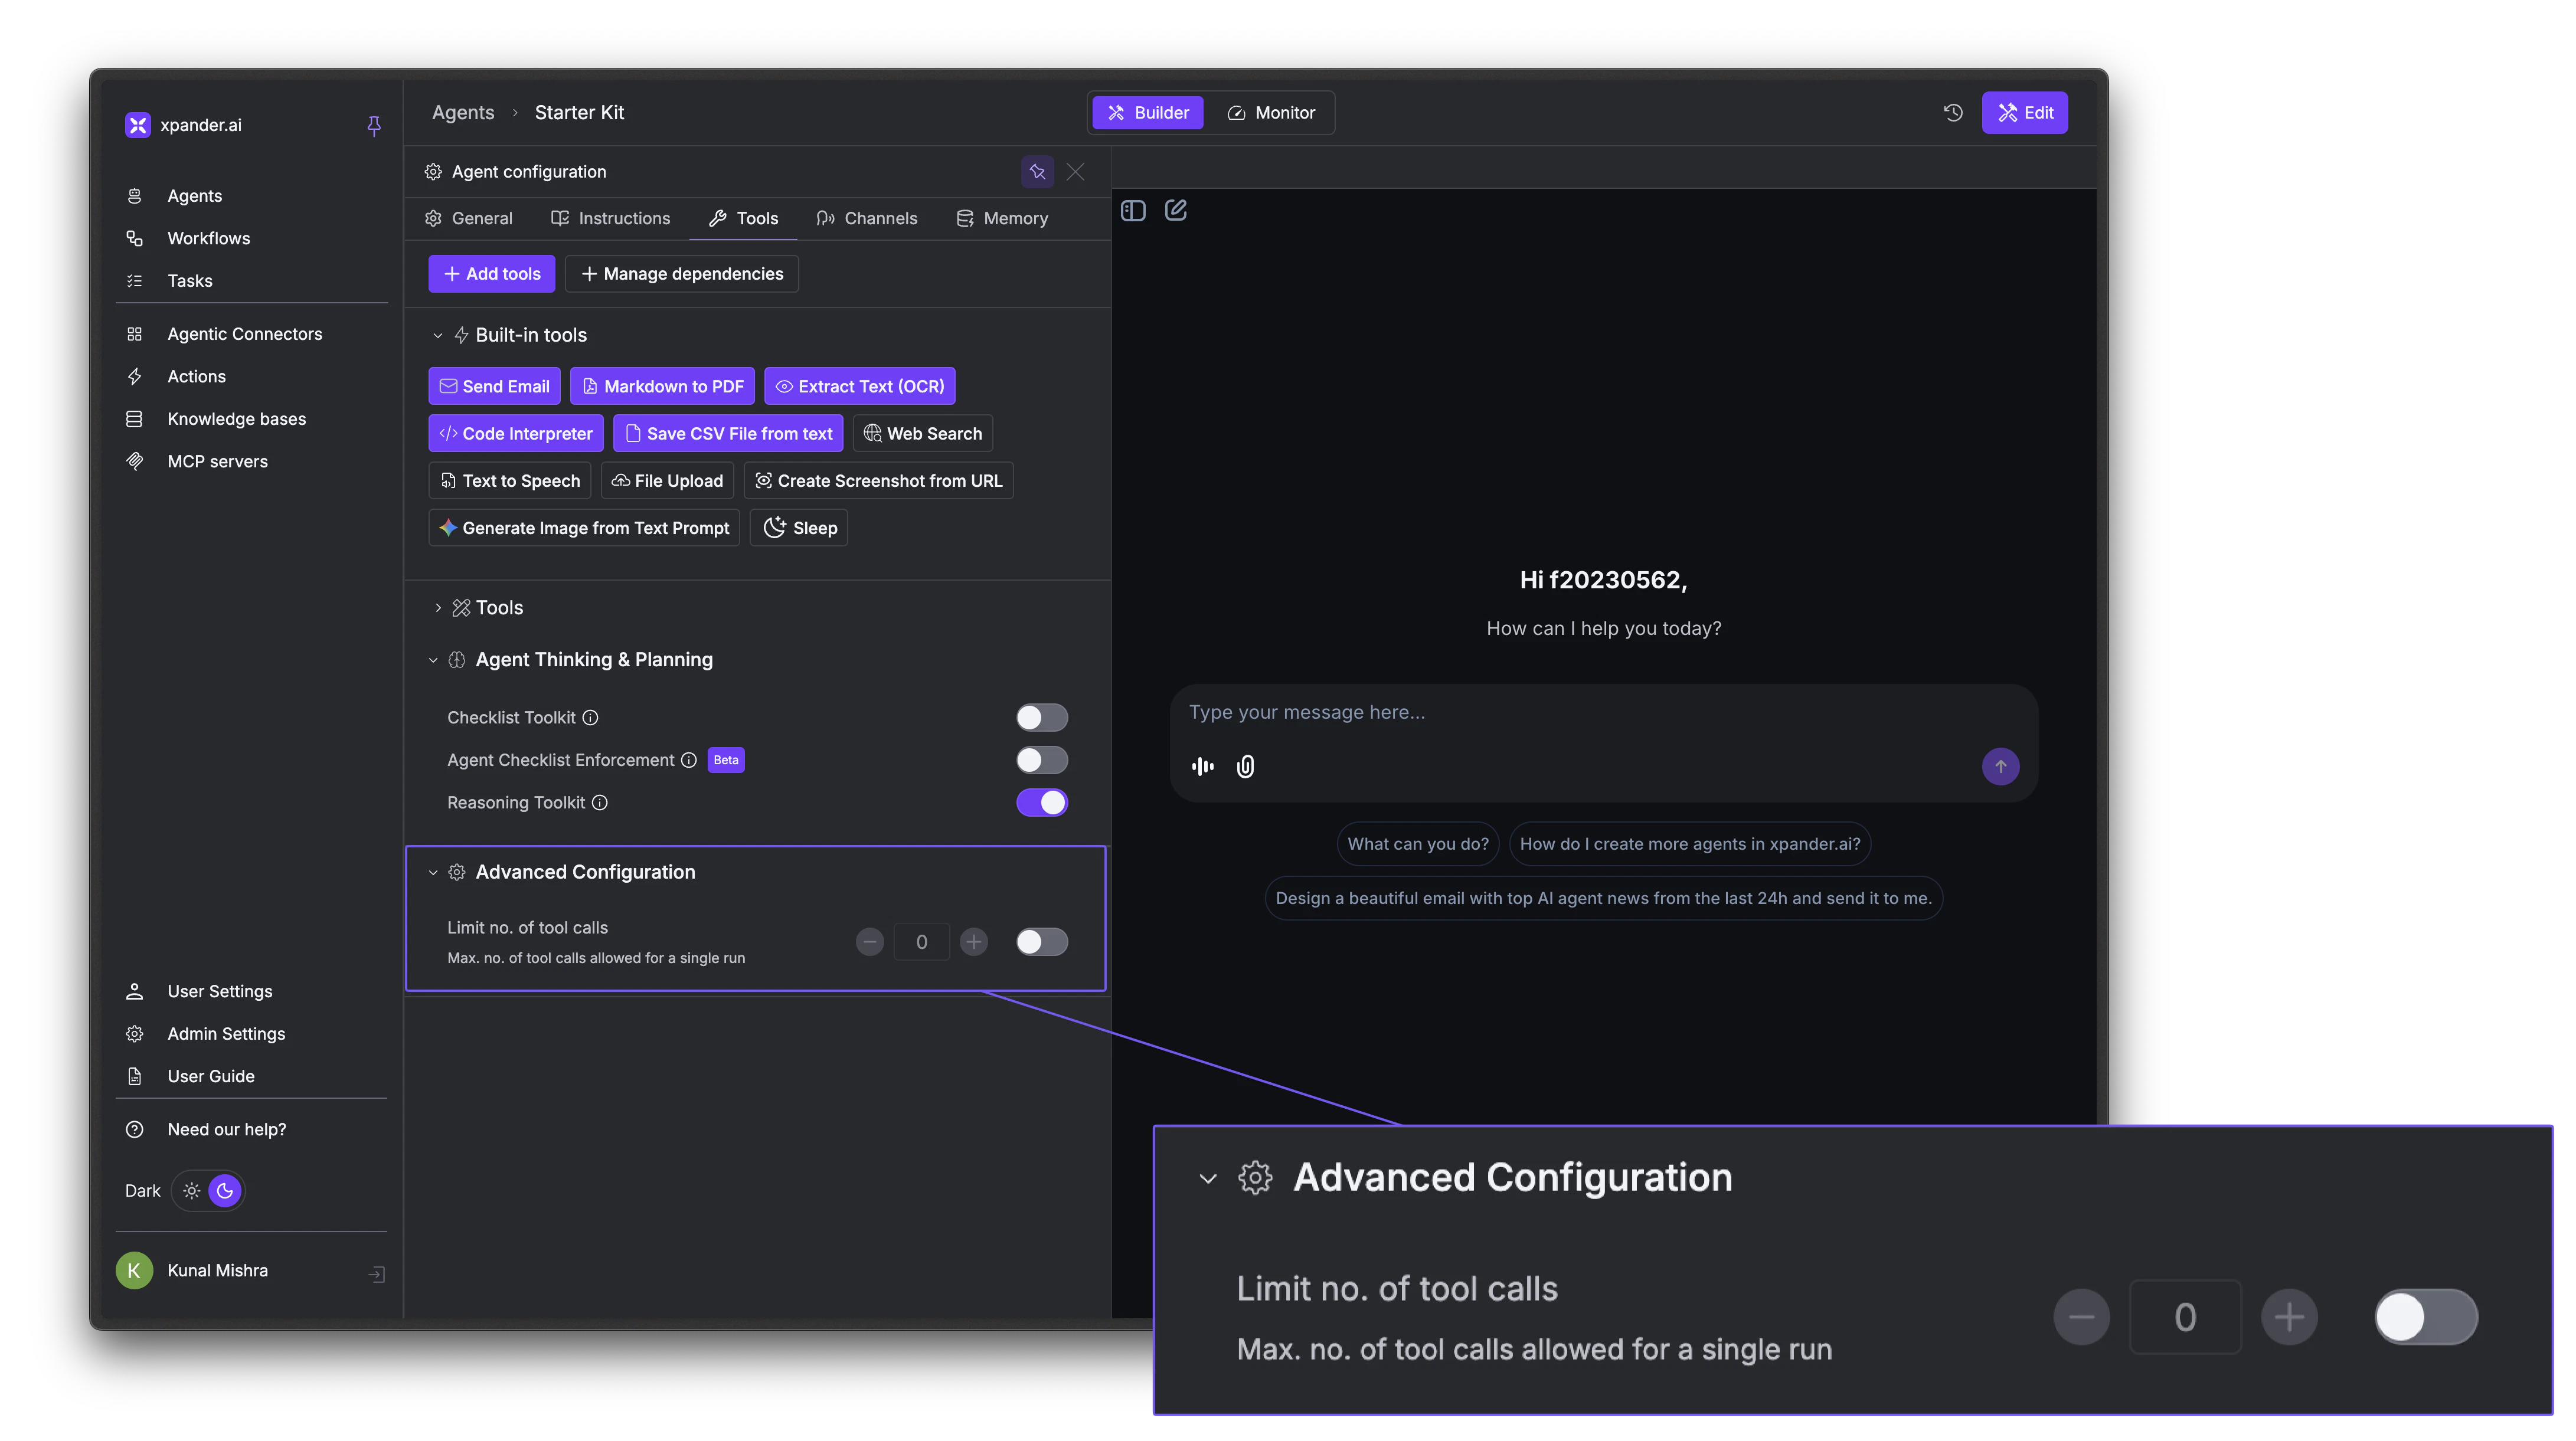 Reasoning Mode produces higher-quality answers at the cost of speed and tokens. Use it selectively for tasks where accuracy matters more than speed.
## Multi-Agent Orchestration
Your agent can call other agents in your workspace to handle specialized tasks.
Instead of building one agent that does everything, you can create focused agents and connect them together.
For example: create 3 specialized agents: a research agent, a writing agent, a data analysis agent. Each has its own knowledge bases, tool connections, and system prompts. Then create a primary agent that delegates work to whichever specialist is best suited.
In the Agent Studio, scroll down to the **Multi-Agent** section and expand it.
Click **+ Attach agents**. A panel opens showing all agents in your workspace. Select the agents you want this agent to be able to call.
Click **+ Add to agent** to confirm. The attached agents now appear as available tools the primary agent can invoke during execution.
Reasoning Mode produces higher-quality answers at the cost of speed and tokens. Use it selectively for tasks where accuracy matters more than speed.
## Multi-Agent Orchestration
Your agent can call other agents in your workspace to handle specialized tasks.
Instead of building one agent that does everything, you can create focused agents and connect them together.
For example: create 3 specialized agents: a research agent, a writing agent, a data analysis agent. Each has its own knowledge bases, tool connections, and system prompts. Then create a primary agent that delegates work to whichever specialist is best suited.
In the Agent Studio, scroll down to the **Multi-Agent** section and expand it.
Click **+ Attach agents**. A panel opens showing all agents in your workspace. Select the agents you want this agent to be able to call.
Click **+ Add to agent** to confirm. The attached agents now appear as available tools the primary agent can invoke during execution.
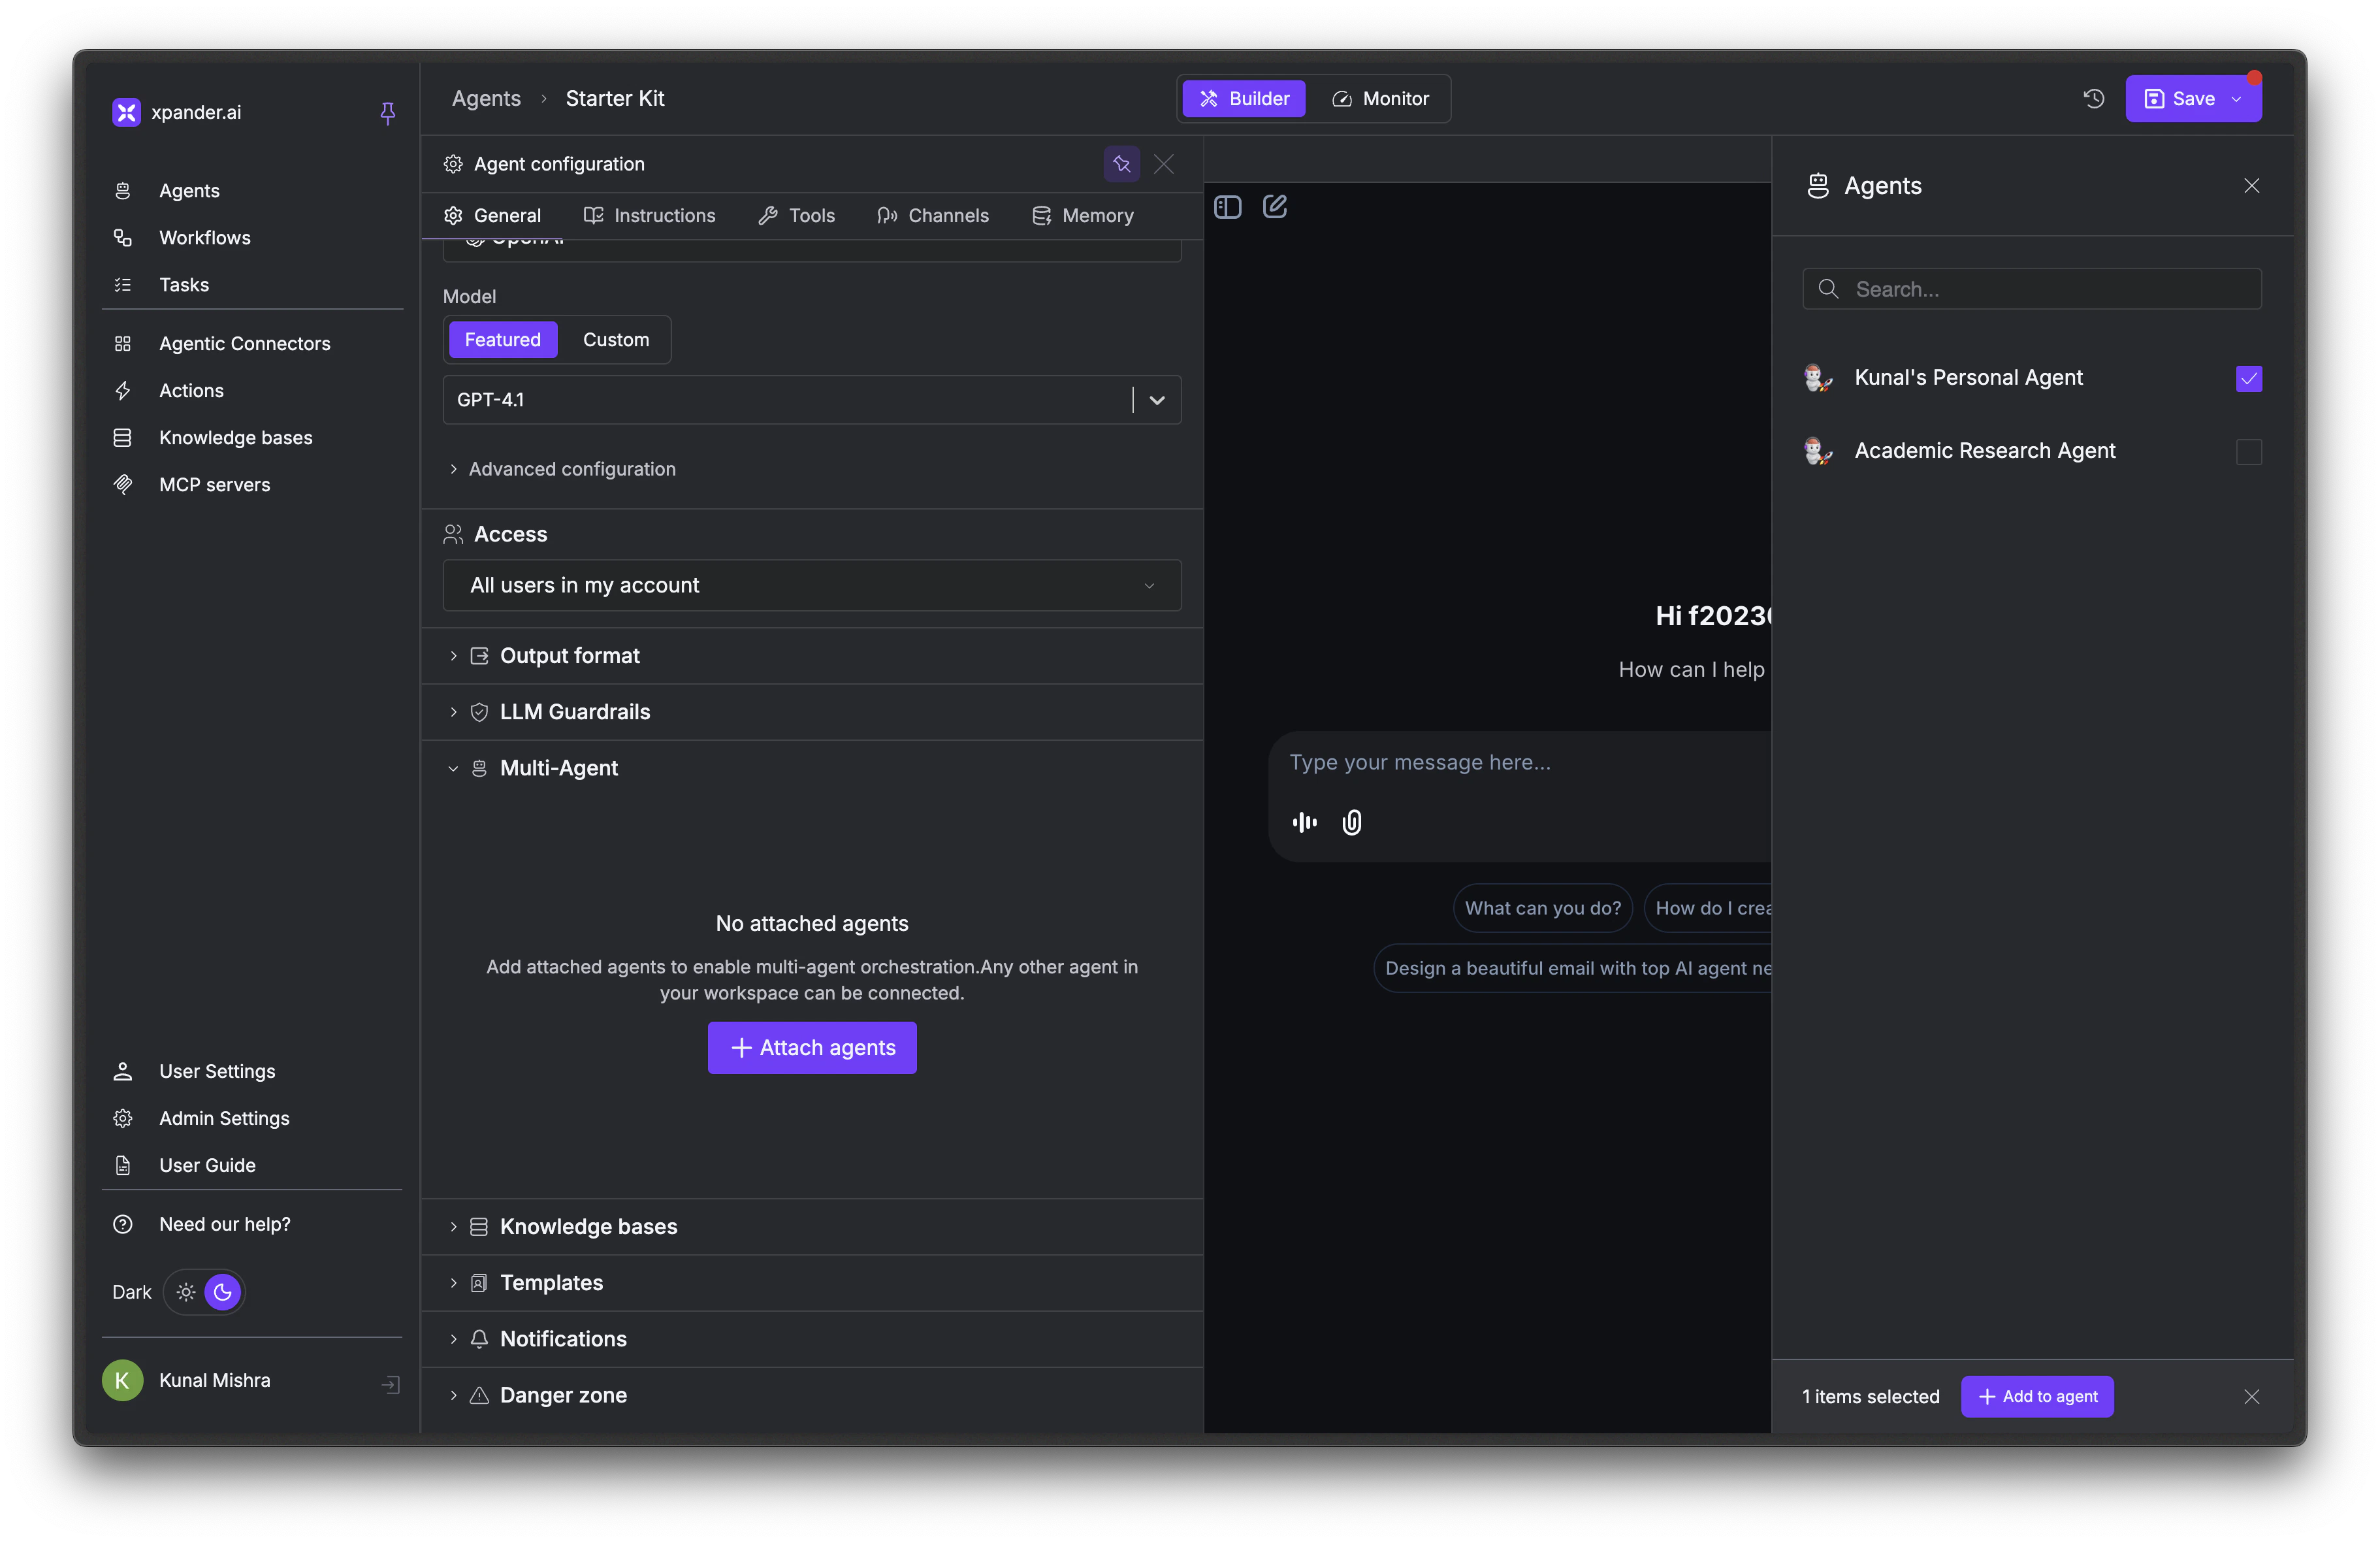 Once attached, the primary agent can decide when to delegate a task to another agent based on its instructions and the nature of the request. Each sub-agent runs independently with its own tools, memory, and configuration, and can even have its own planning checklist if Planning Mode is enabled.
Sub-agent executions are tracked separately in the Monitor tab, so you can drill into any agent's run to see exactly what it did.
## LLM Guardrails
Safety checks applied to user input and model output before and during each run. Configure them under the **LLM Guardrails** section in the Agent Studio **General** tab.
Once attached, the primary agent can decide when to delegate a task to another agent based on its instructions and the nature of the request. Each sub-agent runs independently with its own tools, memory, and configuration, and can even have its own planning checklist if Planning Mode is enabled.
Sub-agent executions are tracked separately in the Monitor tab, so you can drill into any agent's run to see exactly what it did.
## LLM Guardrails
Safety checks applied to user input and model output before and during each run. Configure them under the **LLM Guardrails** section in the Agent Studio **General** tab.
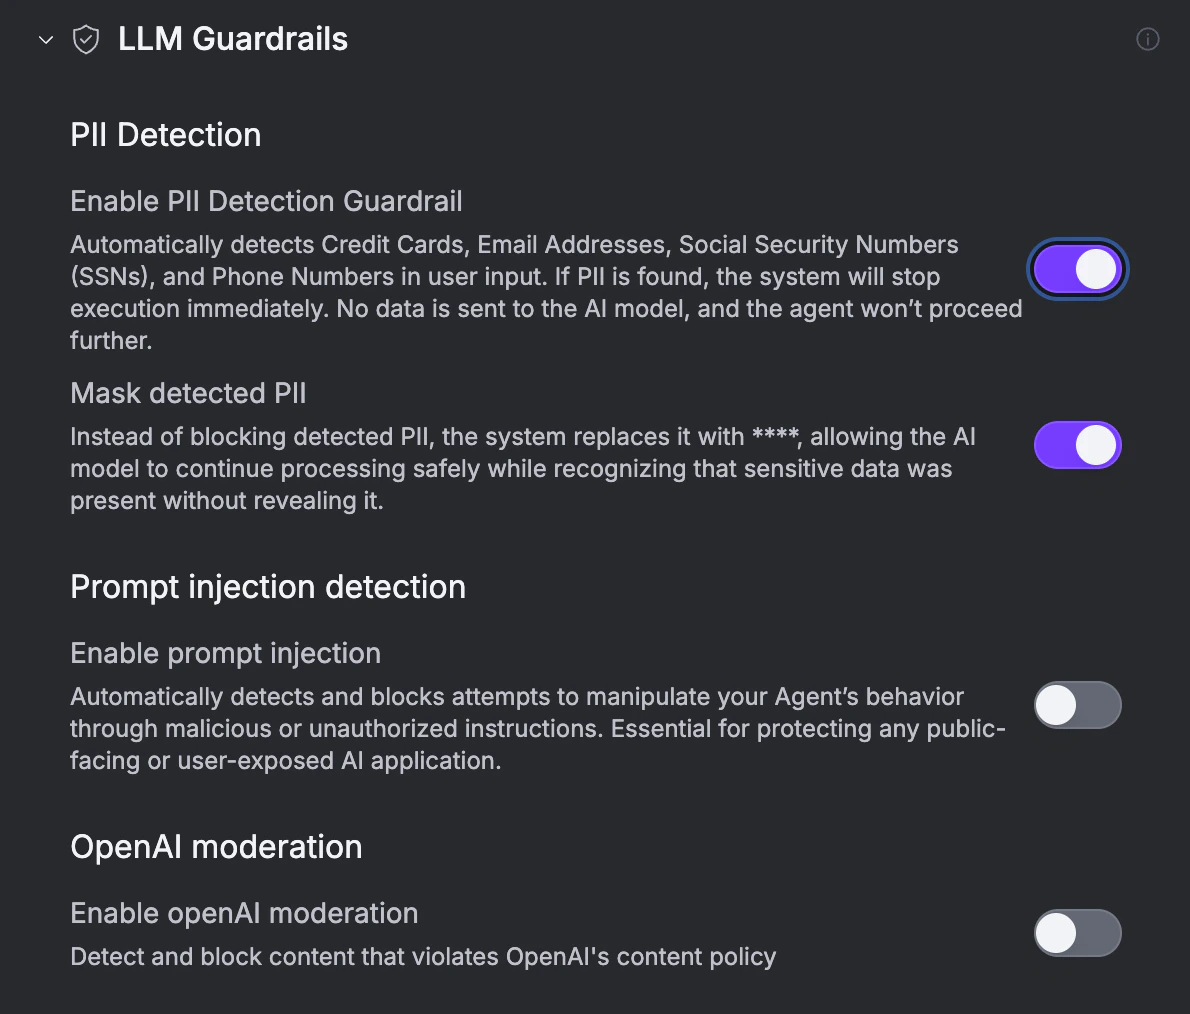 | Guardrail | What it does |
| ------------------------------ | ------------------------------------------------------------------------------------------------- |
| **PII Detection** | Block runs when user input contains credit cards, emails, SSNs, or phone numbers. |
| **Mask detected PII** | Replace PII with `****` instead of blocking. |
| **Prompt injection detection** | Block attempts to manipulate the agent's behavior through malicious or unauthorized instructions. |
| **OpenAI moderation** | Block content that violates OpenAI's content policy. |
Turn on **Prompt injection detection** for any agent exposed to public or untrusted users. Use **Mask detected PII** instead of blocking when you want the agent to keep working without ever seeing the raw sensitive data.
## Next Steps
Test model behavior and intelligence features
Give your agent actions to take
Configure what your agent remembers
Publish and connect to channels
| Guardrail | What it does |
| ------------------------------ | ------------------------------------------------------------------------------------------------- |
| **PII Detection** | Block runs when user input contains credit cards, emails, SSNs, or phone numbers. |
| **Mask detected PII** | Replace PII with `****` instead of blocking. |
| **Prompt injection detection** | Block attempts to manipulate the agent's behavior through malicious or unauthorized instructions. |
| **OpenAI moderation** | Block content that violates OpenAI's content policy. |
Turn on **Prompt injection detection** for any agent exposed to public or untrusted users. Use **Mask detected PII** instead of blocking when you want the agent to keep working without ever seeing the raw sensitive data.
## Next Steps
Test model behavior and intelligence features
Give your agent actions to take
Configure what your agent remembers
Publish and connect to channels