> ## Documentation Index
> Fetch the complete documentation index at: https://docs.xpander.ai/llms.txt
> Use this file to discover all available pages before exploring further.
# Workflow Canvas
> Add nodes, wire them into a pipeline, and use the save-and-publish cycle to deploy versioned workflows.
The canvas is the workspace where you build workflow pipelines. Triggers on the left, processing logic in the middle, outputs on the right. This page covers placing nodes, testing, and the save-and-publish cycle.
**Canvas vs. node configuration:** This page covers the canvas workspace. For configuring individual node types (writing instructions, selecting tools, setting up classification groups), see [Agent Nodes](/guides/building-workflows/agent-nodes), [Action Nodes](/guides/building-workflows/action-nodes), and [Flow Control](/guides/building-workflows/flow-control).
## Canvas layout
Every workflow flows left to right: a **START block** on the left, an **END block** on the right, and a purple connection line between them. Events enter from the left, pass through each node in sequence, and exit as output on the right.
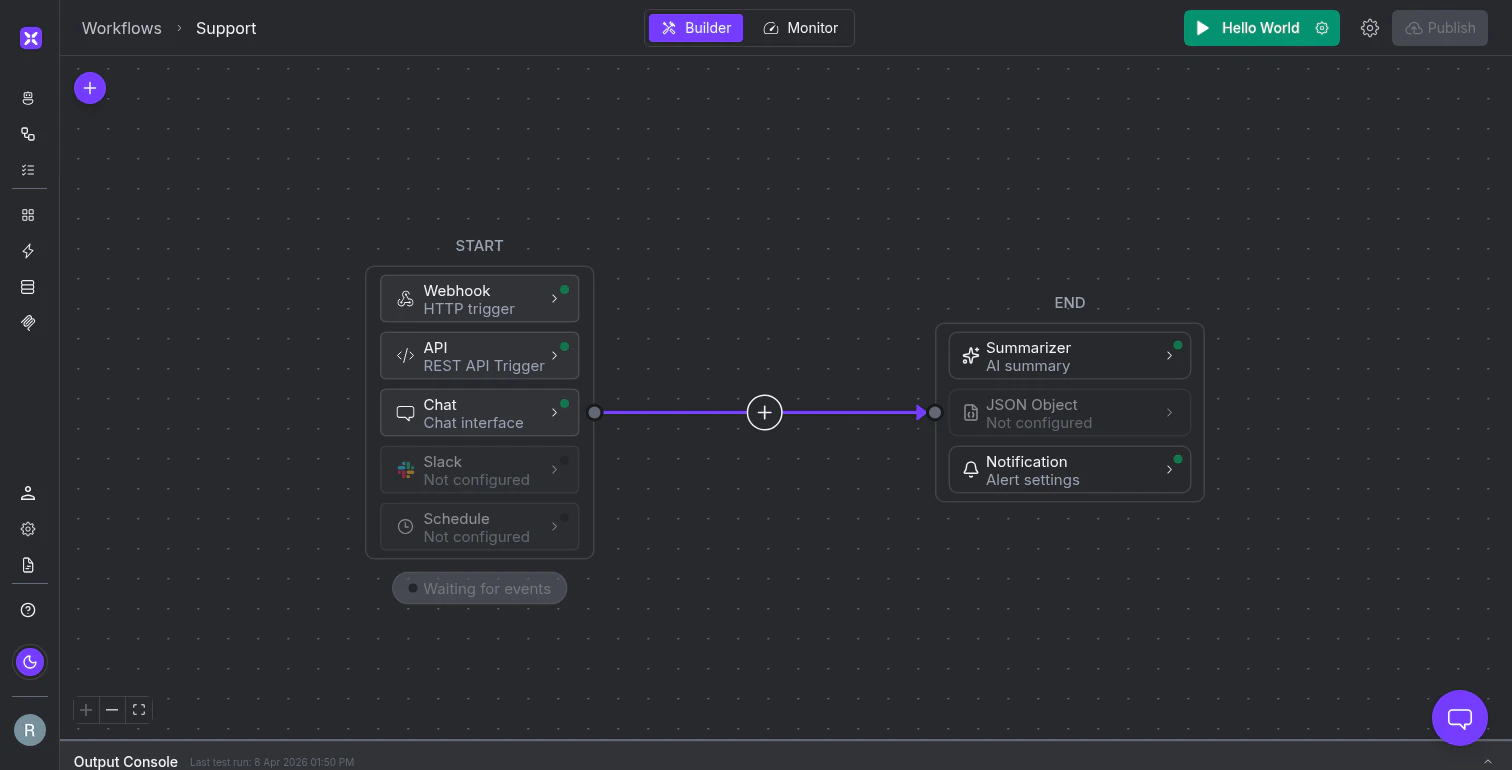 The **START block** stacks five trigger types vertically (Webhook, API, Chat, Slack, Schedule). Each row shows a green dot when enabled and a badge below counts active triggers ("3 events").
The **END block** stacks three output options:
* A **Summarizer** for natural language digests
* A **JSON Object** for structured data against a schema
* **Notifications** for emails or webhooks on success or failure
When a node branches (Classifier, Condition, Guardrail), the canvas expands vertically to show parallel paths, but the left-to-right direction stays the same.
## Add nodes
Click the **+** button on any connection line to open the node picker. It organizes 15 node types into three categories.
**Agents** use AI to reason about data:
| Node | What it does |
| -------------- | ------------------------------------------------------- |
| **Agent** | Full AI agent with tool access for multi-step reasoning |
| **Classifier** | Routes inputs to different branches based on meaning |
| **Summarizer** | Condenses or extracts from content |
**Actions** run deterministic operations without an LLM:
| Node | What it does |
| ------------------- | ----------------------------------------------------------------- |
| **Action** | Invokes a connector tool (Salesforce, GitHub, Slack, 2,000+ more) |
| **Workflow** | Nests a separate workflow as a sub-process |
| **Custom Function** | Executes a custom function you've defined |
| **Code** | Runs Python for calculations and transformations |
| **Email** | Sends an email |
| **OCR** | Extracts text from images |
| **Upload File** | Uploads a file to a destination |
**Flow** nodes control branching and execution:
| Node | What it does |
| --------------- | ------------------------------------------------------------------ |
| **Condition** | Splits flow based on values (contains, equals, regex, comparisons) |
| **Guardrail** | AI judge that validates output as Pass or Fail |
| **Wait** | Pauses for human approval before continuing |
| **Send to End** | Finishes the workflow immediately |
| **Parallel** | Runs child nodes concurrently and combines results |
| **Schedule** | Can schedule runs on new/existing nodes at a set frequency |
The **START block** stacks five trigger types vertically (Webhook, API, Chat, Slack, Schedule). Each row shows a green dot when enabled and a badge below counts active triggers ("3 events").
The **END block** stacks three output options:
* A **Summarizer** for natural language digests
* A **JSON Object** for structured data against a schema
* **Notifications** for emails or webhooks on success or failure
When a node branches (Classifier, Condition, Guardrail), the canvas expands vertically to show parallel paths, but the left-to-right direction stays the same.
## Add nodes
Click the **+** button on any connection line to open the node picker. It organizes 15 node types into three categories.
**Agents** use AI to reason about data:
| Node | What it does |
| -------------- | ------------------------------------------------------- |
| **Agent** | Full AI agent with tool access for multi-step reasoning |
| **Classifier** | Routes inputs to different branches based on meaning |
| **Summarizer** | Condenses or extracts from content |
**Actions** run deterministic operations without an LLM:
| Node | What it does |
| ------------------- | ----------------------------------------------------------------- |
| **Action** | Invokes a connector tool (Salesforce, GitHub, Slack, 2,000+ more) |
| **Workflow** | Nests a separate workflow as a sub-process |
| **Custom Function** | Executes a custom function you've defined |
| **Code** | Runs Python for calculations and transformations |
| **Email** | Sends an email |
| **OCR** | Extracts text from images |
| **Upload File** | Uploads a file to a destination |
**Flow** nodes control branching and execution:
| Node | What it does |
| --------------- | ------------------------------------------------------------------ |
| **Condition** | Splits flow based on values (contains, equals, regex, comparisons) |
| **Guardrail** | AI judge that validates output as Pass or Fail |
| **Wait** | Pauses for human approval before continuing |
| **Send to End** | Finishes the workflow immediately |
| **Parallel** | Runs child nodes concurrently and combines results |
| **Schedule** | Can schedule runs on new/existing nodes at a set frequency |
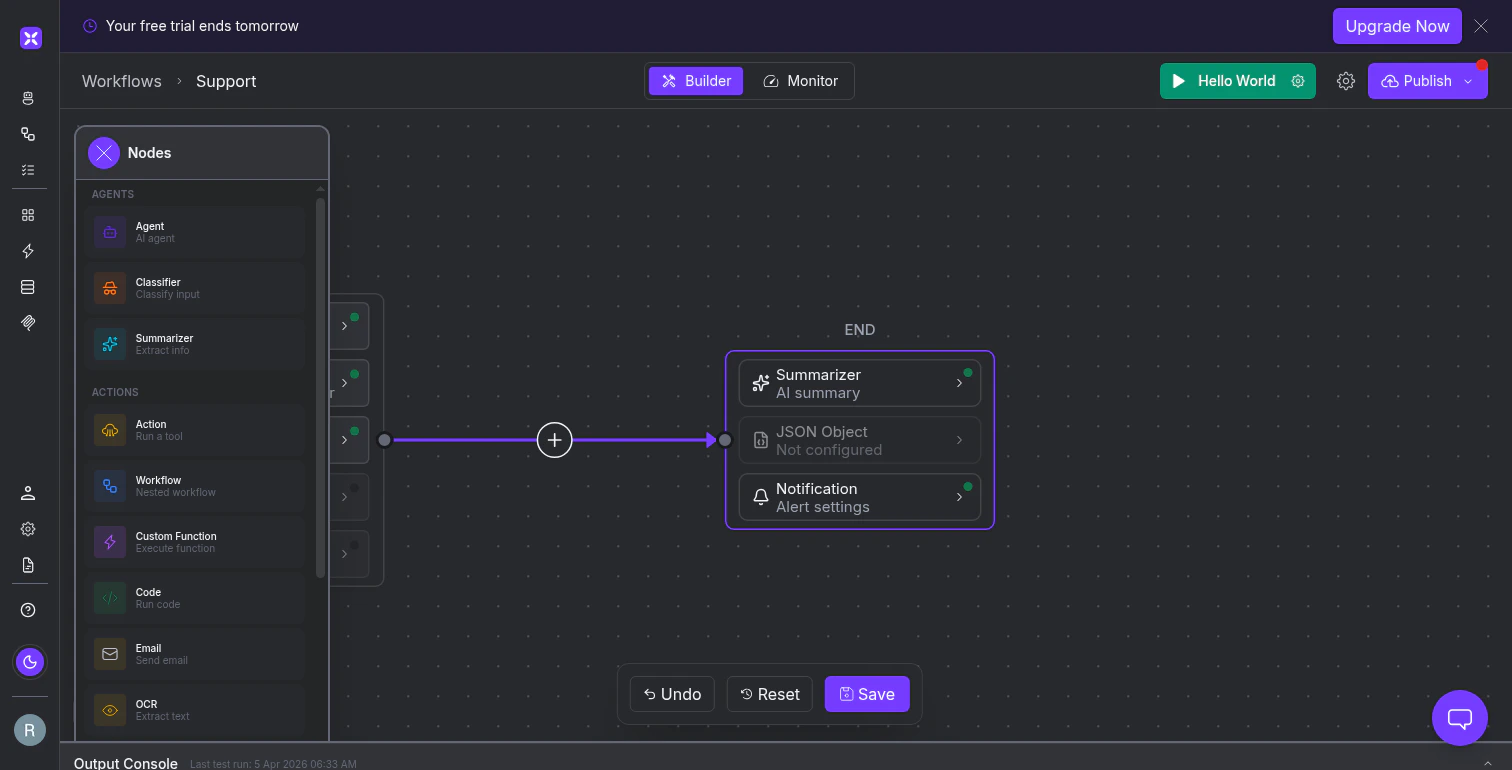 Clicking a node type inserts it at that position. A configuration panel opens on the right where you write instructions, select tools, or define conditions.
Every connection line between nodes has its own **+** button, so you can insert steps anywhere in the pipeline without rebuilding the flow.
Branching nodes (Classifier, Condition, Guardrail) automatically create output branches. A Classifier with "Billing," "Technical Support," and "Other" groups fans out into three branches, each with its own **+** buttons for adding downstream logic.
## Test workflows
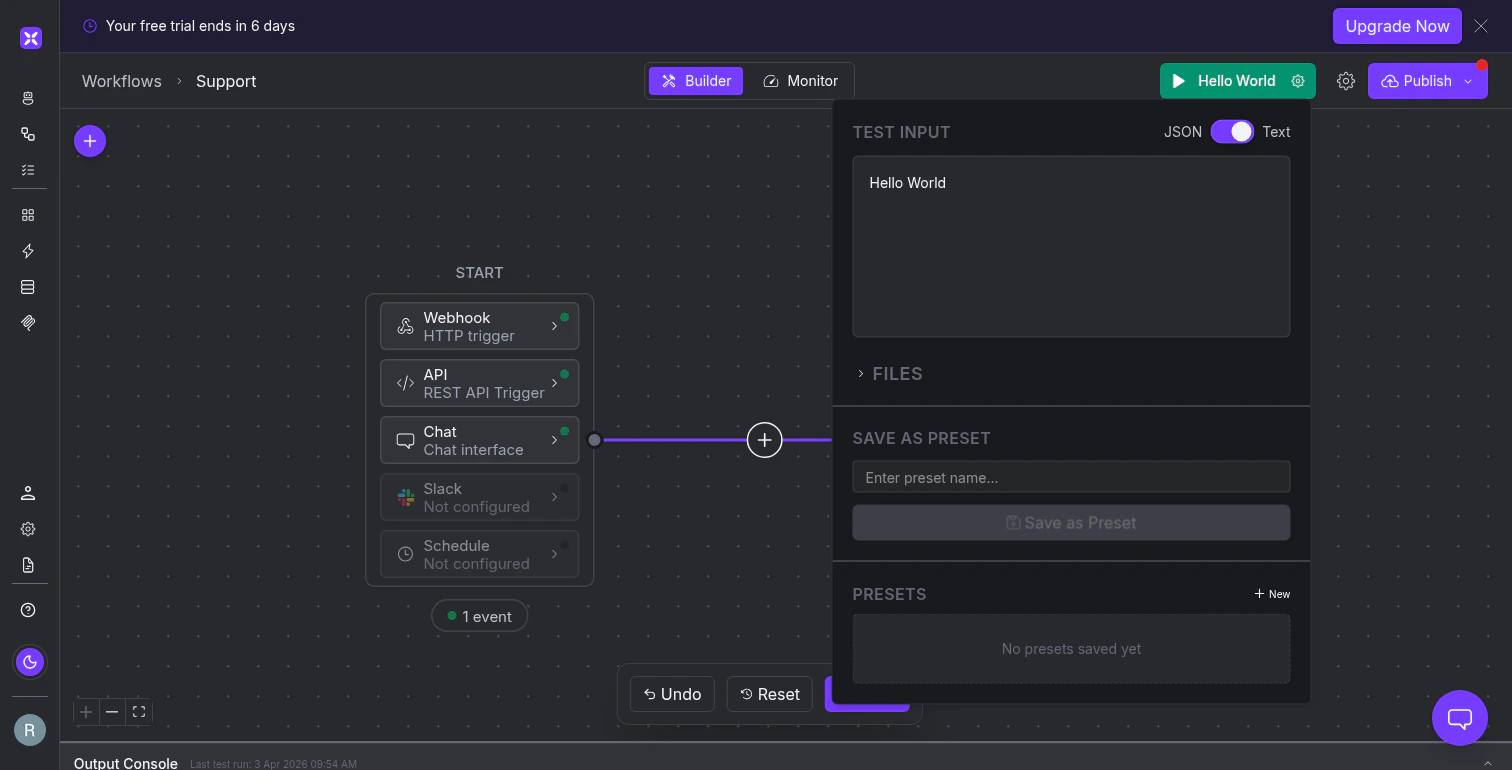
The top toolbar has a green **Run** button labeled with the active test preset name (e.g., "Hello World"). Click the gear icon next to it to configure your test payload: plain text or JSON, with optional file attachments.
Save named presets so you can re-run the same test cases quickly.
When a test starts, the **Output Console** appears at the bottom of the canvas showing real-time execution events: task creation, tool requests, tool results, and the final outcome. Click any entry to expand the full JSON payload.
Clicking a node type inserts it at that position. A configuration panel opens on the right where you write instructions, select tools, or define conditions.
Every connection line between nodes has its own **+** button, so you can insert steps anywhere in the pipeline without rebuilding the flow.
Branching nodes (Classifier, Condition, Guardrail) automatically create output branches. A Classifier with "Billing," "Technical Support," and "Other" groups fans out into three branches, each with its own **+** buttons for adding downstream logic.
## Test workflows
The top toolbar has a green **Run** button labeled with the active test preset name (e.g., "Hello World"). Click the gear icon next to it to configure your test payload: plain text or JSON, with optional file attachments.
Save named presets so you can re-run the same test cases quickly.
When a test starts, the **Output Console** appears at the bottom of the canvas showing real-time execution events: task creation, tool requests, tool results, and the final outcome. Click any entry to expand the full JSON payload.
 If your workflow handles different input shapes, create a preset for each one and cycle through them before publishing.
The top toolbar also has **Builder** and **Monitor** tabs. Builder is the canvas. Monitor shows execution history, logs, and metrics after the workflow has run.
## Save and publish
Changes are not saved automatically. When you modify anything, a floating toolbar appears at the bottom with **Undo**, **Reset**, and **Save**. It disappears once you save or reset.
If your workflow handles different input shapes, create a preset for each one and cycle through them before publishing.
The top toolbar also has **Builder** and **Monitor** tabs. Builder is the canvas. Monitor shows execution history, logs, and metrics after the workflow has run.
## Save and publish
Changes are not saved automatically. When you modify anything, a floating toolbar appears at the bottom with **Undo**, **Reset**, and **Save**. It disappears once you save or reset.
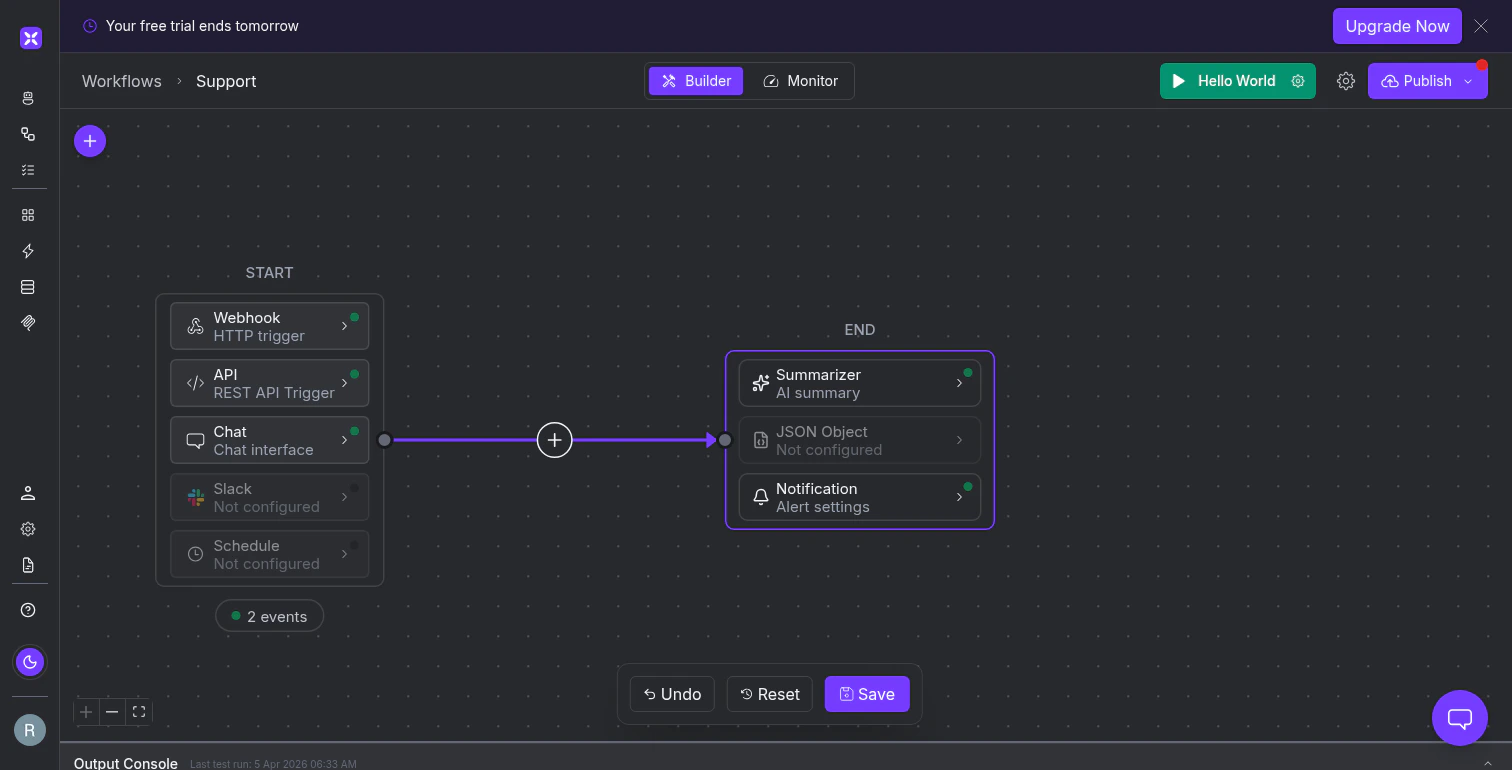 Saving stores your changes but does not deploy them. The live version that triggers run against stays unchanged until you publish. This lets you iterate without affecting production traffic.
The cycle:
1. Make changes on the canvas
2. **Save** using the floating toolbar
3. The **Publish** button in the top toolbar turns purple with a red dot
4. Click **Publish**, confirm the dialog, and the new version goes live
Each publish creates a new live version. All triggers (webhooks, schedules, API calls) immediately execute against it.
If something goes wrong, you can roll back to a previous version. The platform keeps immutable snapshots of every published version.
**Save vs. Publish:** Save is a checkpoint. Publish is a release. Save frequently as you work. Publish when the workflow is ready for production traffic. You can save many times between publishes, but only a publish pushes changes to the live version.
## What's next
Configure webhooks, schedules, API calls, and other trigger types in the START block.
Add AI-powered reasoning steps that query systems, classify inputs, and summarize results.
Run deterministic operations: tool invocations, code, email, and OCR.
Branch with conditions, validate with guardrails, and pause for human approval.
Saving stores your changes but does not deploy them. The live version that triggers run against stays unchanged until you publish. This lets you iterate without affecting production traffic.
The cycle:
1. Make changes on the canvas
2. **Save** using the floating toolbar
3. The **Publish** button in the top toolbar turns purple with a red dot
4. Click **Publish**, confirm the dialog, and the new version goes live
Each publish creates a new live version. All triggers (webhooks, schedules, API calls) immediately execute against it.
If something goes wrong, you can roll back to a previous version. The platform keeps immutable snapshots of every published version.
**Save vs. Publish:** Save is a checkpoint. Publish is a release. Save frequently as you work. Publish when the workflow is ready for production traffic. You can save many times between publishes, but only a publish pushes changes to the live version.
## What's next
Configure webhooks, schedules, API calls, and other trigger types in the START block.
Add AI-powered reasoning steps that query systems, classify inputs, and summarize results.
Run deterministic operations: tool invocations, code, email, and OCR.
Branch with conditions, validate with guardrails, and pause for human approval.