> ## Documentation Index
> Fetch the complete documentation index at: https://docs.xpander.ai/llms.txt
> Use this file to discover all available pages before exploring further.
# Flow Control
> Branch on values, validate with AI, pause for human approval, finish early, run steps in parallel or schedule runs at a set frequency.
Flow control nodes handle branching, validation, gating, and parallel execution. Six types are available.
**Flow control vs. Classifier:** The Classifier node (covered in [Agent Nodes](/guides/building-workflows/agent-nodes)) also branches a workflow, but it uses an LLM to understand the *meaning* of the input. Condition nodes branch on explicit data values. Use Classifiers for intent-based routing, Conditions for value-based branching.
## Branch on data values with Conditions
The Condition node splits your workflow into two paths based on a test you define: an IF branch for inputs that match, and an ELSE branch for everything that doesn't.
### Configure a Condition node
The Condition node opens as a floating dialog instead of a side panel.
 Configuration happens in two steps.
**Step 1** asks you to define the condition. Pick a **Condition Type** from the dropdown and enter a **Term** (the value to test against). The term field supports `{{variable}}` placeholders to reference data from previous workflow steps. Click **Next** once defined.
**Step 2** asks you to select the target node type for the IF branch, the node that runs when the condition matches. The ELSE branch connects to whatever comes next in the default flow.
Once placed on the canvas, clicking the IF branch opens an **Edit Condition** panel where you can change the condition type and term without rebuilding the node.
### The nine condition operators
| Category | Operator | What it checks |
| ----------------- | ----------------------- | ------------------------------------------ |
| **Text matching** | Contains | Input includes the term as a substring |
| | Regex | Input matches a regular expression pattern |
| **Comparison** | Equal (`==`) | Input exactly matches the term |
| | Not Equal (`!=`) | Input does not match the term |
| | Greater Than (`>`) | Input is numerically greater than the term |
| | Less Than (`<`) | Input is numerically less than the term |
| | Greater or Equal (`>=`) | Input is greater than or equal to the term |
| | Less or Equal (`<=`) | Input is less than or equal to the term |
| **Existence** | Not Empty | Input has any value (term is not required) |
Contains is the default. Switch to comparison operators for numeric thresholds, or use Regex for pattern matching more expressive than simple substring search.
## Validate output with Guardrails
The Guardrail node uses an AI judge to evaluate upstream output against criteria you define, then routes it down a **Pass** or **Fail** branch. Unlike the Condition node, which tests against fixed values, the Guardrail evaluates quality and correctness using natural language criteria.
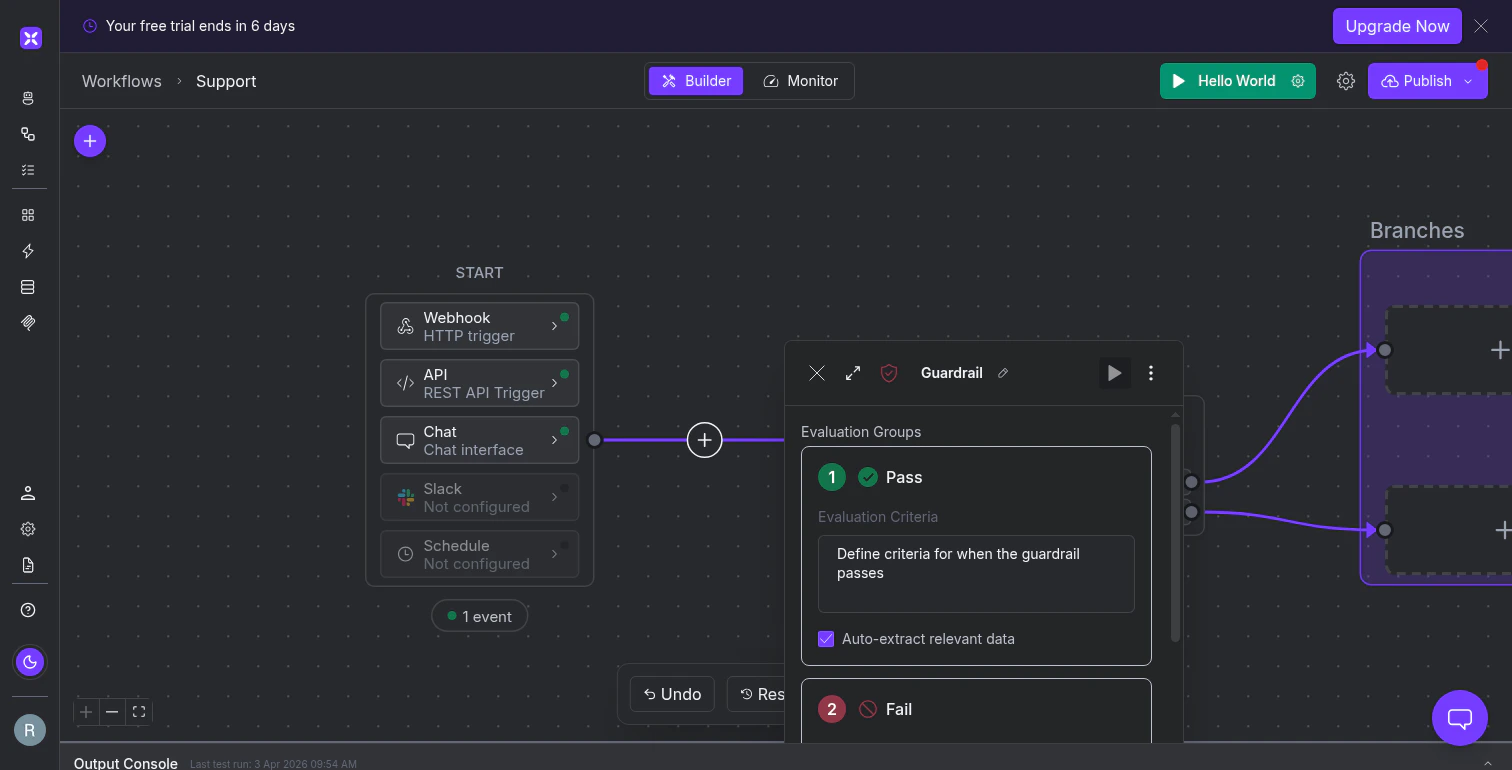
### Configure a Guardrail node
The Guardrail opens as a side panel with two fixed groups: **Pass** (green checkmark) and **Fail** (red circle). You cannot add or remove groups. Every Guardrail is a binary pass/fail gate.
For each group, write **Evaluation Criteria** in natural language:
```text theme={"dark"}
Pass criteria:
The response includes a specific dollar amount, references the
customer's account ID, and does not promise anything outside
our standard refund policy.
Fail criteria:
The response is vague about the refund amount, references a
different customer's information, or makes commitments that
exceed our refund policy limits.
```
The **Auto-extract relevant data** checkbox (on by default) tells the Guardrail to pull out the data points that informed its decision and pass them downstream. The next node receives a focused extraction, not the raw input.
Configuration happens in two steps.
**Step 1** asks you to define the condition. Pick a **Condition Type** from the dropdown and enter a **Term** (the value to test against). The term field supports `{{variable}}` placeholders to reference data from previous workflow steps. Click **Next** once defined.
**Step 2** asks you to select the target node type for the IF branch, the node that runs when the condition matches. The ELSE branch connects to whatever comes next in the default flow.
Once placed on the canvas, clicking the IF branch opens an **Edit Condition** panel where you can change the condition type and term without rebuilding the node.
### The nine condition operators
| Category | Operator | What it checks |
| ----------------- | ----------------------- | ------------------------------------------ |
| **Text matching** | Contains | Input includes the term as a substring |
| | Regex | Input matches a regular expression pattern |
| **Comparison** | Equal (`==`) | Input exactly matches the term |
| | Not Equal (`!=`) | Input does not match the term |
| | Greater Than (`>`) | Input is numerically greater than the term |
| | Less Than (`<`) | Input is numerically less than the term |
| | Greater or Equal (`>=`) | Input is greater than or equal to the term |
| | Less or Equal (`<=`) | Input is less than or equal to the term |
| **Existence** | Not Empty | Input has any value (term is not required) |
Contains is the default. Switch to comparison operators for numeric thresholds, or use Regex for pattern matching more expressive than simple substring search.
## Validate output with Guardrails
The Guardrail node uses an AI judge to evaluate upstream output against criteria you define, then routes it down a **Pass** or **Fail** branch. Unlike the Condition node, which tests against fixed values, the Guardrail evaluates quality and correctness using natural language criteria.
### Configure a Guardrail node
The Guardrail opens as a side panel with two fixed groups: **Pass** (green checkmark) and **Fail** (red circle). You cannot add or remove groups. Every Guardrail is a binary pass/fail gate.
For each group, write **Evaluation Criteria** in natural language:
```text theme={"dark"}
Pass criteria:
The response includes a specific dollar amount, references the
customer's account ID, and does not promise anything outside
our standard refund policy.
Fail criteria:
The response is vague about the refund amount, references a
different customer's information, or makes commitments that
exceed our refund policy limits.
```
The **Auto-extract relevant data** checkbox (on by default) tells the Guardrail to pull out the data points that informed its decision and pass them downstream. The next node receives a focused extraction, not the raw input.
 The Guardrail has its own **LLM settings**, independent of any agent in your workflow. You can choose the provider and model. A capable model like Claude Sonnet 4.6 works well for nuanced quality checks, while simpler pass/fail criteria might work with a lighter model.
Use the **Additional instructions** field and **+ Add example** button to provide sample inputs with expected outcomes, which improves evaluation accuracy on edge cases.
## Pause for human approval with Wait
The Wait node pauses the workflow and sends a notification to a person (or group) to approve or deny before execution continues. The recipient gets an email with context and two buttons: **Approve** (resumes the workflow) and **Deny** (stops it).
The Guardrail has its own **LLM settings**, independent of any agent in your workflow. You can choose the provider and model. A capable model like Claude Sonnet 4.6 works well for nuanced quality checks, while simpler pass/fail criteria might work with a lighter model.
Use the **Additional instructions** field and **+ Add example** button to provide sample inputs with expected outcomes, which improves evaluation accuracy on edge cases.
## Pause for human approval with Wait
The Wait node pauses the workflow and sends a notification to a person (or group) to approve or deny before execution continues. The recipient gets an email with context and two buttons: **Approve** (resumes the workflow) and **Deny** (stops it).
 The notification defaults to **Email**. Add recipients, customize the subject and body (using `{title}` and `{content}` placeholders for workflow context, or `{{variable}}` for data from previous steps), and optionally relabel the approve/deny buttons.
A **Webhook** notification option is also available for routing approvals to your own system (an internal dashboard, a ticketing tool, or a custom approval system) instead of email.
## Stop the workflow early with Send to End
The notification defaults to **Email**. Add recipients, customize the subject and body (using `{title}` and `{content}` placeholders for workflow context, or `{{variable}}` for data from previous steps), and optionally relabel the approve/deny buttons.
A **Webhook** notification option is also available for routing approvals to your own system (an internal dashboard, a ticketing tool, or a custom approval system) instead of email.
## Stop the workflow early with Send to End
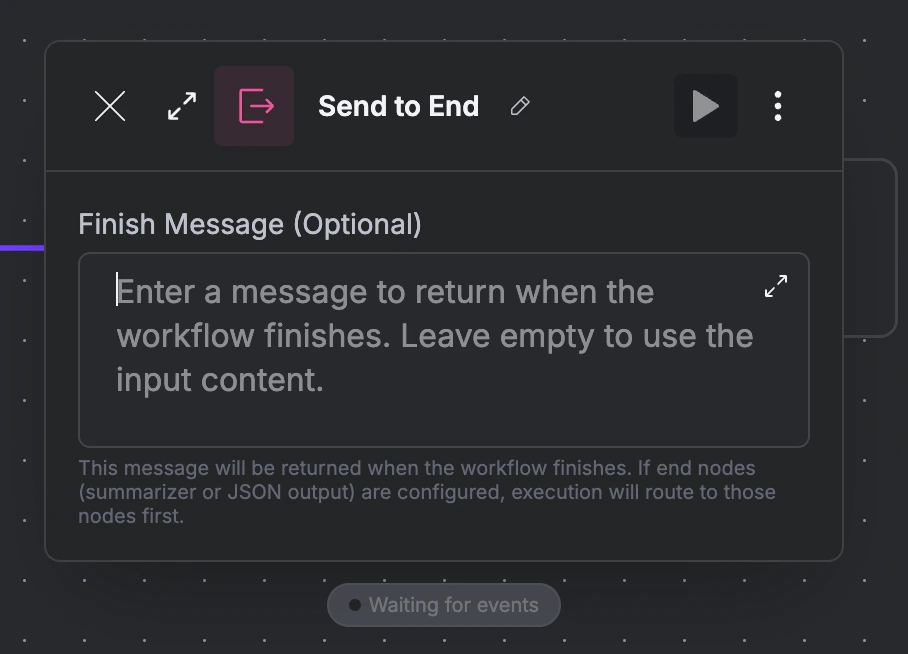 The Send to End node immediately finishes the workflow from wherever it sits in the flow. The only configuration is an optional **Finish Message** that becomes the workflow's output. If left empty, the workflow returns whatever the previous step produced.
If your END block has output nodes configured (a Summarizer or JSON output), the workflow routes through those nodes before finishing. Send to End triggers the endgame but respects the output pipeline you've defined.
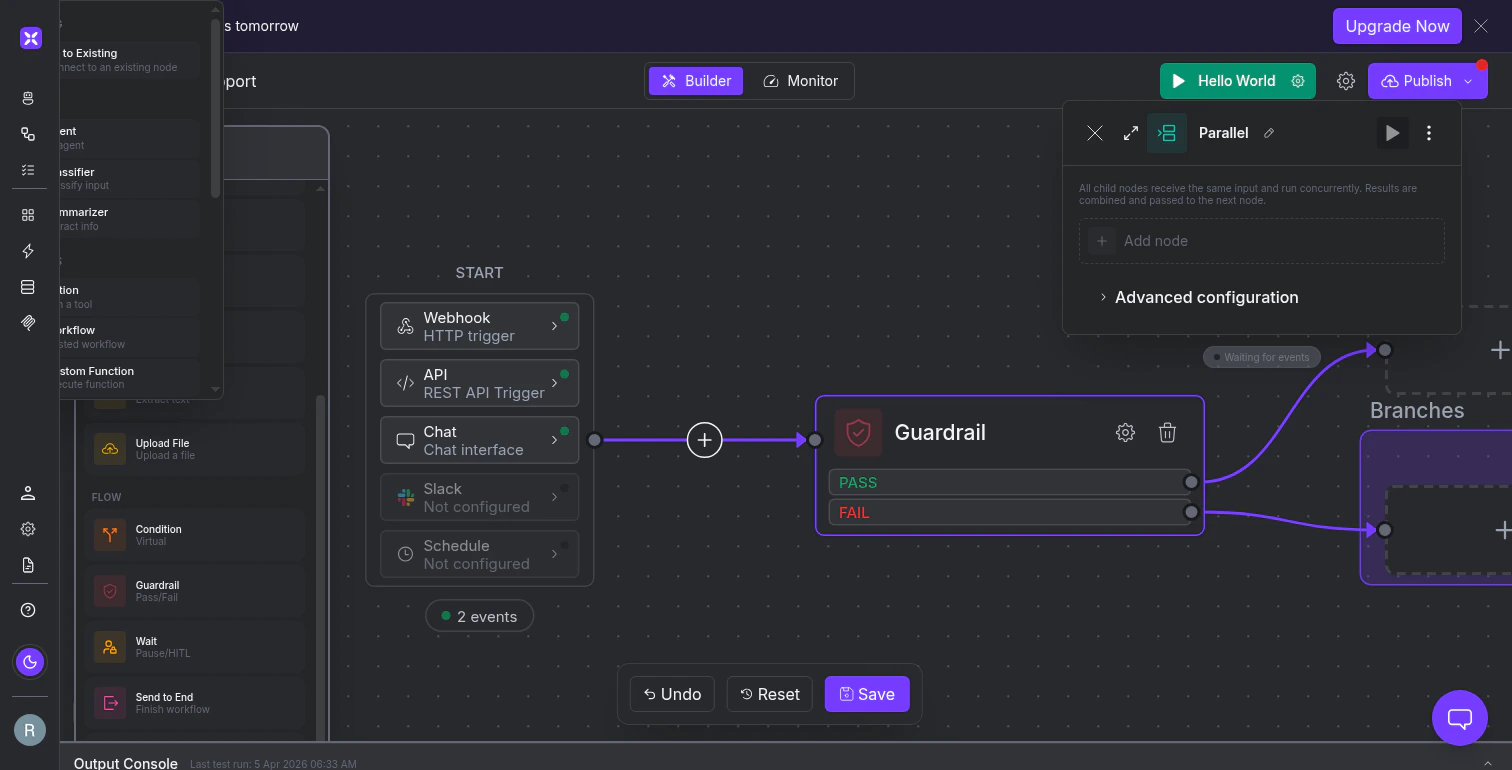
## Run steps concurrently with Parallel
The Parallel node runs its child nodes concurrently and combines their results before passing them to the next step. Click **+ Add node** to add branches. All branches receive the same input and execute simultaneously.
The Send to End node immediately finishes the workflow from wherever it sits in the flow. The only configuration is an optional **Finish Message** that becomes the workflow's output. If left empty, the workflow returns whatever the previous step produced.
If your END block has output nodes configured (a Summarizer or JSON output), the workflow routes through those nodes before finishing. Send to End triggers the endgame but respects the output pipeline you've defined.
## Run steps concurrently with Parallel
The Parallel node runs its child nodes concurrently and combines their results before passing them to the next step. Click **+ Add node** to add branches. All branches receive the same input and execute simultaneously.
 ## Schedule runs with the Schedule node
The Schedule node resumes a workflow at a defined time or frequency. When triggered, it routes execution to any target node you choose - an Agent, Classifier, Condition, Summarizer, Custom Action or any other node in the workflow.
## Schedule runs with the Schedule node
The Schedule node resumes a workflow at a defined time or frequency. When triggered, it routes execution to any target node you choose - an Agent, Classifier, Condition, Summarizer, Custom Action or any other node in the workflow.
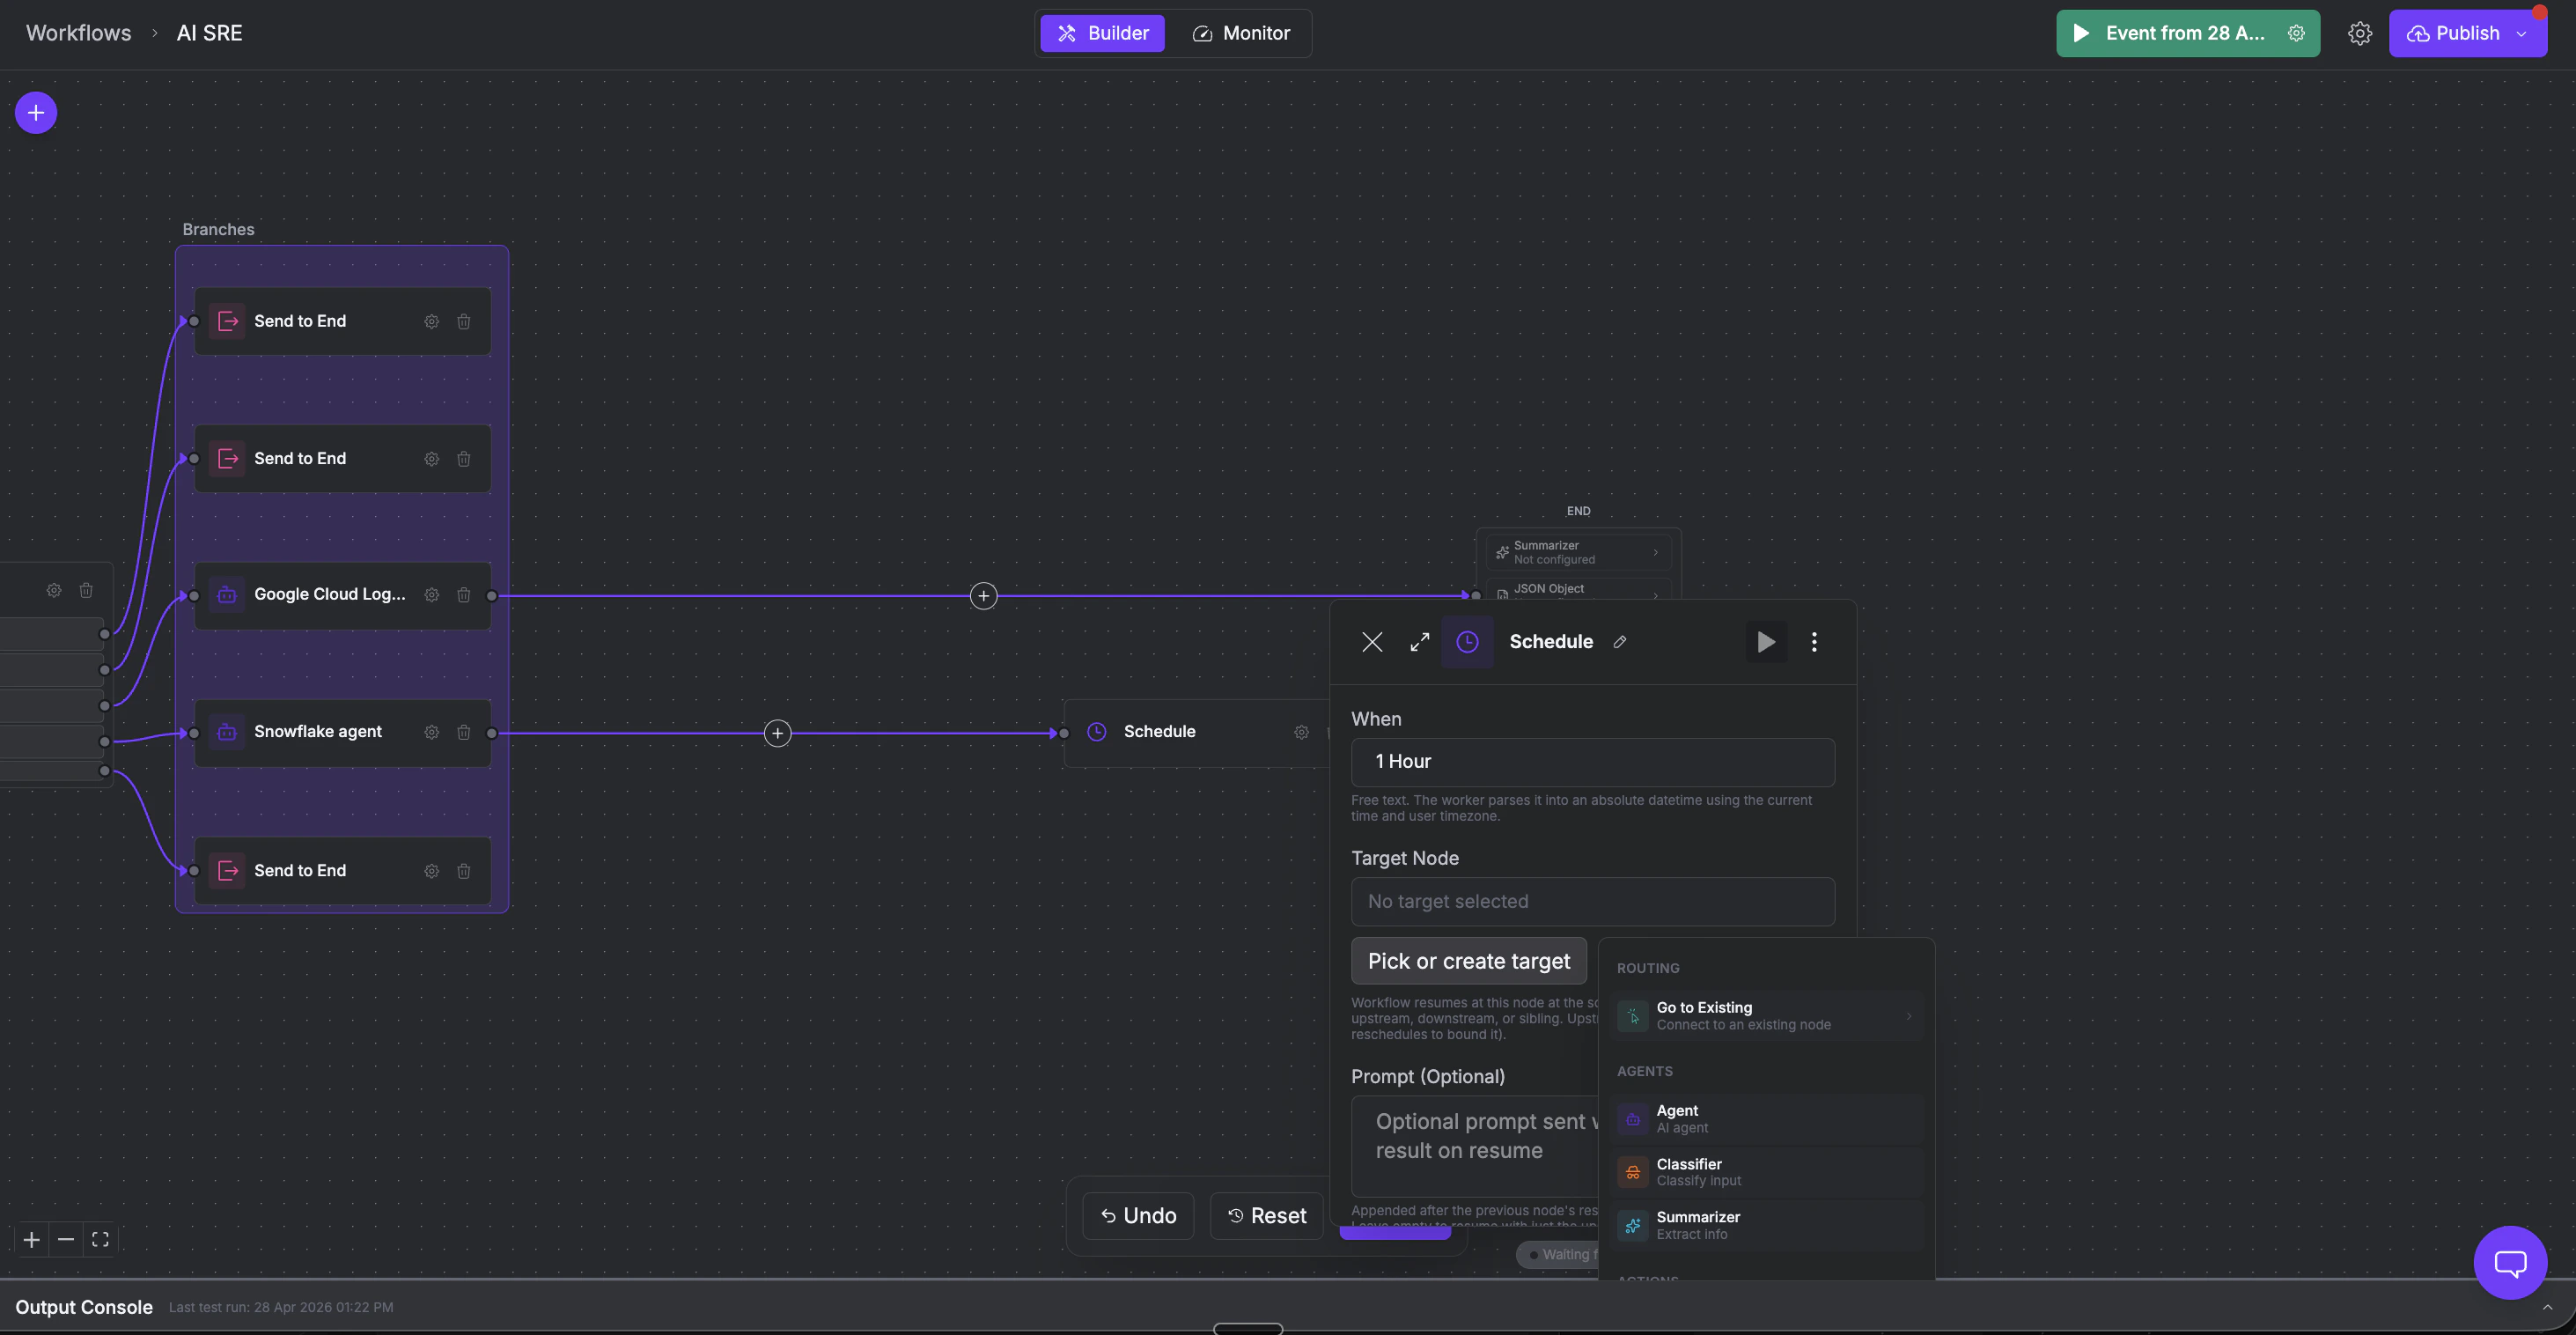 Configure it with two fields:
* **When** - a free-text time expression (e.g. "in 1 hour", "next Monday 9am", "tomorrow 14:00")
* **Target Node** - the node to resume execution at when the schedule fires
## Choosing the right flow control node
| Node | What it does | Decision made by | Branches |
| --------------- | ------------------------------------------------------- | ------------------------------------------------------------- | ----------------------------- |
| **Condition** | Splits flow based on a data test | Deterministic operator (contains, equals, greater than, etc.) | IF / ELSE |
| **Guardrail** | Validates output quality | AI judge evaluating natural language criteria | Pass / Fail |
| **Wait** | Pauses for human review | A person clicking Approve or Deny | Continues or stops |
| **Send to End** | Terminates the workflow early | Placement in the flow (always fires) | None (workflow ends) |
| **Parallel** | Runs steps concurrently | Placement in the flow (always fires) | N concurrent branches |
| **Schedule** | Resumes the workflow at a target node on a set schedule | A time expression (e.g. "in 1 hour", "next Monday 9am") | None (resumes at target node) |
Conditions test data values ("is this number above 500?"). Guardrails evaluate quality ("does this response meet our standards?"). If you can write the check as a comparison operator, use a Condition. If you need an LLM to judge whether something passes, use a Guardrail.
Wait and Guardrail both act as gates, but with different reviewers. A Guardrail uses AI for fast, consistent checks you can describe in criteria. A Wait node requires a human, necessary when regulations, contracts, or organizational policy demand a person sign off.
Use a Schedule node when you need a part of your workflow to run automatically at a future time or recurring interval, without any manual trigger.
## What's next
Persist state across workflow runs for delta detection and cross-run intelligence.
Save immutable snapshots of your workflow and roll back to previous versions.
Configure it with two fields:
* **When** - a free-text time expression (e.g. "in 1 hour", "next Monday 9am", "tomorrow 14:00")
* **Target Node** - the node to resume execution at when the schedule fires
## Choosing the right flow control node
| Node | What it does | Decision made by | Branches |
| --------------- | ------------------------------------------------------- | ------------------------------------------------------------- | ----------------------------- |
| **Condition** | Splits flow based on a data test | Deterministic operator (contains, equals, greater than, etc.) | IF / ELSE |
| **Guardrail** | Validates output quality | AI judge evaluating natural language criteria | Pass / Fail |
| **Wait** | Pauses for human review | A person clicking Approve or Deny | Continues or stops |
| **Send to End** | Terminates the workflow early | Placement in the flow (always fires) | None (workflow ends) |
| **Parallel** | Runs steps concurrently | Placement in the flow (always fires) | N concurrent branches |
| **Schedule** | Resumes the workflow at a target node on a set schedule | A time expression (e.g. "in 1 hour", "next Monday 9am") | None (resumes at target node) |
Conditions test data values ("is this number above 500?"). Guardrails evaluate quality ("does this response meet our standards?"). If you can write the check as a comparison operator, use a Condition. If you need an LLM to judge whether something passes, use a Guardrail.
Wait and Guardrail both act as gates, but with different reviewers. A Guardrail uses AI for fast, consistent checks you can describe in criteria. A Wait node requires a human, necessary when regulations, contracts, or organizational policy demand a person sign off.
Use a Schedule node when you need a part of your workflow to run automatically at a future time or recurring interval, without any manual trigger.
## What's next
Persist state across workflow runs for delta detection and cross-run intelligence.
Save immutable snapshots of your workflow and roll back to previous versions.