> ## Documentation Index
> Fetch the complete documentation index at: https://docs.xpander.ai/llms.txt
> Use this file to discover all available pages before exploring further.
# Log destinations
> Send a span for every request to your OpenTelemetry collector, such as Coralogix, Grafana, Honeycomb or Datadog, and a copy of every request record to your own S3, Google Cloud Storage or Azure bucket.
Request records always stay in your organization's own database. **Log destinations** sends a copy to your own systems as well: spans to an OpenTelemetry collector, and Parquet files to a storage bucket. Neither ever carries prompt or response text.
Open [Logs](https://platform.xpander.ai/governance/logs) and choose **Log destinations** in the table's toolbar. Make your changes and choose **Save changes**.
## OpenTelemetry
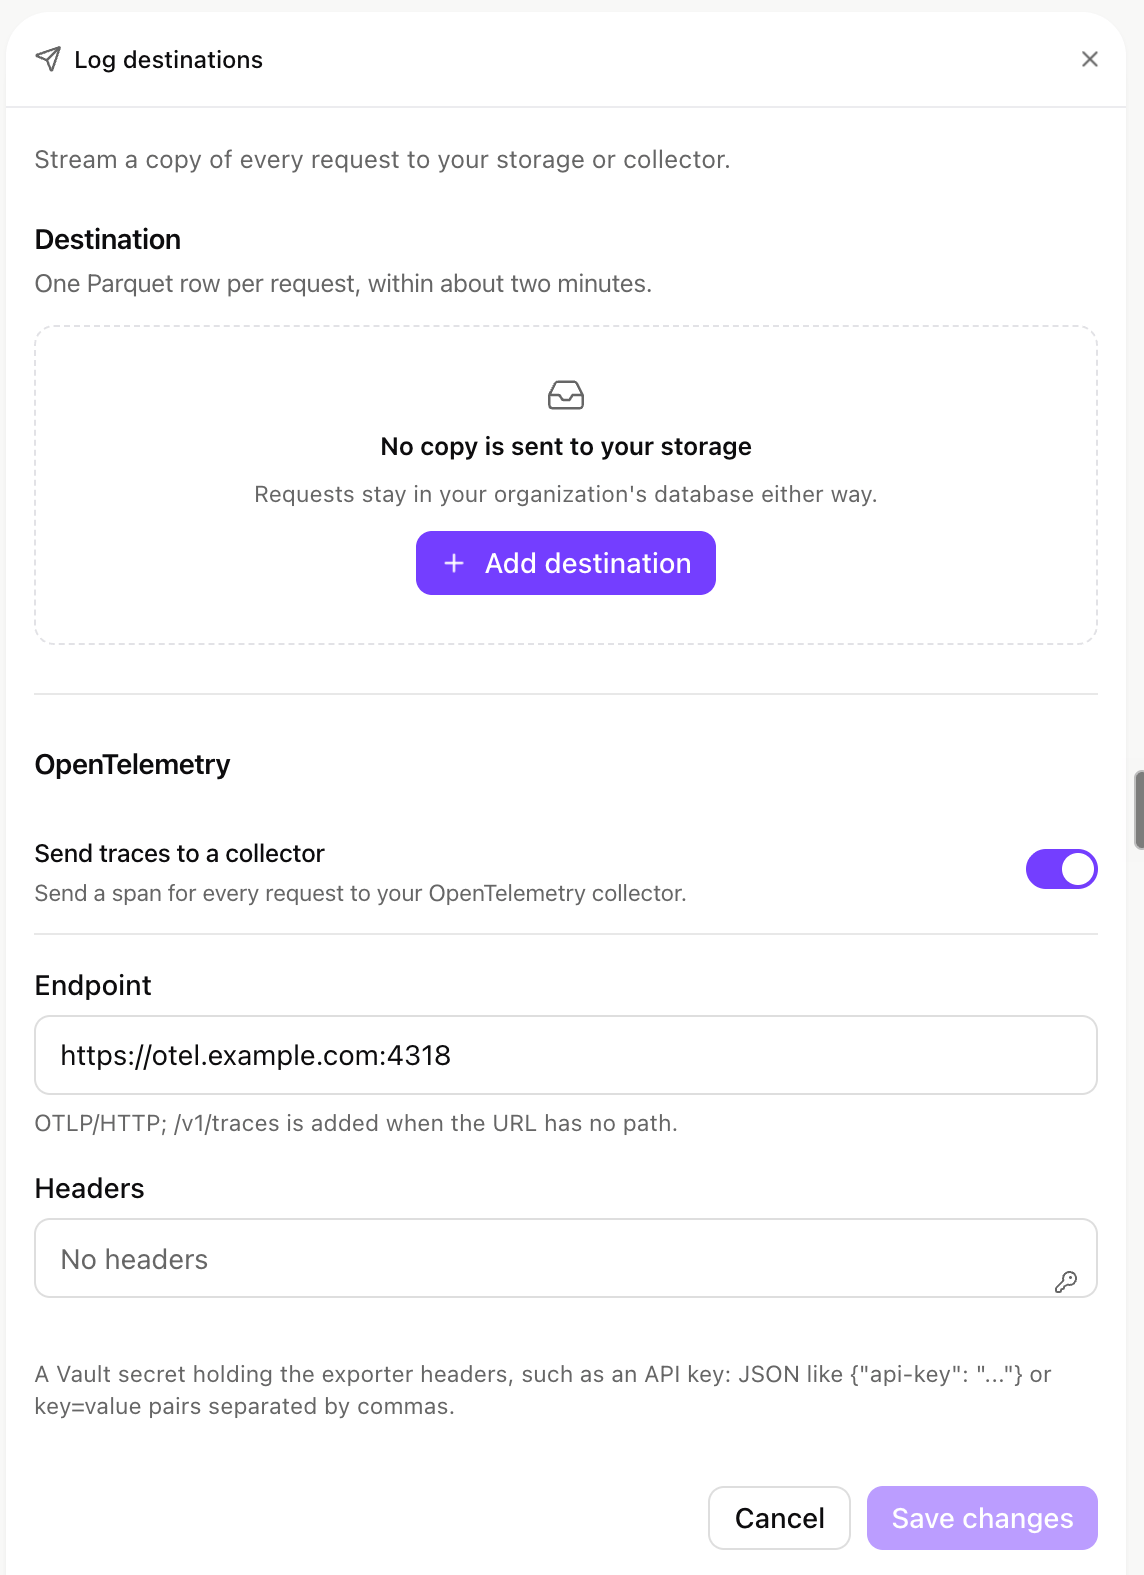 1. Store your collector's headers, such as its API key, as a secret in [Secrets](https://platform.xpander.ai/agents/secrets) (**Platform > Agents > Secrets**). The value is JSON, such as `{"api-key": "..."}`, or `key=value` pairs separated by commas.
2. In **Log destinations**, under **OpenTelemetry**, turn on **Send traces to a collector**.
3. Enter the collector's **Endpoint**. The gateway sends OTLP over HTTP (JSON), so use the collector's HTTP port, usually `4318`. `/v1/traces` is added when the URL has no path.
4. Under **Headers**, pick the secret from step 1.
5. Choose **Save changes**.
Only OTLP over HTTP is supported. A gRPC endpoint (usually port `4317`) receives nothing. If a collector was saved for gRPC, it shows *This collector was saved for gRPC*. Point the endpoint at the HTTP port and save again.
### What each span carries
One span per request, named with the OpenTelemetry GenAI conventions:
* the provider, the model asked for and the model that answered
* input, output, cache and reasoning tokens, and the cost in USD
* timings: start and end, time to first token and total time
* IDs: trace, person, group, agent, task and conversation, the API key's name, the client and its version, what started the call, and the license model
* the status, and the error type of a failed call
A span never carries prompt or response text, an email address, or an error's text. The calls of one agent run or coding session share one trace ID, so they show as one trace in your observability backend.
Spans are sent every 30 seconds, about 2 minutes after the request, so a request reaches your collector within roughly two and a half minutes. A new collector receives requests from the moment you save it. Earlier requests are not sent. When the collector is unreachable, sending pauses and resumes where it stopped, without losing requests.
The endpoint must be reachable from where your agents run: a public address on xpander cloud, or an address your cluster can reach on a self-hosted install.
### Coralogix
1. In Coralogix, create a **Send-Your-Data** API key.
2. In xpander, create a secret with this JSON value:
```json theme={"dark"}
{
"Authorization": "Bearer ",
"cx-application-name": "xpander-llm-gateway",
"cx-subsystem-name": "requests"
}
```
The application and subsystem names are yours to choose; they are how the spans are grouped in Coralogix.
3. Set **Endpoint** to `https://ingress./v1/traces`, such as `https://ingress.eu2.coralogix.com/v1/traces`.
4. Pick the secret under **Headers** and choose **Save changes**.
The spans arrive in Coralogix as traces with the service name `xpander-llm-gateway`, under the application and subsystem names you set.
### Other collectors
Any backend that accepts OTLP over HTTP works the same way: its OTLP HTTP endpoint, and its authentication headers in the secret.
| Backend | Endpoint | Headers secret |
| - | - | - |
| Grafana Cloud | Your stack's OTLP endpoint, such as `https://otlp-gateway-.grafana.net/otlp` | `{"Authorization": "Basic "}` |
| Honeycomb | `https://api.honeycomb.io` (`https://api.eu1.honeycomb.io` in the EU) | `{"x-honeycomb-team": ""}` |
| Datadog | An OpenTelemetry Collector or Datadog Agent with OTLP HTTP intake on, at its `:4318` address | Whatever your collector requires, or none |
| Your own OpenTelemetry Collector | Its OTLP HTTP receiver, such as `https://otel.example.com:4318` | Whatever your collector requires, or none |
## Storage bucket
A copy of every request record, as Parquet files in your own Amazon S3 bucket, Google Cloud Storage bucket or Azure Blob Storage container.
### 1. Store a credential
Create a secret in [Secrets](https://platform.xpander.ai/agents/secrets) (**Platform > Agents > Secrets**) holding a credential that can write to the bucket:
| Storage | Credential the secret holds |
| - | - |
| **Amazon S3** | An AWS access key that may `s3:PutObject` to the bucket, as JSON `{"access_key_id": "...", "secret_access_key": "..."}` (add `"session_token"` for temporary keys), or as `ID:SECRET`. For S3-compatible storage such as MinIO, add `"endpoint_url"` to the JSON. |
| **Google Cloud** | The whole JSON key file of a service account that may create objects in the bucket (`storage.objects.create`). |
| **Azure Blob Storage** | The storage account connection string (with `AccountKey` or `SharedAccessSignature`), or a SAS URL for the account or the container, with write access. |
Log export does not support AWS IAM roles. Use an access key.
### 2. Add the destination
1. In [Logs](https://platform.xpander.ai/governance/logs), choose **Log destinations**.
2. Under **Destination**, choose **Add destination** and pick **Amazon S3**, **Google Cloud** or **Azure Blob Storage**.
3. Fill in the fields:
| Field | Value |
| - | - |
| **Bucket** (**Container** for Azure) | The bucket name, such as `acme-ai-audit` |
| **Prefix** | A folder inside it, if you want one, such as `gateway/` (no leading slash) |
| **Region** | Amazon S3 only: the bucket's region, such as `eu-west-1` |
| **Credential** | The secret from step 1 |
4. Choose **Send test**. It writes `/_xpander_test.json` with the settings on screen, saved or not. **Test row written** means the export can write there. **The test failed** says why, for example:
* the bucket does not exist;
* the bucket is in another region, naming the region it is in;
* the key may not write to the bucket (access denied);
* the provider did not accept the key;
* the storage endpoint is at an address the export does not write to: a metadata address, or, on xpander cloud, a private or cluster address.
5. Choose **Save changes**.
**Turn off** stops the copy. Requests stay in your organization's database either way.
### What lands in the bucket
Parquet files under `/dt=YYYY-MM-DD/hour=HH/`, split by the hour of the call (UTC), one row per request. A request arrives within about two minutes of the call. Export starts from the moment you save the destination: earlier requests are not sent, and changing the bucket or prefix starts again from that moment. When the bucket can't be written, the export pauses and resumes where it stopped, without losing or duplicating rows.
Each row has these columns:
| Columns | What they hold |
| - | - |
| `request_id`, `trace_id`, `created_at`, `stored_at` | The request, its trace, when the call started and when it was recorded (UTC) |
| `organization_id`, `user_id`, `group_id`, `principal_kind`, `key_id`, `key_name`, `app_id` | Who made the call and with which key |
| `agent_id`, `task_id`, `parent_task_id`, `conversation_id`, `trigger_source` | The agent run behind it and what started it |
| `operation`, `internal_ops`, `billed`, `category` | Work xpander did for your organization, and whether the call was billed |
| `client`, `client_version`, `surface` | The coding tool or SDK that sent it |
| `license`, `is_byok` | The license model, and whether your own key paid |
| `requested_model`, `model`, `served_model`, `provider`, `route`, `route_reason` | The model asked for, the one that answered, and how the call was routed |
| `status`, `http_status`, `error_code` | The outcome |
| `input_tokens`, `cached_input_tokens`, `cache_write_tokens`, `output_tokens`, `reasoning_tokens` | Tokens |
| `cost_usd`, `input_cost_usd`, `output_cost_usd`, `cache_read_cost_usd`, `cache_write_cost_usd` | Cost in USD, and its parts |
| `ttft_ms`, `latency_ms`, `overhead_ms` | Time to first token, total time, and time spent in the gateway |
Rows never hold prompt or response text, email addresses, IP addresses or error text.
**Keep requests for** in [Policies](https://platform.xpander.ai/governance/policies) does not delete exported files. To delete old files, set a lifecycle rule on your bucket.
## Self-hosted installs
On a Hybrid or Air-Gapped install, both destinations are sent from inside your install, so the collector and the bucket only need to be reachable from your cluster. An Air-Gapped install can use S3-compatible storage inside your network through `endpoint_url` in the credential.
This documentation is built and hosted on [Mintlify](https://mintlify.com), a developer documentation platform.
1. Store your collector's headers, such as its API key, as a secret in [Secrets](https://platform.xpander.ai/agents/secrets) (**Platform > Agents > Secrets**). The value is JSON, such as `{"api-key": "..."}`, or `key=value` pairs separated by commas.
2. In **Log destinations**, under **OpenTelemetry**, turn on **Send traces to a collector**.
3. Enter the collector's **Endpoint**. The gateway sends OTLP over HTTP (JSON), so use the collector's HTTP port, usually `4318`. `/v1/traces` is added when the URL has no path.
4. Under **Headers**, pick the secret from step 1.
5. Choose **Save changes**.
Only OTLP over HTTP is supported. A gRPC endpoint (usually port `4317`) receives nothing. If a collector was saved for gRPC, it shows *This collector was saved for gRPC*. Point the endpoint at the HTTP port and save again.
### What each span carries
One span per request, named with the OpenTelemetry GenAI conventions:
* the provider, the model asked for and the model that answered
* input, output, cache and reasoning tokens, and the cost in USD
* timings: start and end, time to first token and total time
* IDs: trace, person, group, agent, task and conversation, the API key's name, the client and its version, what started the call, and the license model
* the status, and the error type of a failed call
A span never carries prompt or response text, an email address, or an error's text. The calls of one agent run or coding session share one trace ID, so they show as one trace in your observability backend.
Spans are sent every 30 seconds, about 2 minutes after the request, so a request reaches your collector within roughly two and a half minutes. A new collector receives requests from the moment you save it. Earlier requests are not sent. When the collector is unreachable, sending pauses and resumes where it stopped, without losing requests.
The endpoint must be reachable from where your agents run: a public address on xpander cloud, or an address your cluster can reach on a self-hosted install.
### Coralogix
1. In Coralogix, create a **Send-Your-Data** API key.
2. In xpander, create a secret with this JSON value:
```json theme={"dark"}
{
"Authorization": "Bearer ",
"cx-application-name": "xpander-llm-gateway",
"cx-subsystem-name": "requests"
}
```
The application and subsystem names are yours to choose; they are how the spans are grouped in Coralogix.
3. Set **Endpoint** to `https://ingress./v1/traces`, such as `https://ingress.eu2.coralogix.com/v1/traces`.
4. Pick the secret under **Headers** and choose **Save changes**.
The spans arrive in Coralogix as traces with the service name `xpander-llm-gateway`, under the application and subsystem names you set.
### Other collectors
Any backend that accepts OTLP over HTTP works the same way: its OTLP HTTP endpoint, and its authentication headers in the secret.
| Backend | Endpoint | Headers secret |
| - | - | - |
| Grafana Cloud | Your stack's OTLP endpoint, such as `https://otlp-gateway-.grafana.net/otlp` | `{"Authorization": "Basic "}` |
| Honeycomb | `https://api.honeycomb.io` (`https://api.eu1.honeycomb.io` in the EU) | `{"x-honeycomb-team": ""}` |
| Datadog | An OpenTelemetry Collector or Datadog Agent with OTLP HTTP intake on, at its `:4318` address | Whatever your collector requires, or none |
| Your own OpenTelemetry Collector | Its OTLP HTTP receiver, such as `https://otel.example.com:4318` | Whatever your collector requires, or none |
## Storage bucket
A copy of every request record, as Parquet files in your own Amazon S3 bucket, Google Cloud Storage bucket or Azure Blob Storage container.
### 1. Store a credential
Create a secret in [Secrets](https://platform.xpander.ai/agents/secrets) (**Platform > Agents > Secrets**) holding a credential that can write to the bucket:
| Storage | Credential the secret holds |
| - | - |
| **Amazon S3** | An AWS access key that may `s3:PutObject` to the bucket, as JSON `{"access_key_id": "...", "secret_access_key": "..."}` (add `"session_token"` for temporary keys), or as `ID:SECRET`. For S3-compatible storage such as MinIO, add `"endpoint_url"` to the JSON. |
| **Google Cloud** | The whole JSON key file of a service account that may create objects in the bucket (`storage.objects.create`). |
| **Azure Blob Storage** | The storage account connection string (with `AccountKey` or `SharedAccessSignature`), or a SAS URL for the account or the container, with write access. |
Log export does not support AWS IAM roles. Use an access key.
### 2. Add the destination
1. In [Logs](https://platform.xpander.ai/governance/logs), choose **Log destinations**.
2. Under **Destination**, choose **Add destination** and pick **Amazon S3**, **Google Cloud** or **Azure Blob Storage**.
3. Fill in the fields:
| Field | Value |
| - | - |
| **Bucket** (**Container** for Azure) | The bucket name, such as `acme-ai-audit` |
| **Prefix** | A folder inside it, if you want one, such as `gateway/` (no leading slash) |
| **Region** | Amazon S3 only: the bucket's region, such as `eu-west-1` |
| **Credential** | The secret from step 1 |
4. Choose **Send test**. It writes `/_xpander_test.json` with the settings on screen, saved or not. **Test row written** means the export can write there. **The test failed** says why, for example:
* the bucket does not exist;
* the bucket is in another region, naming the region it is in;
* the key may not write to the bucket (access denied);
* the provider did not accept the key;
* the storage endpoint is at an address the export does not write to: a metadata address, or, on xpander cloud, a private or cluster address.
5. Choose **Save changes**.
**Turn off** stops the copy. Requests stay in your organization's database either way.
### What lands in the bucket
Parquet files under `/dt=YYYY-MM-DD/hour=HH/`, split by the hour of the call (UTC), one row per request. A request arrives within about two minutes of the call. Export starts from the moment you save the destination: earlier requests are not sent, and changing the bucket or prefix starts again from that moment. When the bucket can't be written, the export pauses and resumes where it stopped, without losing or duplicating rows.
Each row has these columns:
| Columns | What they hold |
| - | - |
| `request_id`, `trace_id`, `created_at`, `stored_at` | The request, its trace, when the call started and when it was recorded (UTC) |
| `organization_id`, `user_id`, `group_id`, `principal_kind`, `key_id`, `key_name`, `app_id` | Who made the call and with which key |
| `agent_id`, `task_id`, `parent_task_id`, `conversation_id`, `trigger_source` | The agent run behind it and what started it |
| `operation`, `internal_ops`, `billed`, `category` | Work xpander did for your organization, and whether the call was billed |
| `client`, `client_version`, `surface` | The coding tool or SDK that sent it |
| `license`, `is_byok` | The license model, and whether your own key paid |
| `requested_model`, `model`, `served_model`, `provider`, `route`, `route_reason` | The model asked for, the one that answered, and how the call was routed |
| `status`, `http_status`, `error_code` | The outcome |
| `input_tokens`, `cached_input_tokens`, `cache_write_tokens`, `output_tokens`, `reasoning_tokens` | Tokens |
| `cost_usd`, `input_cost_usd`, `output_cost_usd`, `cache_read_cost_usd`, `cache_write_cost_usd` | Cost in USD, and its parts |
| `ttft_ms`, `latency_ms`, `overhead_ms` | Time to first token, total time, and time spent in the gateway |
Rows never hold prompt or response text, email addresses, IP addresses or error text.
**Keep requests for** in [Policies](https://platform.xpander.ai/governance/policies) does not delete exported files. To delete old files, set a lifecycle rule on your bucket.
## Self-hosted installs
On a Hybrid or Air-Gapped install, both destinations are sent from inside your install, so the collector and the bucket only need to be reachable from your cluster. An Air-Gapped install can use S3-compatible storage inside your network through `endpoint_url` in the credential.
This documentation is built and hosted on [Mintlify](https://mintlify.com), a developer documentation platform.