> ## Documentation Index
> Fetch the complete documentation index at: https://docs.xpander.ai/llms.txt
> Use this file to discover all available pages before exploring further.
# AI models and keys
> Create your own API key for the LLM Gateway, connect your coding tools in one click, and see the models you may call.
[AI models & keys](https://chat.xpander.ai/?settings=my-gateway) (**Settings > AI models & keys** in Xpander Chat) is where you set up access to your company's AI models from your own coding tools and scripts. Every call made with your key runs as you: on the models your organization enabled for you, within your budgets, and in your usage.
The page starts with your **Gateway address**, with a copy button. On a self-hosted install, open AI models & keys in your organization's own Xpander Chat.
## API keys
1. Under **API keys**, choose **Create key** (**Create your first key** when you have none).
2. Enter a **Name**, such as `My laptop`. Create one key per computer and coding tool, so you can revoke one without touching the others.
3. Pick when it **Expires**: **7 days**, **30 days**, **90 days**, **1 year** or **Never**. Your organization may allow less, and the form says how long.
4. Choose **Create key**, then copy it. It is **Shown only once**.
The list shows each key's **Name**, **Last used** and **Expires**. **Revoke** stops a key at once; anything using it gets `401` from then on.
You don't always need to create a key yourself: **Copy setup command** under **Connect a client** creates one for that coding tool and computer, named after them, such as `Claude Code on macOS`.
## Connect a client
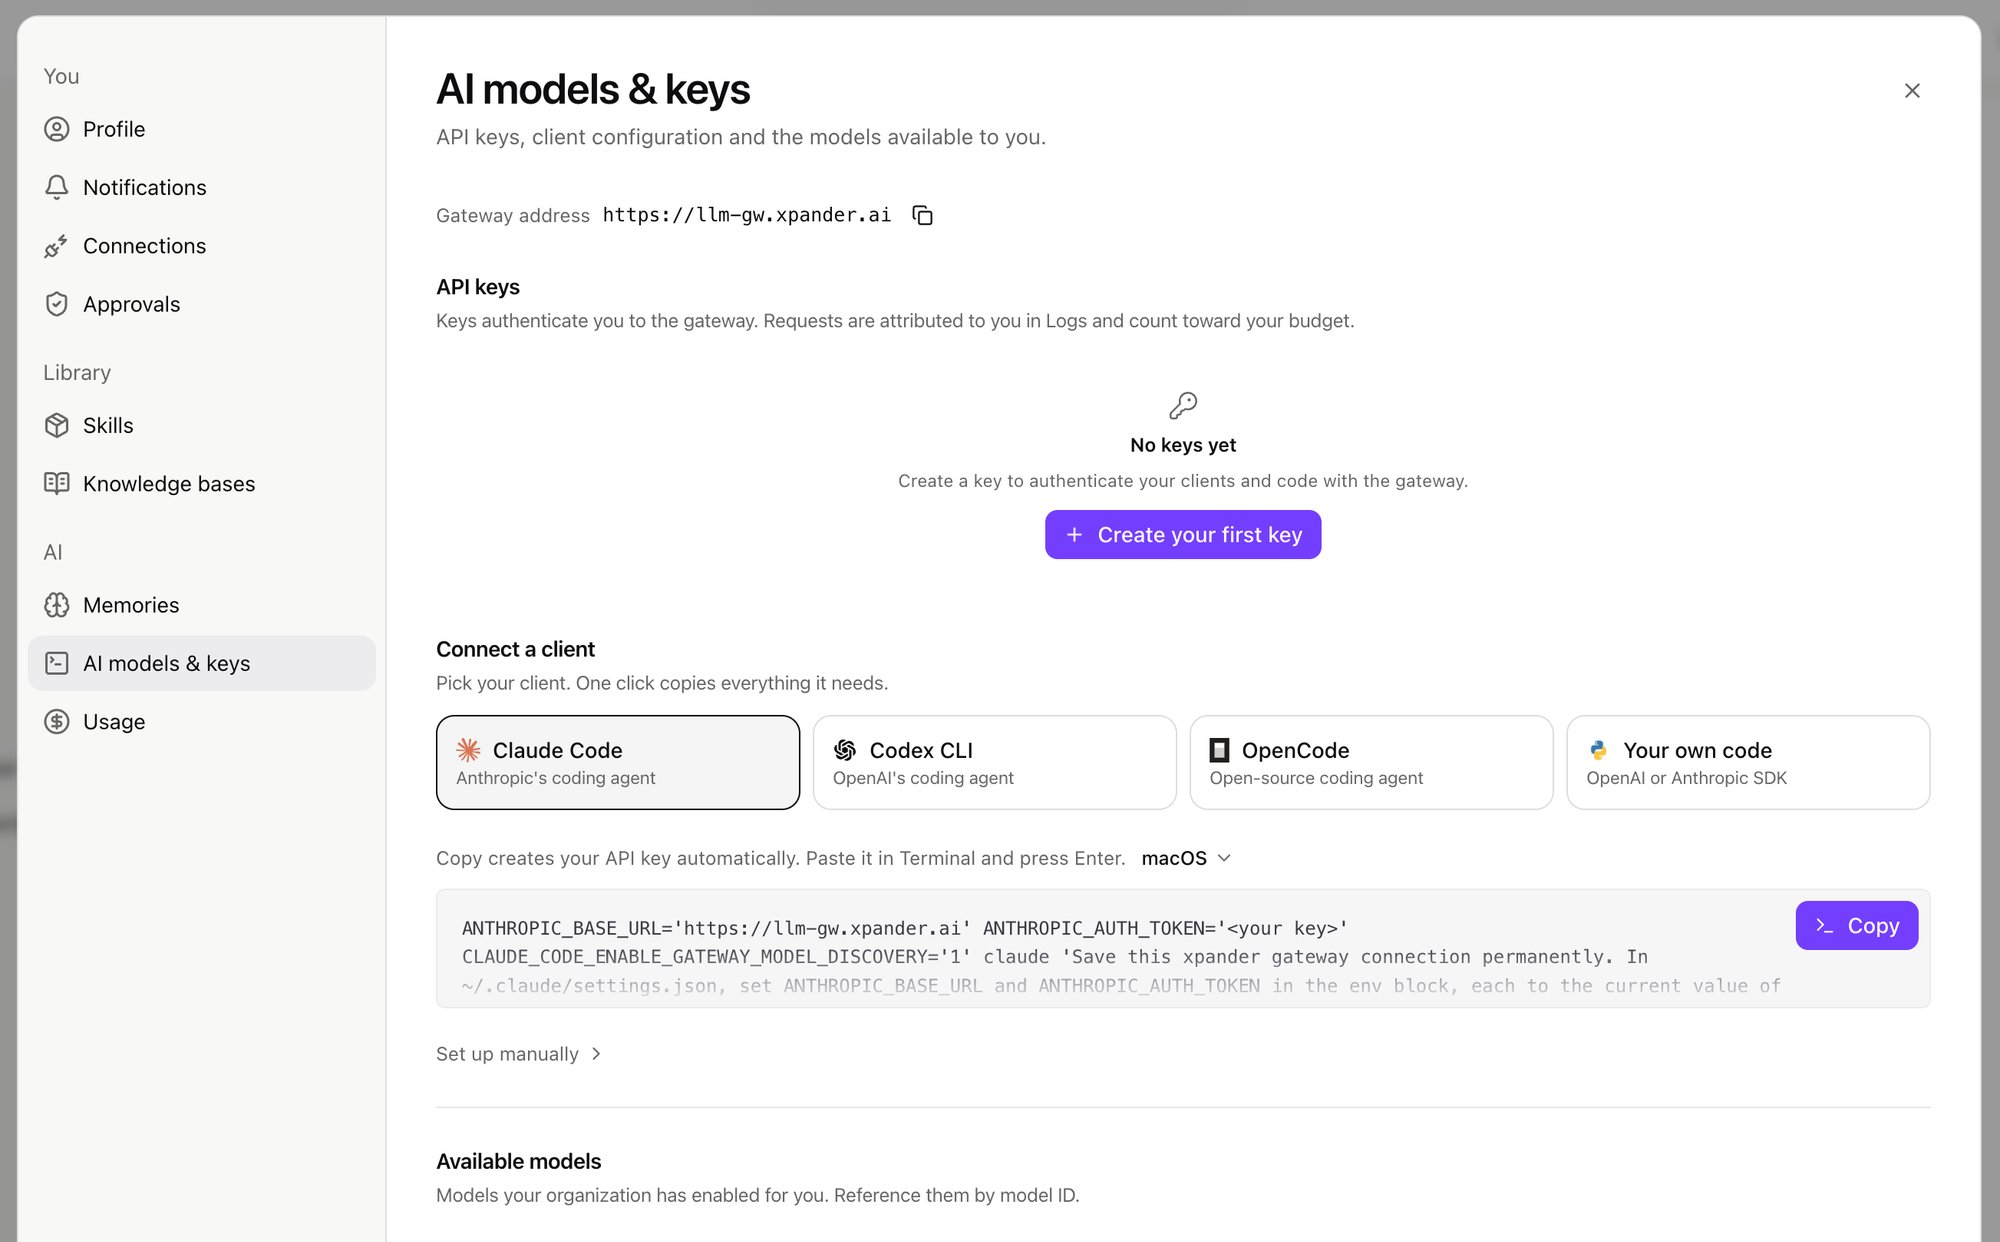 Pick **Claude Code**, **Codex CLI**, **OpenCode** or **Your own code**:
* For Claude Code, Codex CLI and OpenCode, pick your system and choose **Copy setup command**, paste it in your terminal and press Enter. Your coding tool starts connected and keeps the connection for every new terminal.
* For **Your own code**, choose **Copy prompt** and paste it into the coding agent you use in your project, which connects your project's OpenAI or Anthropic SDK calls.
* **Set up manually** shows the settings files and commands instead.
Every option, with the files it writes, is on [Connect your tools](/run/llm-gateway/connect-tools).
## Available models
**Available models** lists the models your organization enabled for you, grouped by provider. Copy a model ID with its copy button and use it as the `model` in your coding tool. **Shortcuts your admin set up** lists the aliases your admins defined, which you can use the same way.
A model missing from the list is off for you; ask an organization admin for access. On a Hybrid install, a model whose provider has no key stored in xpander is shown with *No key for this provider is stored in xpander, so tools on your computer can't use these models.*
## Your Claude plan
When your organization lets you use your own Claude plan, the page shows any limit your plan has reached and when it resets, and **When my Claude plan hits its limit**: **Continue on company models** or **Pause**.
## Your spend
[Usage](https://chat.xpander.ai/?settings=my-usage) (**Settings > Usage**) shows what your calls and the agent runs you started cost today, this week or this month, with your spending limit when one applies.
This documentation is built and hosted on [Mintlify](https://mintlify.com), a developer documentation platform.
Pick **Claude Code**, **Codex CLI**, **OpenCode** or **Your own code**:
* For Claude Code, Codex CLI and OpenCode, pick your system and choose **Copy setup command**, paste it in your terminal and press Enter. Your coding tool starts connected and keeps the connection for every new terminal.
* For **Your own code**, choose **Copy prompt** and paste it into the coding agent you use in your project, which connects your project's OpenAI or Anthropic SDK calls.
* **Set up manually** shows the settings files and commands instead.
Every option, with the files it writes, is on [Connect your tools](/run/llm-gateway/connect-tools).
## Available models
**Available models** lists the models your organization enabled for you, grouped by provider. Copy a model ID with its copy button and use it as the `model` in your coding tool. **Shortcuts your admin set up** lists the aliases your admins defined, which you can use the same way.
A model missing from the list is off for you; ask an organization admin for access. On a Hybrid install, a model whose provider has no key stored in xpander is shown with *No key for this provider is stored in xpander, so tools on your computer can't use these models.*
## Your Claude plan
When your organization lets you use your own Claude plan, the page shows any limit your plan has reached and when it resets, and **When my Claude plan hits its limit**: **Continue on company models** or **Pause**.
## Your spend
[Usage](https://chat.xpander.ai/?settings=my-usage) (**Settings > Usage**) shows what your calls and the agent runs you started cost today, this week or this month, with your spending limit when one applies.
This documentation is built and hosted on [Mintlify](https://mintlify.com), a developer documentation platform.