Tutorials
Transform Text into Structured Output
Build a ready-to-deploy agent to transform text into structured in minutes
In this tutorial, we’ll build a simple AI agent in seconds using xpander.ai. Specifically, our AI agent will take a user message and transform it into a format that matches a Google Docs template stored on Google Drive.
This tutorial is designed to be straightforward to give you a hands-on introduction to various features offered by xpander.ai. By the end, you’ll learn:
 In our use case, we’ll build an AI agent that can take a user message and transform it into a format that matches a Google Docs template stored on Google Drive. Here’s an example of the prompt we can give to the Planner:
 Each interface comes with its own set of operations (tools). An operation serves a specific purpose, either retrieving an event ID, reading an event’s content, updating an event, or something else.
Your AI agent can call one or more of these operations as part of its workflow to complete a task. For example, in the visualization below, you can see that the Google Docs interface has three distinct operations to choose from. You can view detailed descriptions of each operation directly in the xpander Workbench.
Each interface comes with its own set of operations (tools). An operation serves a specific purpose, either retrieving an event ID, reading an event’s content, updating an event, or something else.
Your AI agent can call one or more of these operations as part of its workflow to complete a task. For example, in the visualization below, you can see that the Google Docs interface has three distinct operations to choose from. You can view detailed descriptions of each operation directly in the xpander Workbench.
 By looking at the graph visualization, we can see that xpander has intelligently integrated several operations from both Google Docs and Google Drive into our agent. These operations are not random; they are highly relevant operations selected by xpander that can help the agent to complete the task. However, you might also notice a warning icon next to each operation. This means they aren’t usable just yet.
To enable these operations, you need to grant xpander permission to access the connectors (your Google Drive and Google Docs accounts). There are two ways to do this. The easiest is to click directly on the warning icon in the operation box within the graph visualization. Alternatively, you can follow these steps:
By looking at the graph visualization, we can see that xpander has intelligently integrated several operations from both Google Docs and Google Drive into our agent. These operations are not random; they are highly relevant operations selected by xpander that can help the agent to complete the task. However, you might also notice a warning icon next to each operation. This means they aren’t usable just yet.
To enable these operations, you need to grant xpander permission to access the connectors (your Google Drive and Google Docs accounts). There are two ways to do this. The easiest is to click directly on the warning icon in the operation box within the graph visualization. Alternatively, you can follow these steps:
 Once access is granted, you’ll see in the graph visualization that the operations are now fully activated and ready to be used by your agent.
 You can also fine-tune your agent’s settings by clicking the gear icon at the top right of the agent box in the graph.
 Within the settings, you’ll find several aspects you can tweak to customize your agent’s behavior, such as memory strategy, model provider, interactions between agents in a multi-agent workflow, agent roles, deployment options, and more.
The default values for each setting are intelligently generated by the Planner based on your prompt description. However, in most cases, you’ll want to customize them to better fit your specific needs and use case. You can refer to this section of the xpander docs to learn more about these settings.
Within the settings, you’ll find several aspects you can tweak to customize your agent’s behavior, such as memory strategy, model provider, interactions between agents in a multi-agent workflow, agent roles, deployment options, and more.
The default values for each setting are intelligently generated by the Planner based on your prompt description. However, in most cases, you’ll want to customize them to better fit your specific needs and use case. You can refer to this section of the xpander docs to learn more about these settings.
 If everything is set up correctly, the AI agent should take the input message from our prompt, transform it according to the structure in the Google Docs template, and return the final result to us.
To test this, put the prompt in the Chat feature and watch how the agent works through each step using the visual workflow tracker.
If everything is set up correctly, the AI agent should take the input message from our prompt, transform it according to the structure in the Google Docs template, and return the final result to us.
To test this, put the prompt in the Chat feature and watch how the agent works through each step using the visual workflow tracker.
 In our example, the agent will:
 We can also add new interfaces and operations for the agent to use. For example, let’s say we want the agent’s response to be sent via email. To do this, we can use xpander’s built-in action “Send Email with Content”. As the name suggests, this function allows the agent to send plain text (in our case, the reformatted message) to an email address we specify in the prompt. You can find this function by clicking the “+” icon in the top-right of the UI and selecting “Built-in actions”.
Aside from adding or removing operations, you can also modify the agent’s workflow by adjusting the connections between operations in the graph.
In our use case, we want the agent to send the message via email after it finishes the reformatting process. To do this, we can create a new connection in the graph by dragging a line from the end node of the “Retrieve Last Document Version” operation to the start node of “Send Email with Content.”
We can also add new interfaces and operations for the agent to use. For example, let’s say we want the agent’s response to be sent via email. To do this, we can use xpander’s built-in action “Send Email with Content”. As the name suggests, this function allows the agent to send plain text (in our case, the reformatted message) to an email address we specify in the prompt. You can find this function by clicking the “+” icon in the top-right of the UI and selecting “Built-in actions”.
Aside from adding or removing operations, you can also modify the agent’s workflow by adjusting the connections between operations in the graph.
In our use case, we want the agent to send the message via email after it finishes the reformatting process. To do this, we can create a new connection in the graph by dragging a line from the end node of the “Retrieve Last Document Version” operation to the start node of “Send Email with Content.”
 Once you’ve made changes to the graph, you’ll need to re-deploy the agent before testing it. Just click the “Deploy” button, and you’re ready to go. You can now test the updated workflow with a prompt like the following:
 Once you’ve finished testing and are confident that the agent’s workflow meets your expectations, you can easily share the agent with your team. Just click the “Chat” node at the top of the graph visualization to generate a unique URL for the agent. Anyone with the link can interact with the agent through a Chainlit-powered chat interface.
 Before we can interact with our agent via the SDK, we need to set up three configurations:
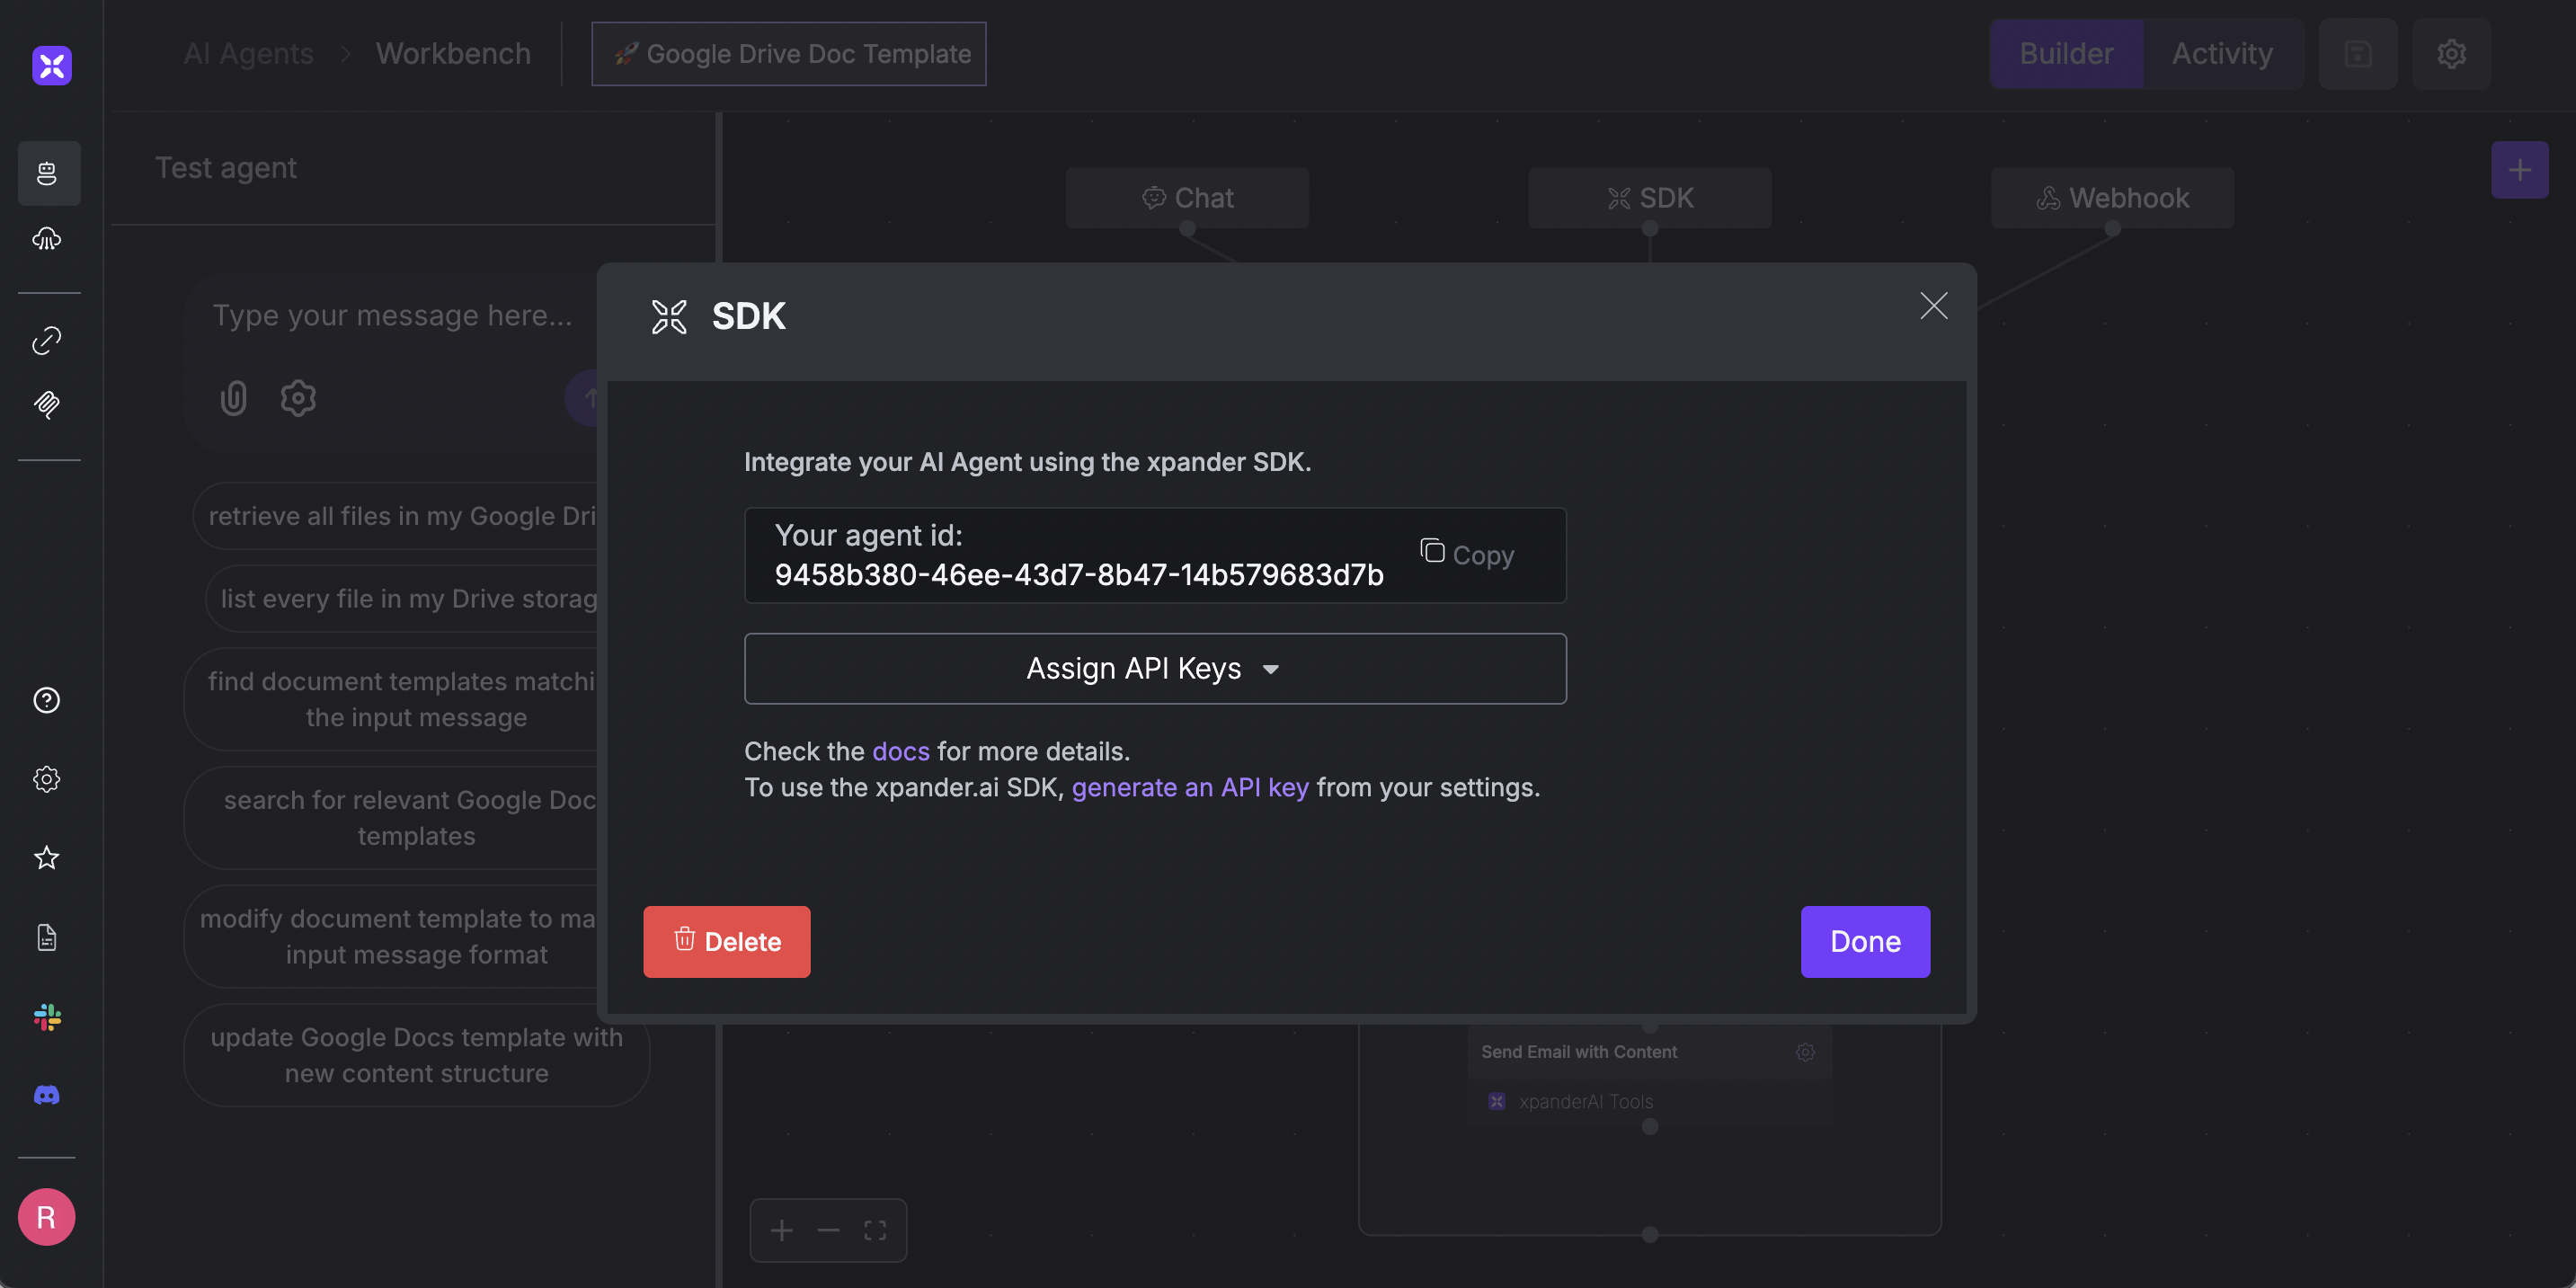 Once you have all three configurations, you can either store them in a
We can start interacting with our agent by looking at the available tools it can use to complete a task.
As you can see, there are four tools available for our agent to use. Three of them are the ones visible in the graph visualization in Workbench, and the fourth is a built-in xpander function that stops the agent’s execution once a task is completed.
Let’s take a closer look at one of the tools available to our agent.
A tool is typically written as a function and defined by its schema. The schema tells the agent what the function does and what input arguments it expects. It includes the following fields:
Following the execution workflow of our agent with xpander’s SDK is pretty straightforward. Based on our initial prompt, the agent’s first response can be executed like this:
The agent’s status and response show that it hasn’t finished executing the task after running the code. Instead, it tries to call the
The result of the tool calling can be used as an input to the next agent call.
Once again, the agent status shows that it hasn’t completed the task yet and needs to call another tool. This time, it’s the
Next, let’s proceed to the next agent call after receiving the response from the last tool calling.
This time, the agent wants to call
Now we can proceed to the last agent call and save the response to the memory.
And now we can see that the agent status has changed to finished! At this point, we can retrieve the final result from our agent by running the following code:
Looking at the full step-by-step workflow above, we can simplify the code using a
Once the agent has finished its execution, you can also retrieve the thread ID of the agent execution by simply using the following method:
The thread ID allows your agent to remember the conversation history. This means you can ask follow-up questions related to a previous query by including the Thread ID and adding it as a task, like this:
When interacting with xpander’s SDK, you can easily track the agent’s execution, inputs, and responses at each step, just like we did earlier. To do this, head over to the “Activity” view in xpander Workbench after running your code. There, you’ll find two key components:
Once you have all three configurations, you can either store them in a
We can start interacting with our agent by looking at the available tools it can use to complete a task.
As you can see, there are four tools available for our agent to use. Three of them are the ones visible in the graph visualization in Workbench, and the fourth is a built-in xpander function that stops the agent’s execution once a task is completed.
Let’s take a closer look at one of the tools available to our agent.
A tool is typically written as a function and defined by its schema. The schema tells the agent what the function does and what input arguments it expects. It includes the following fields:
Following the execution workflow of our agent with xpander’s SDK is pretty straightforward. Based on our initial prompt, the agent’s first response can be executed like this:
The agent’s status and response show that it hasn’t finished executing the task after running the code. Instead, it tries to call the
The result of the tool calling can be used as an input to the next agent call.
Once again, the agent status shows that it hasn’t completed the task yet and needs to call another tool. This time, it’s the
Next, let’s proceed to the next agent call after receiving the response from the last tool calling.
This time, the agent wants to call
Now we can proceed to the last agent call and save the response to the memory.
And now we can see that the agent status has changed to finished! At this point, we can retrieve the final result from our agent by running the following code:
Looking at the full step-by-step workflow above, we can simplify the code using a
Once the agent has finished its execution, you can also retrieve the thread ID of the agent execution by simply using the following method:
The thread ID allows your agent to remember the conversation history. This means you can ask follow-up questions related to a previous query by including the Thread ID and adding it as a task, like this:
When interacting with xpander’s SDK, you can easily track the agent’s execution, inputs, and responses at each step, just like we did earlier. To do this, head over to the “Activity” view in xpander Workbench after running your code. There, you’ll find two key components:
- How to build an AI agent in seconds using xpander’s Planner
- How to enable an interface connector or external tool for the AI agent
- Different ways to interact with your AI agent (via xpander’s Chat or SDK)
- How to use Chat and Visual Tester features to follow the agent’s workflow as it executes a task
- How to add or remove interface operations and update the agent’s workflow
- The typical process for triggering your AI agent via xpander’s SDK
Build an Agent with the Planner
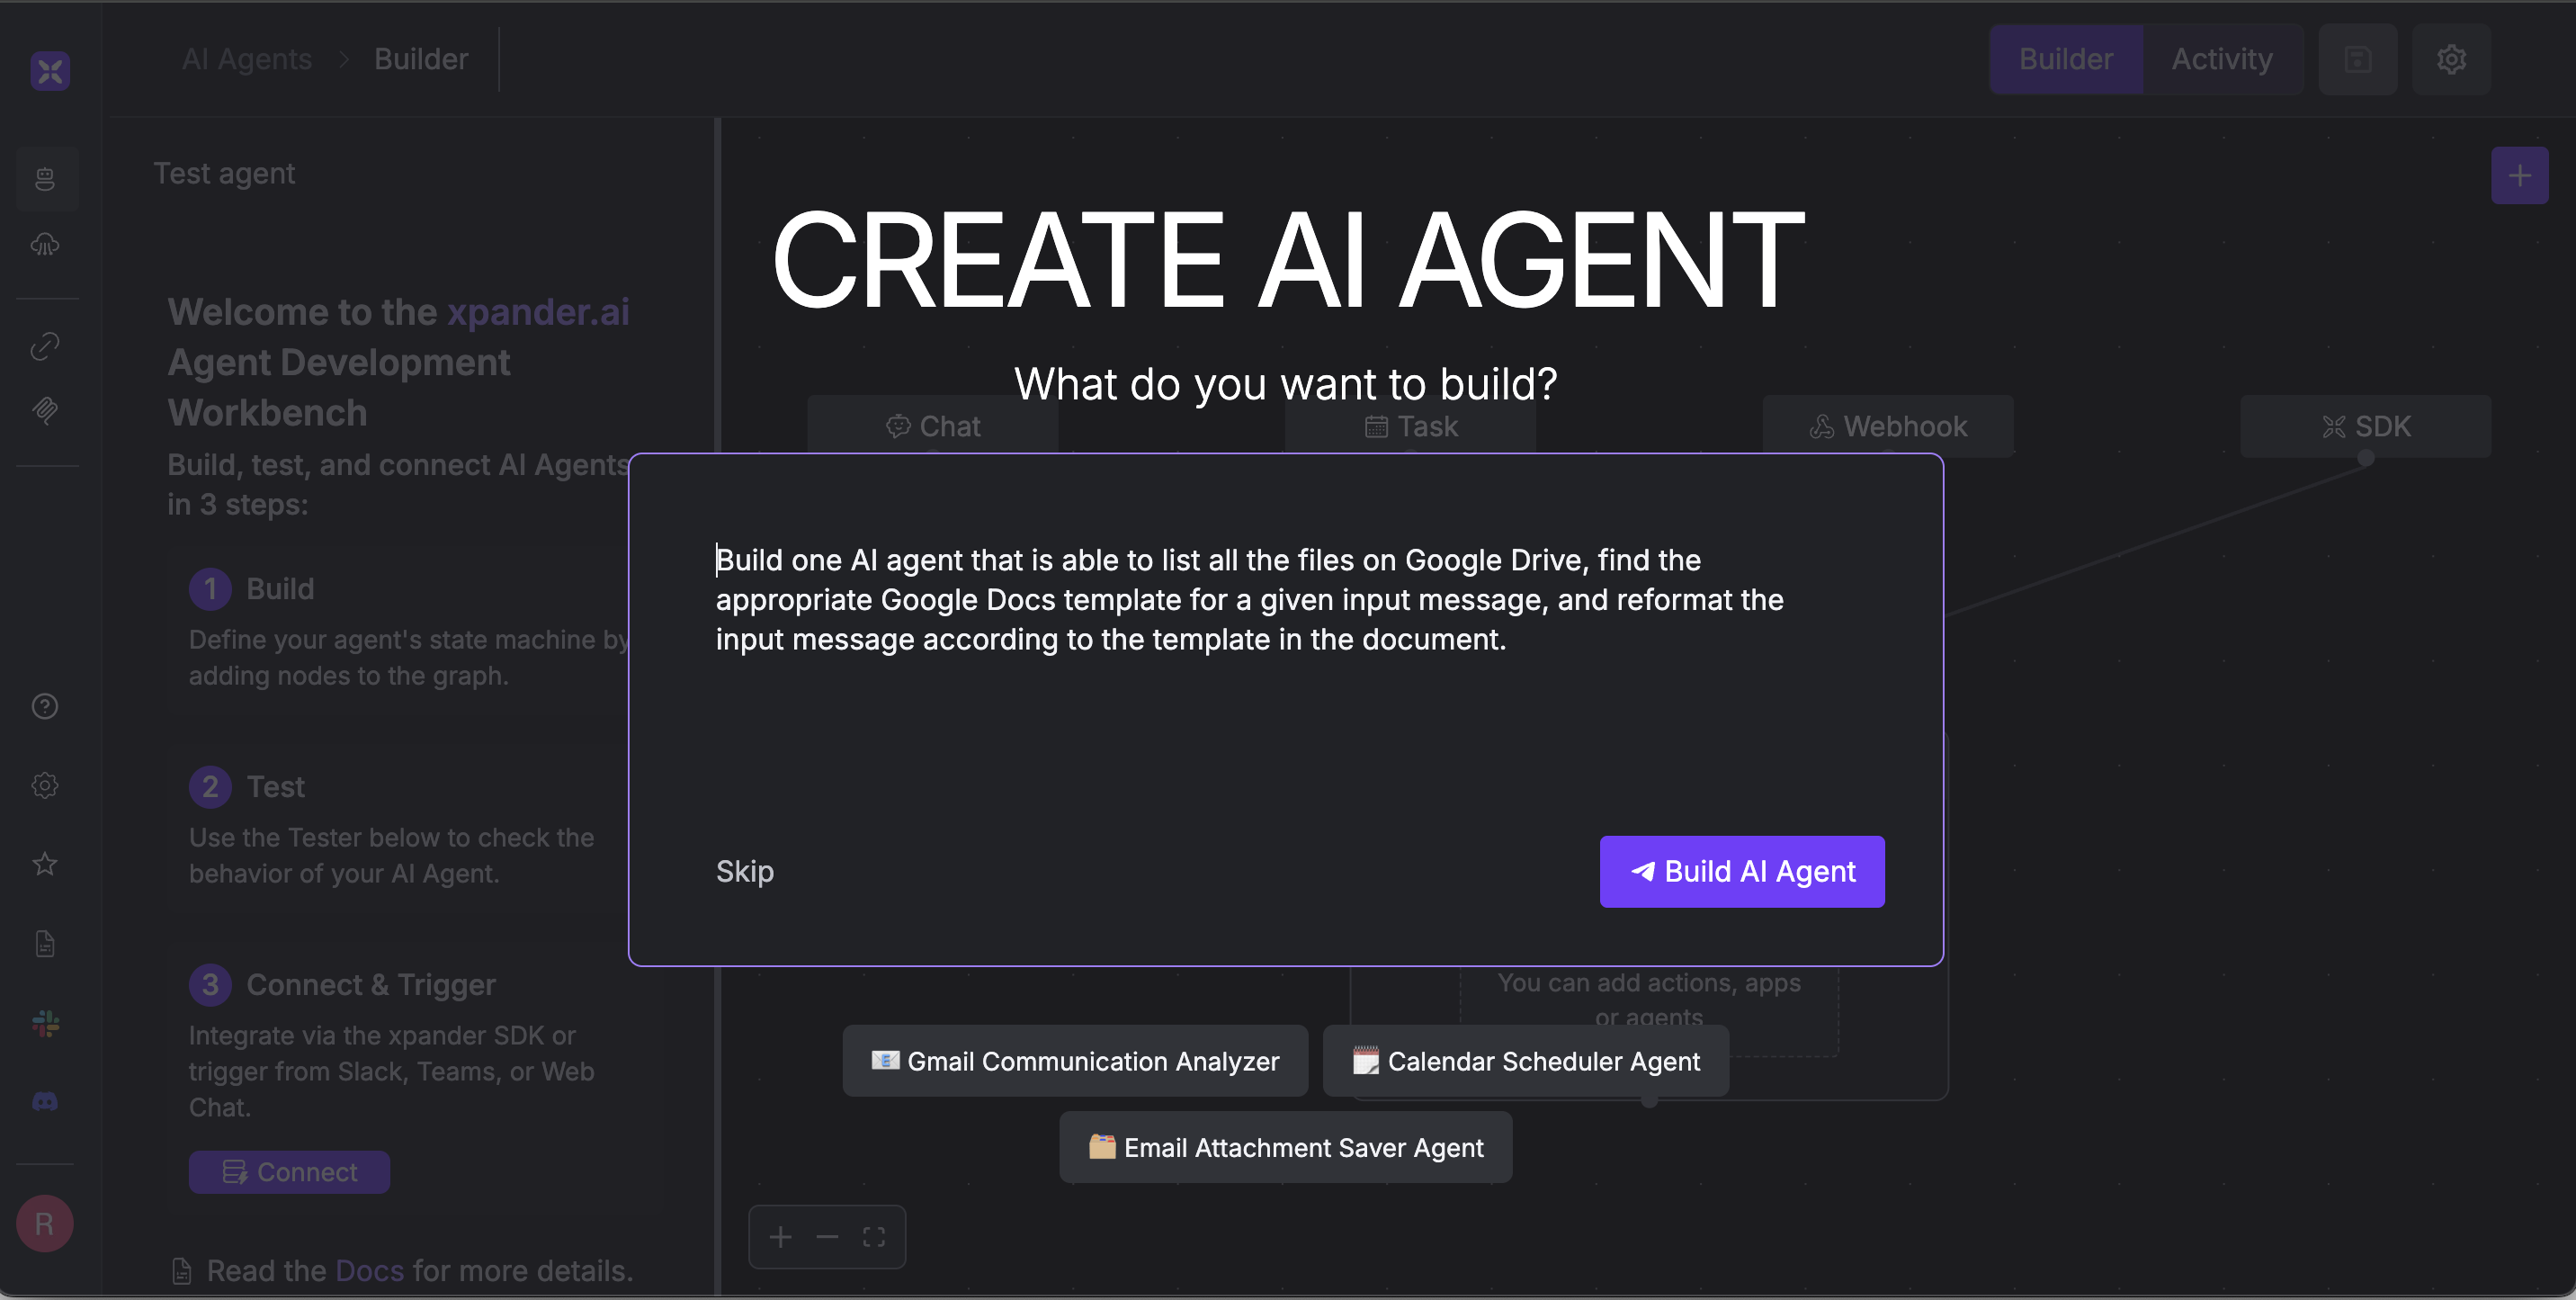
The easiest and fastest way to get started with xpander.ai and build your first AI agent is by using the Planner feature. The Planner feature lets you create a single- or multi-agent system with just a single prompt. The idea is that xpander handles complicated things related to agent’s infrastructure and deployment so that you can solely focus on instructing what your AI agents can do. To begin, head over to https://app.xpander.ai and sign in with your credentials. Once you’re logged in, you’ll see the landing page of xpander Workbench. To start building your agent with Planner, simply click the “New AI Agent” or “Create AI Agent” button. This opens up the Planner, where you’ll be prompted to describe the kind of AI agent you want to build. Be as specific as possible, as this helps the Planner generate the right logic for your agent.
In our use case, we’ll build an AI agent that can take a user message and transform it into a format that matches a Google Docs template stored on Google Drive. Here’s an example of the prompt we can give to the Planner:
Build one AI agent that is able to list all the files on Google Drive, find the appropriate Google Docs template for a given input message, and reformat the input message according to the template in the document.Once you’ve entered the prompt, click the “Build AI Agent” button. In just a few seconds, the Planner will generate the agent for you. In the end, you should see a ready-to-run AI agent represented in a graph similar to the following:
Enabling Interface Connectors and Tools in an Agent
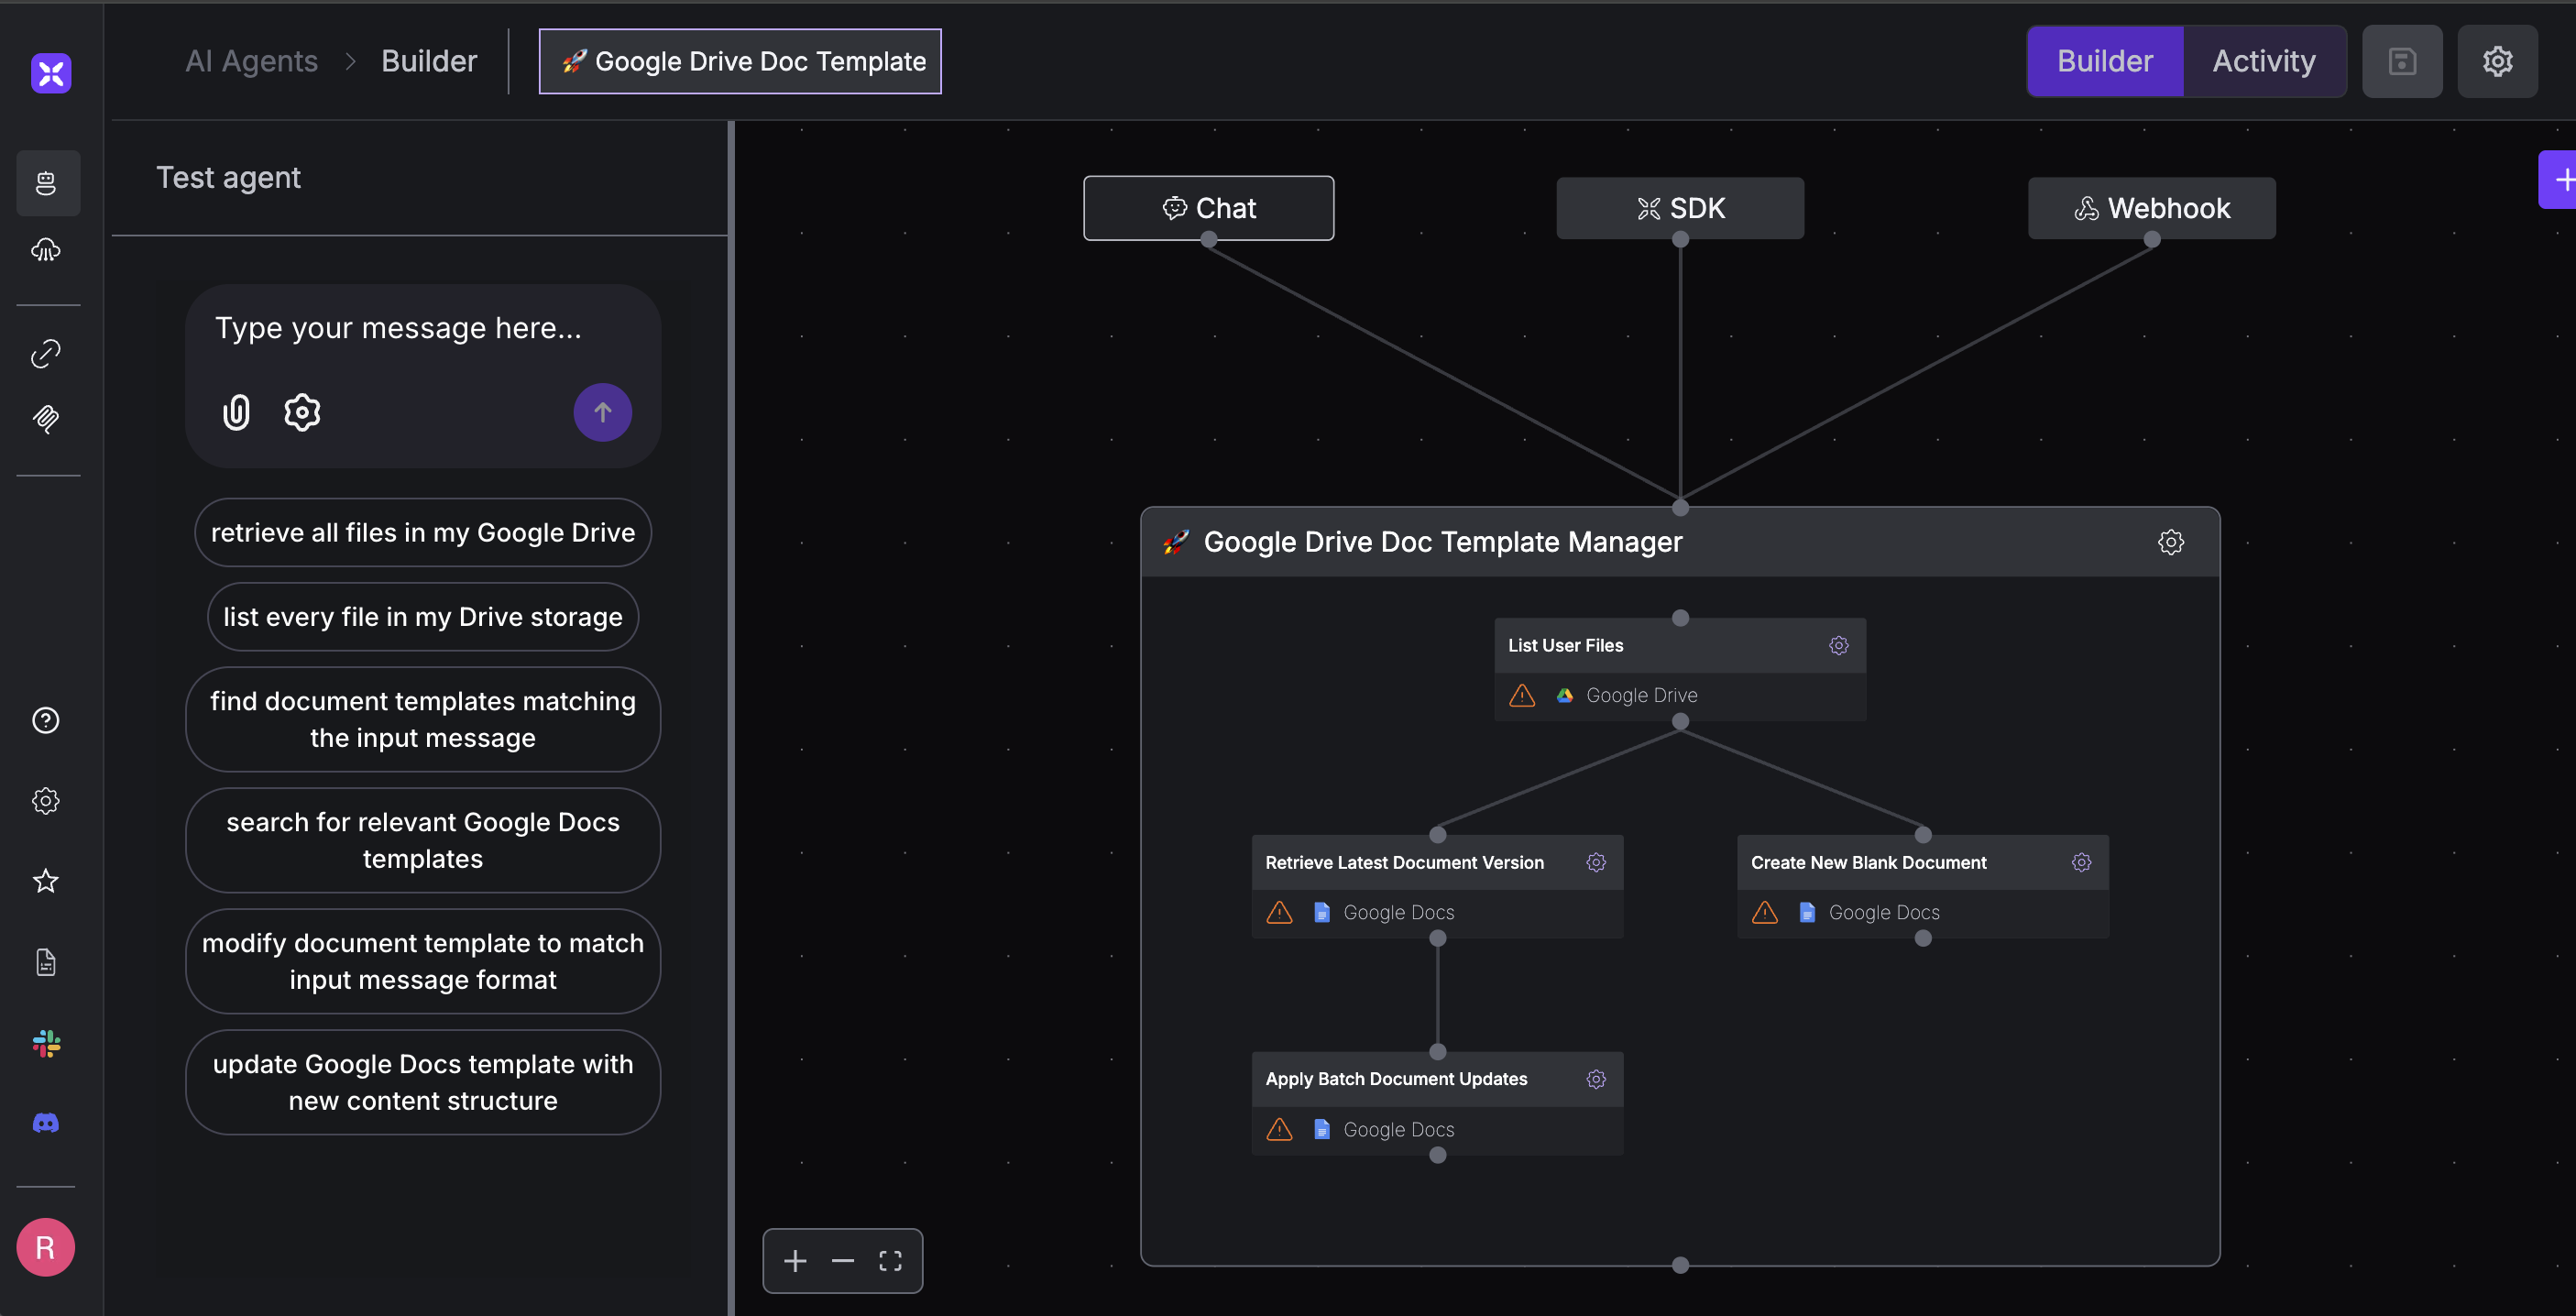
You can see that the AI agent has been created with logic that directly reflects the prompt we gave using Planner. Since we specifically asked the agent to list all files on Google Drive and read the content of a Google Docs file, xpander.ai smartly included Google Drive and Google Docs as the interfaces needed for this task. Aside of Google Drive and Google Docs, xpander.ai also supports a collection of interfaces and tools from popular SaaS platforms like Reddit, Slack, Notion, OneDrive, and more. These interfaces can be easily integrated with your agent, giving it access to those platforms and enabling you to automate countless use cases.
Each interface comes with its own set of operations (tools). An operation serves a specific purpose, either retrieving an event ID, reading an event’s content, updating an event, or something else.
Your AI agent can call one or more of these operations as part of its workflow to complete a task. For example, in the visualization below, you can see that the Google Docs interface has three distinct operations to choose from. You can view detailed descriptions of each operation directly in the xpander Workbench.
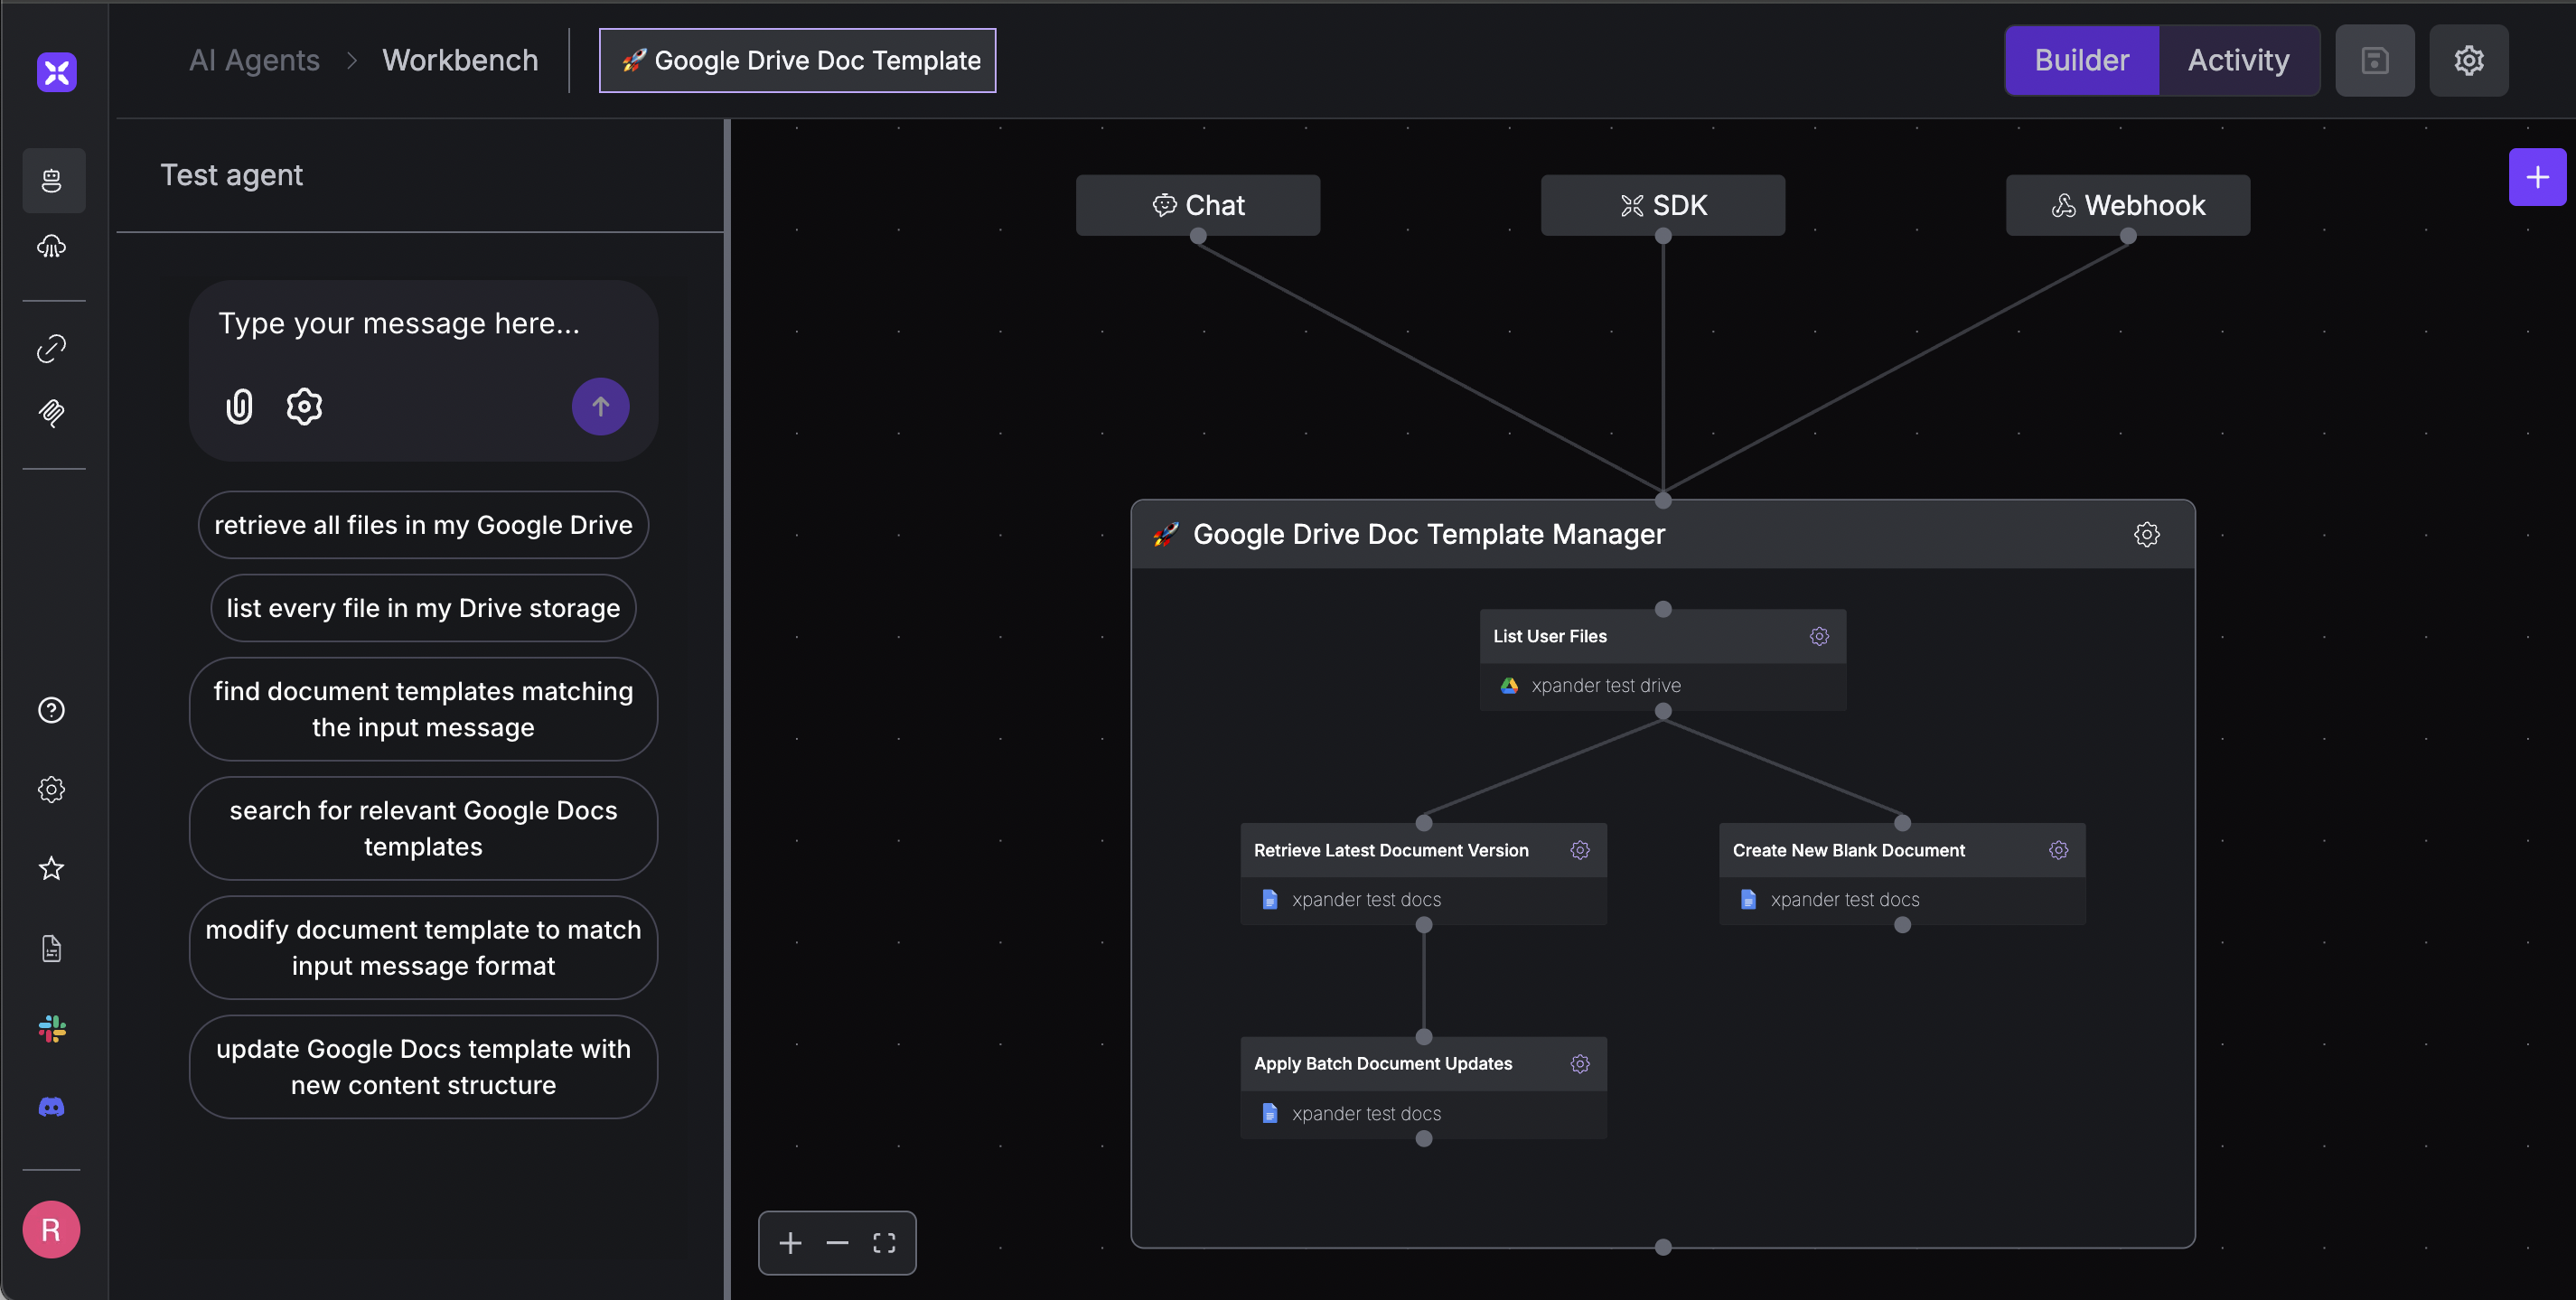
By looking at the graph visualization, we can see that xpander has intelligently integrated several operations from both Google Docs and Google Drive into our agent. These operations are not random; they are highly relevant operations selected by xpander that can help the agent to complete the task. However, you might also notice a warning icon next to each operation. This means they aren’t usable just yet.
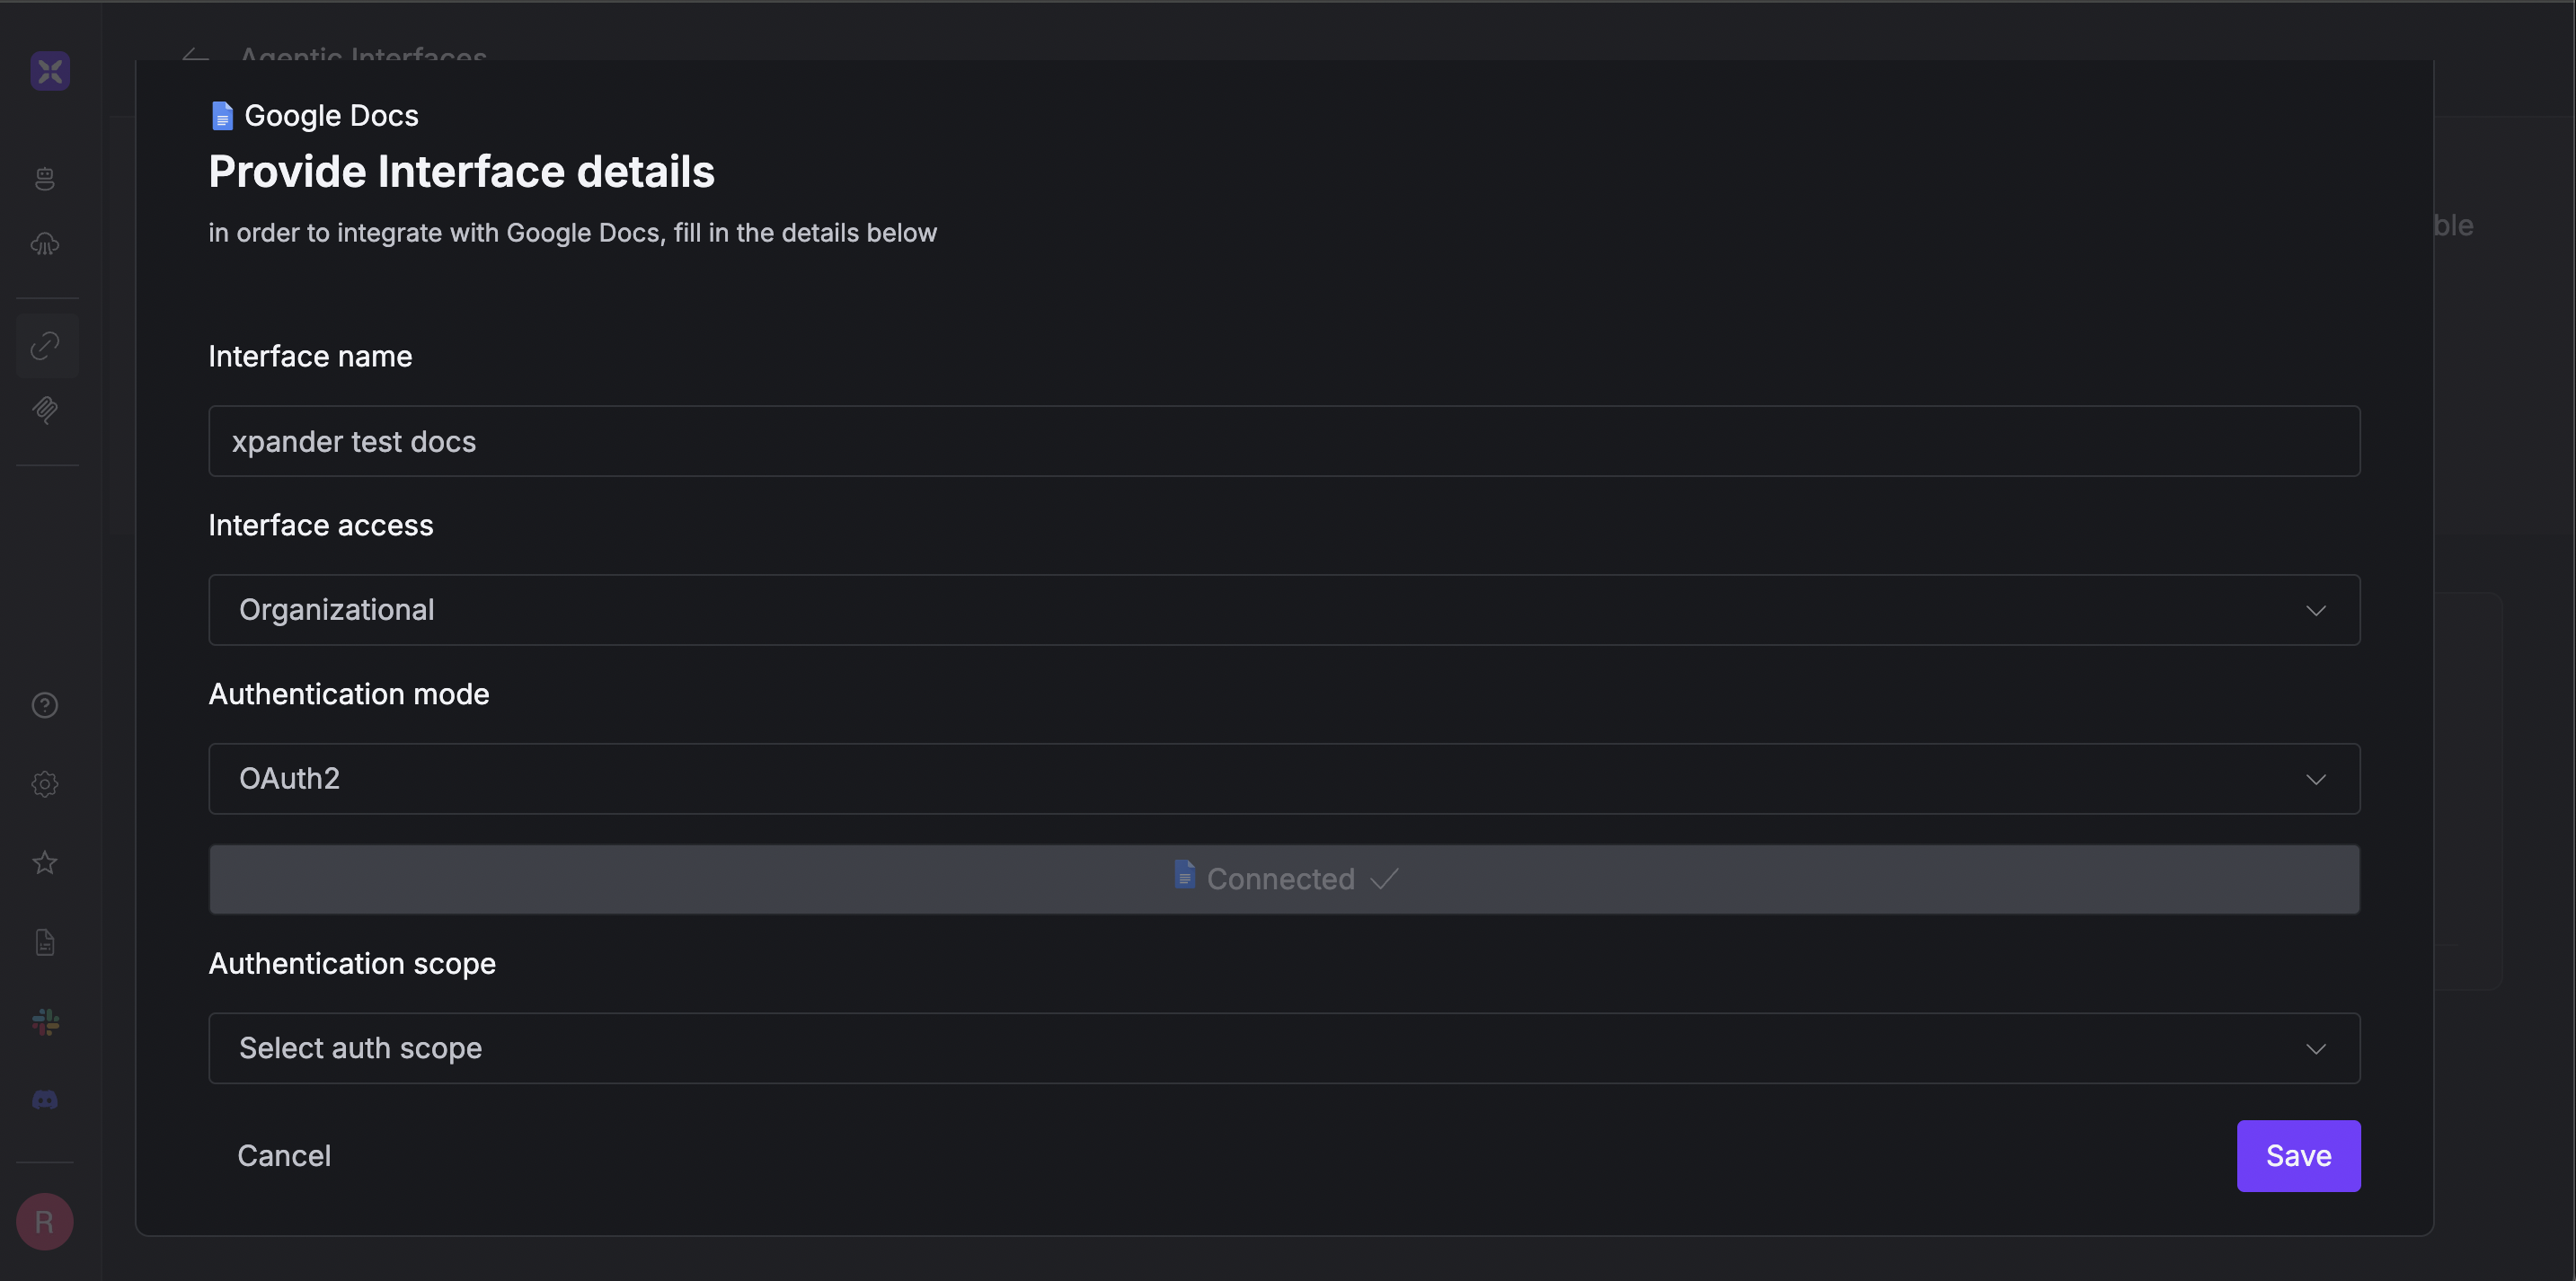
To enable these operations, you need to grant xpander permission to access the connectors (your Google Drive and Google Docs accounts). There are two ways to do this. The easiest is to click directly on the warning icon in the operation box within the graph visualization. Alternatively, you can follow these steps:
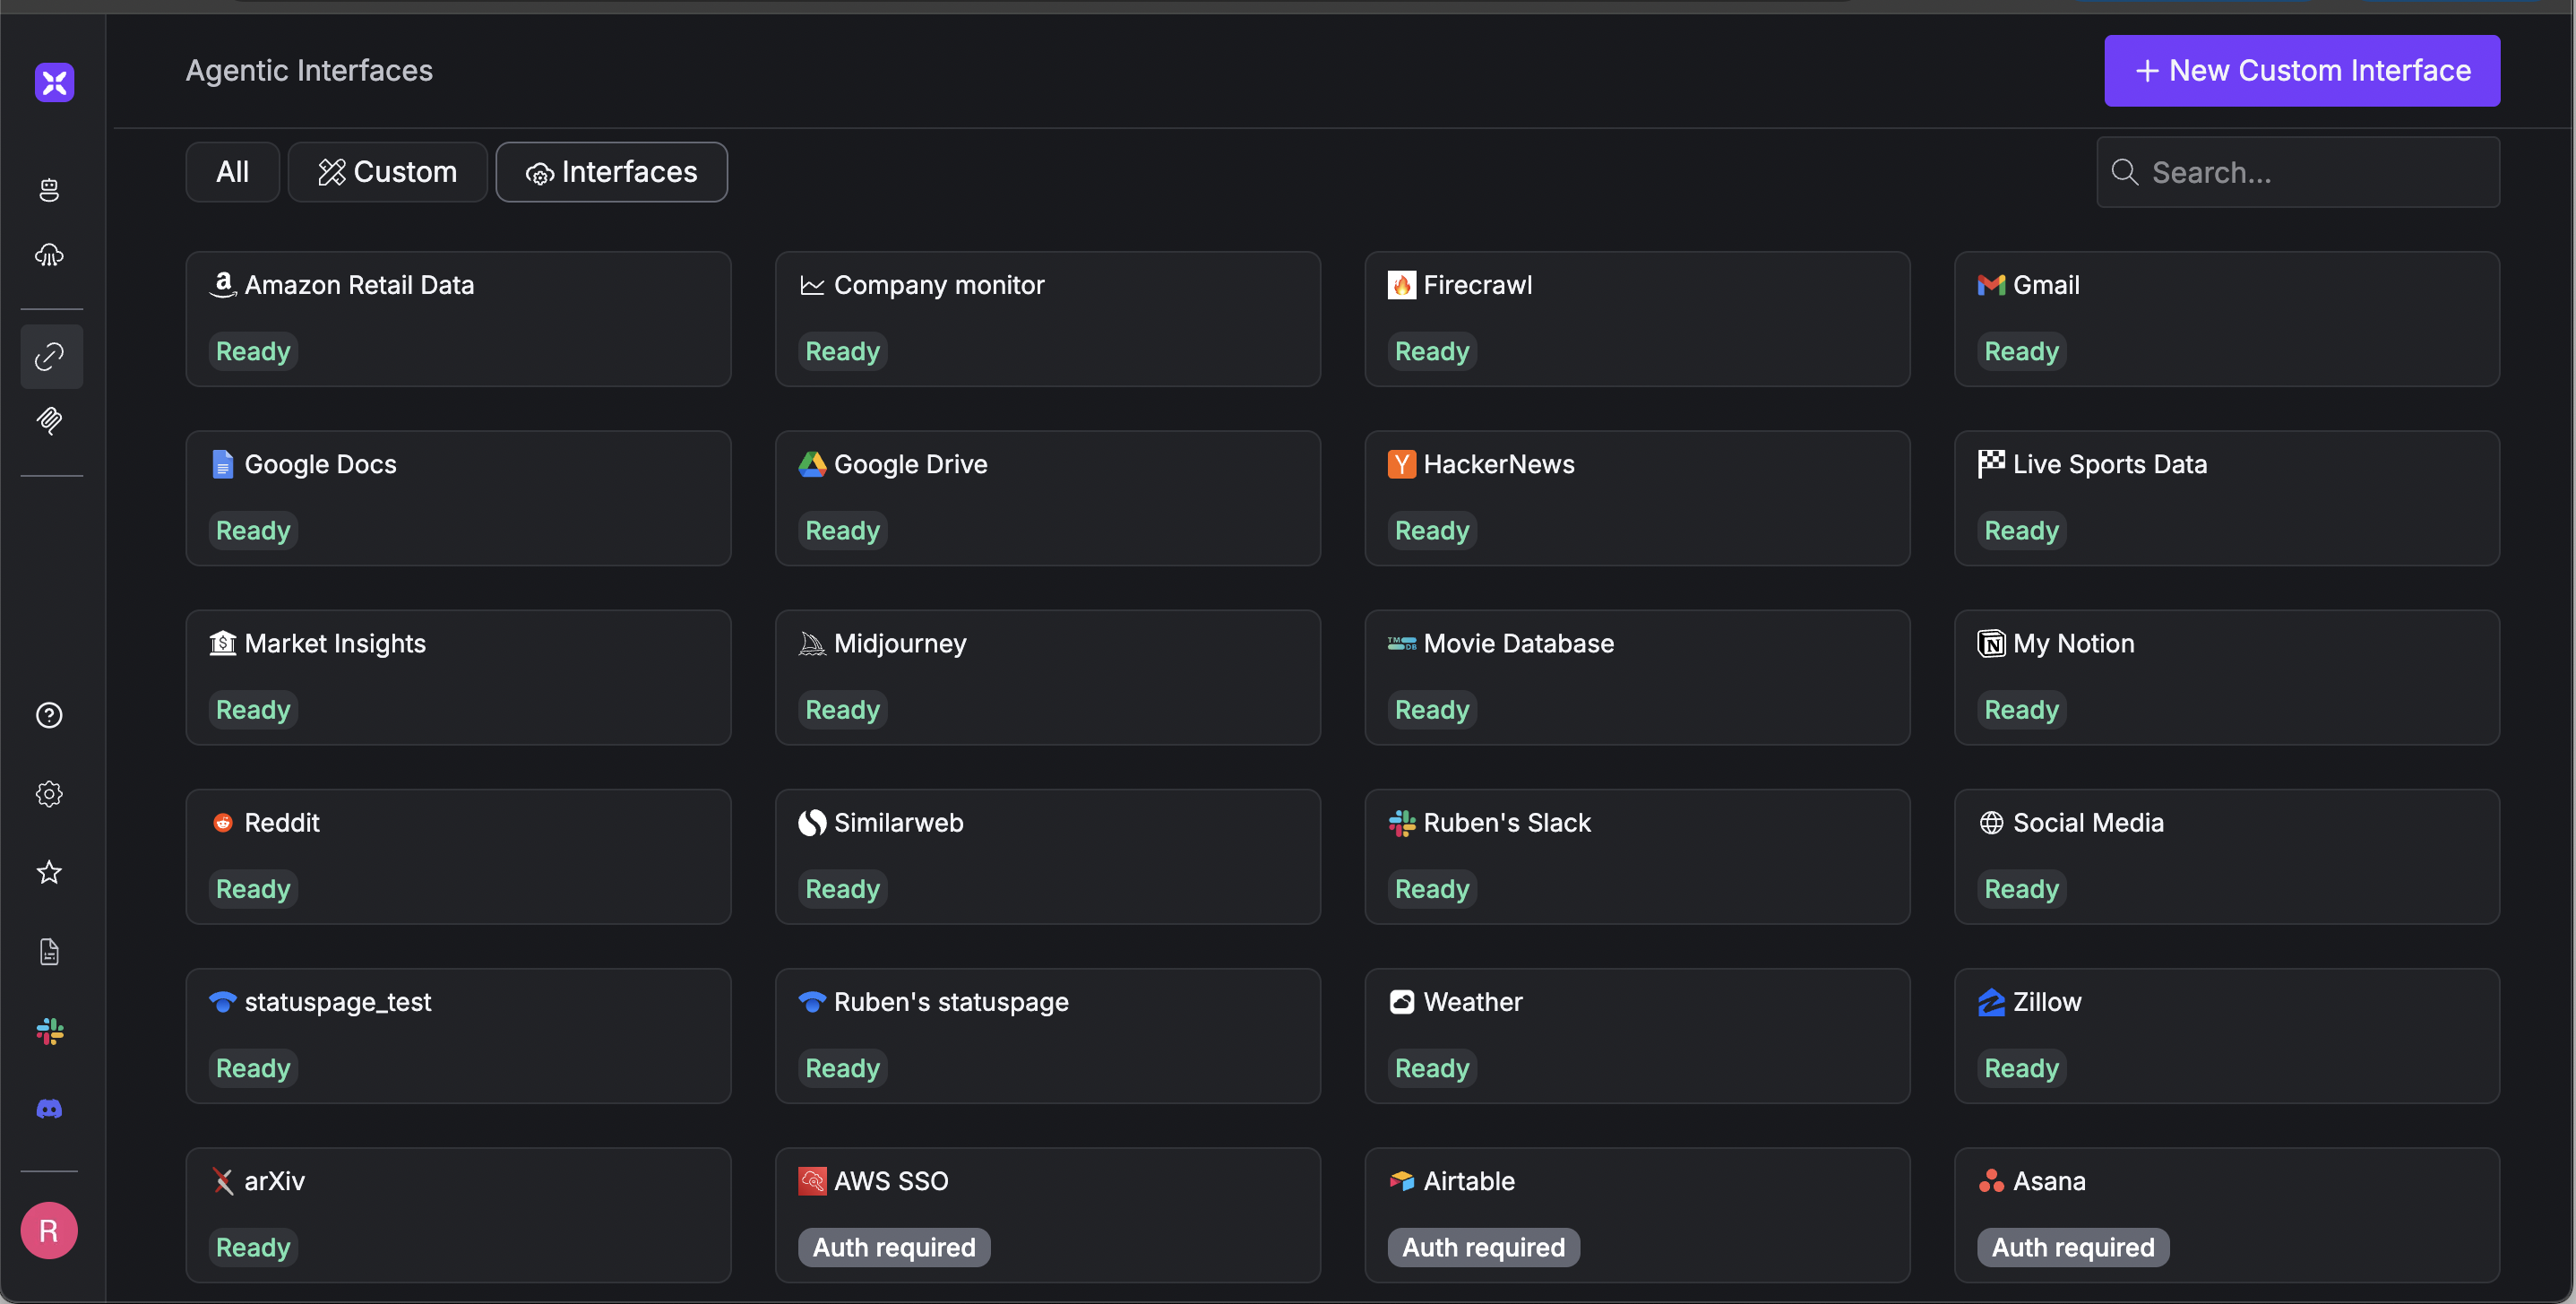
- Go to the sidebar and click “Interfaces.”
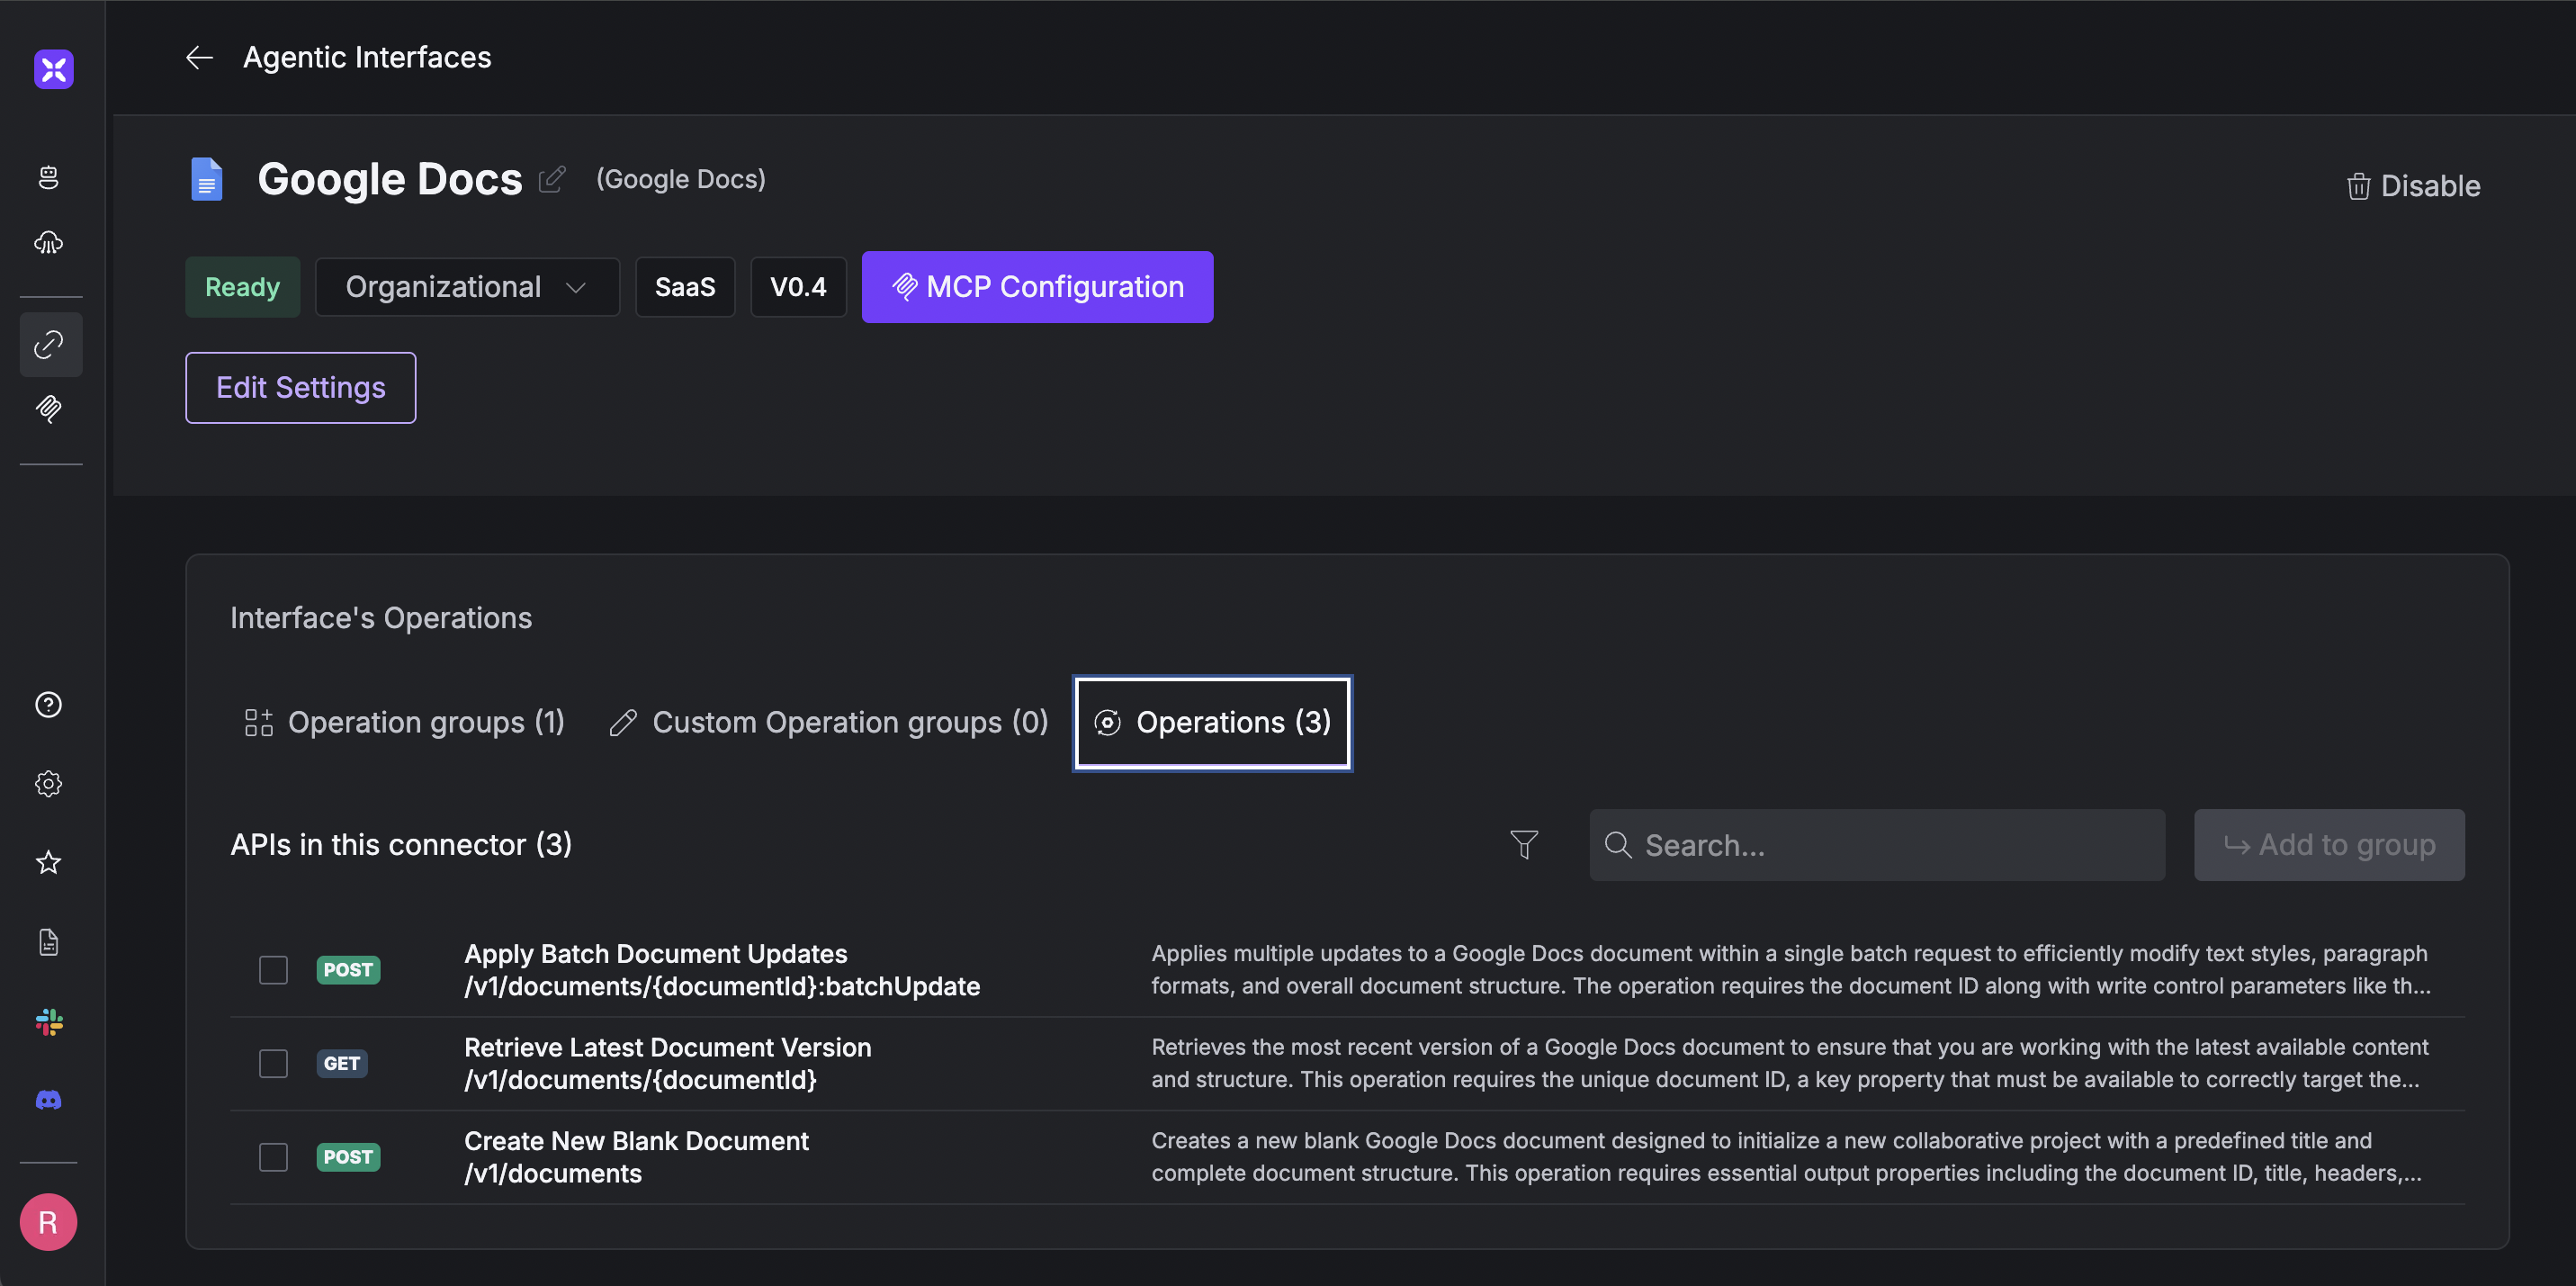
- Select the relevant interface you want to configure (Google Drive and Google Docs in our case)
- Click “Other auth options.”
Once access is granted, you’ll see in the graph visualization that the operations are now fully activated and ready to be used by your agent.
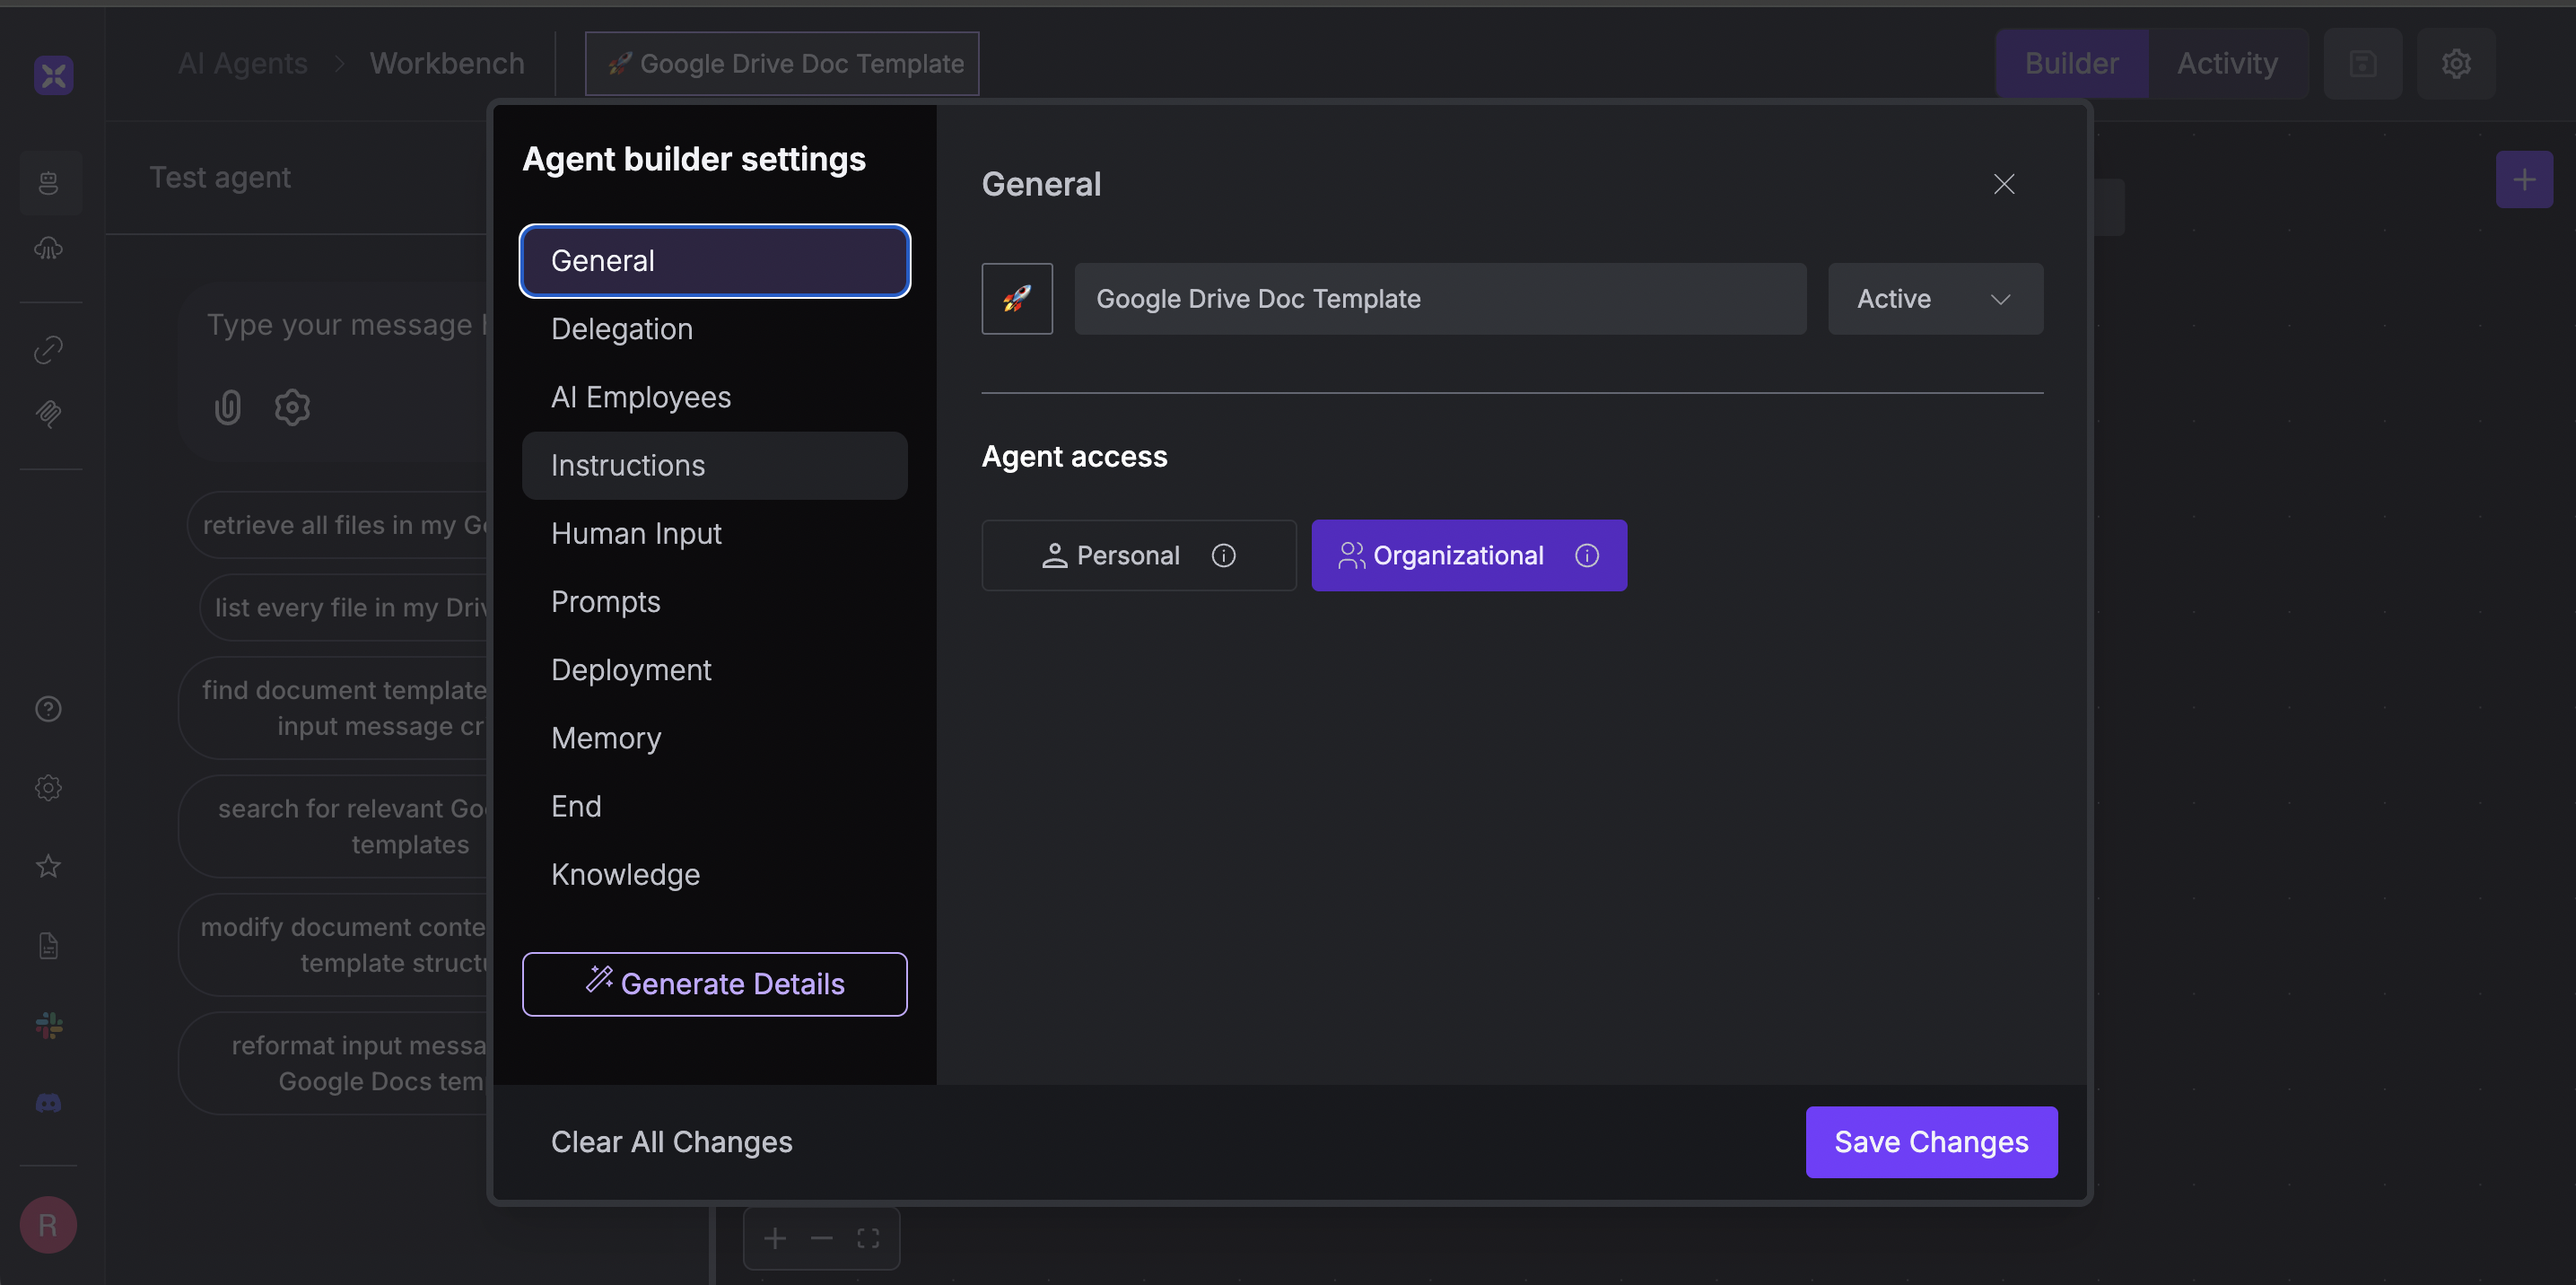
You can also fine-tune your agent’s settings by clicking the gear icon at the top right of the agent box in the graph.
Within the settings, you’ll find several aspects you can tweak to customize your agent’s behavior, such as memory strategy, model provider, interactions between agents in a multi-agent workflow, agent roles, deployment options, and more.
The default values for each setting are intelligently generated by the Planner based on your prompt description. However, in most cases, you’ll want to customize them to better fit your specific needs and use case. You can refer to this section of the xpander docs to learn more about these settings.
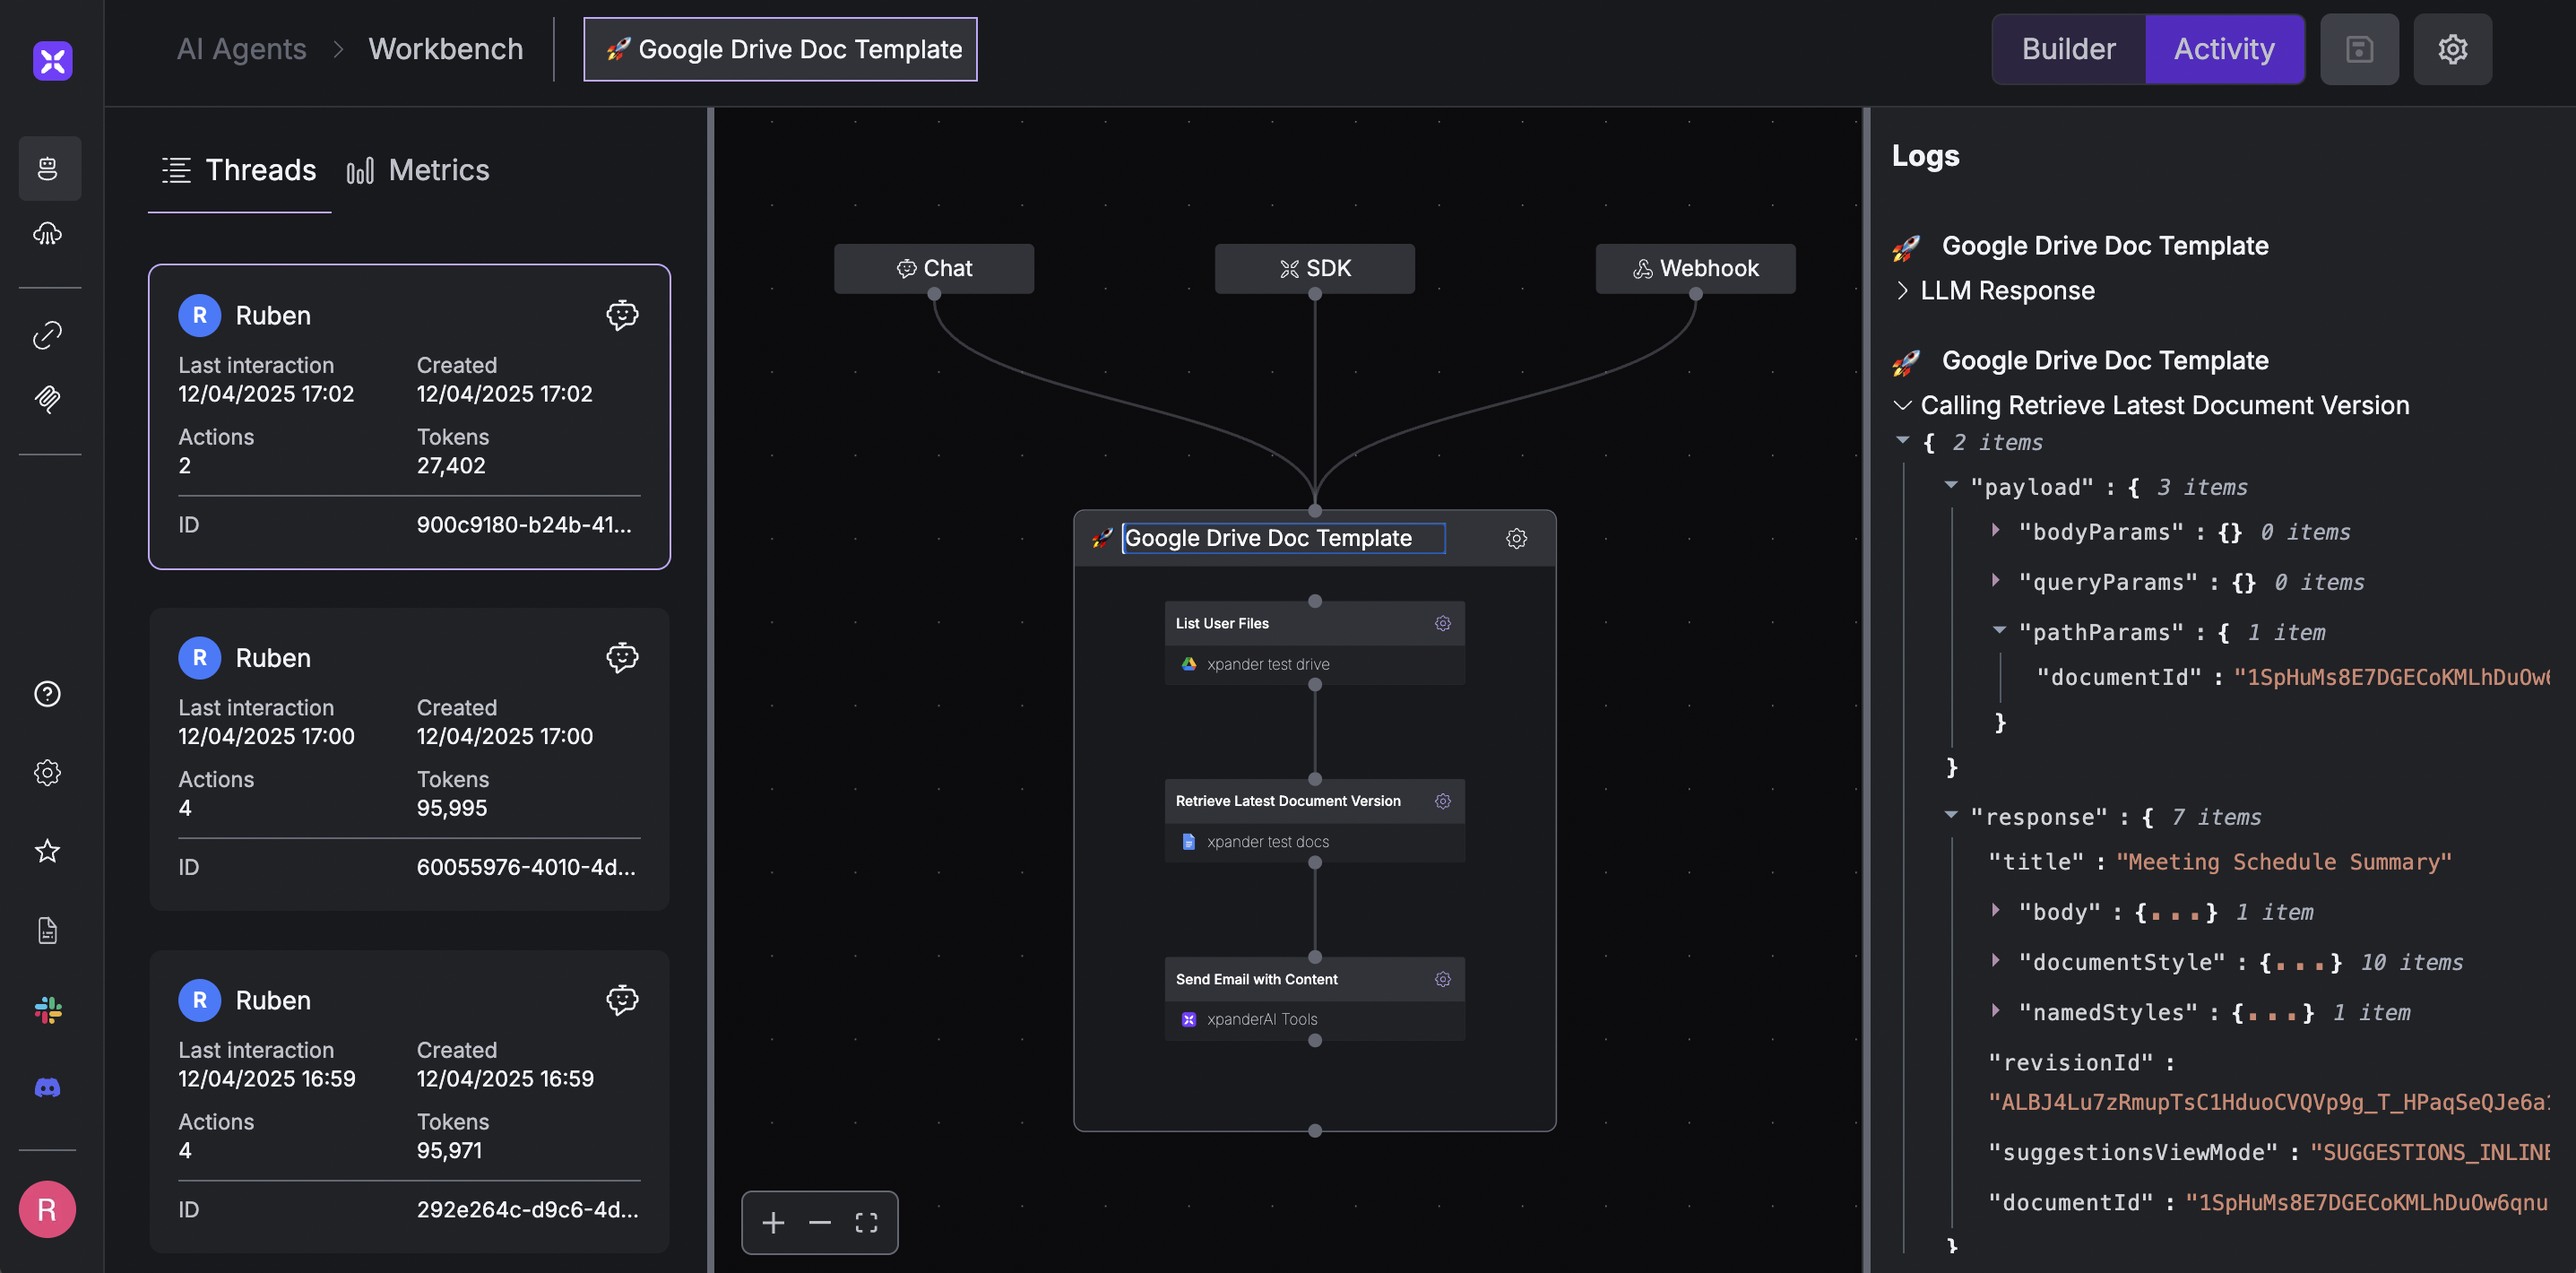
Using Chat and Visual Tester to Check Agent’s Workflow
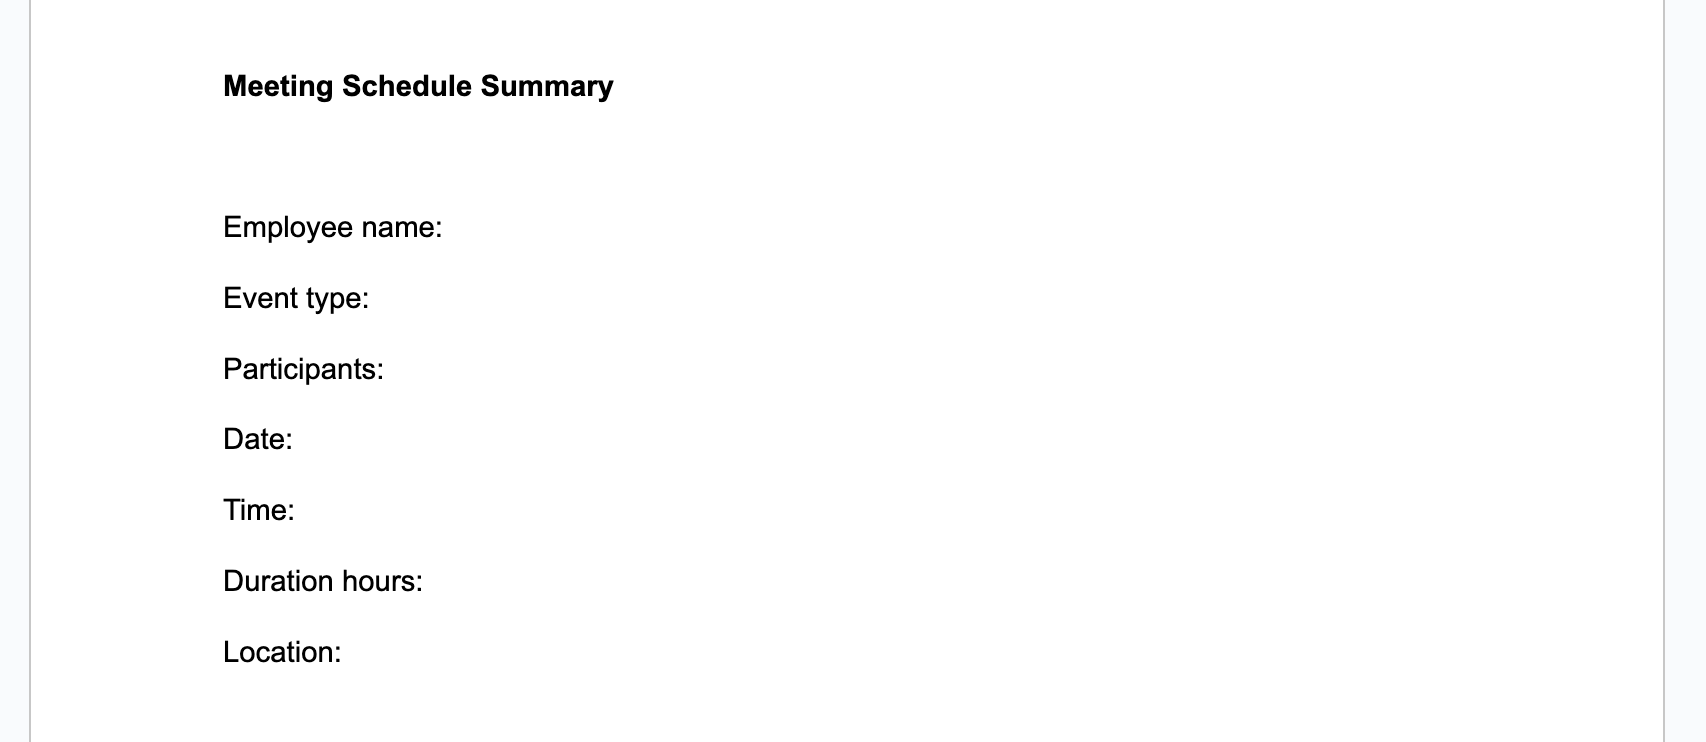
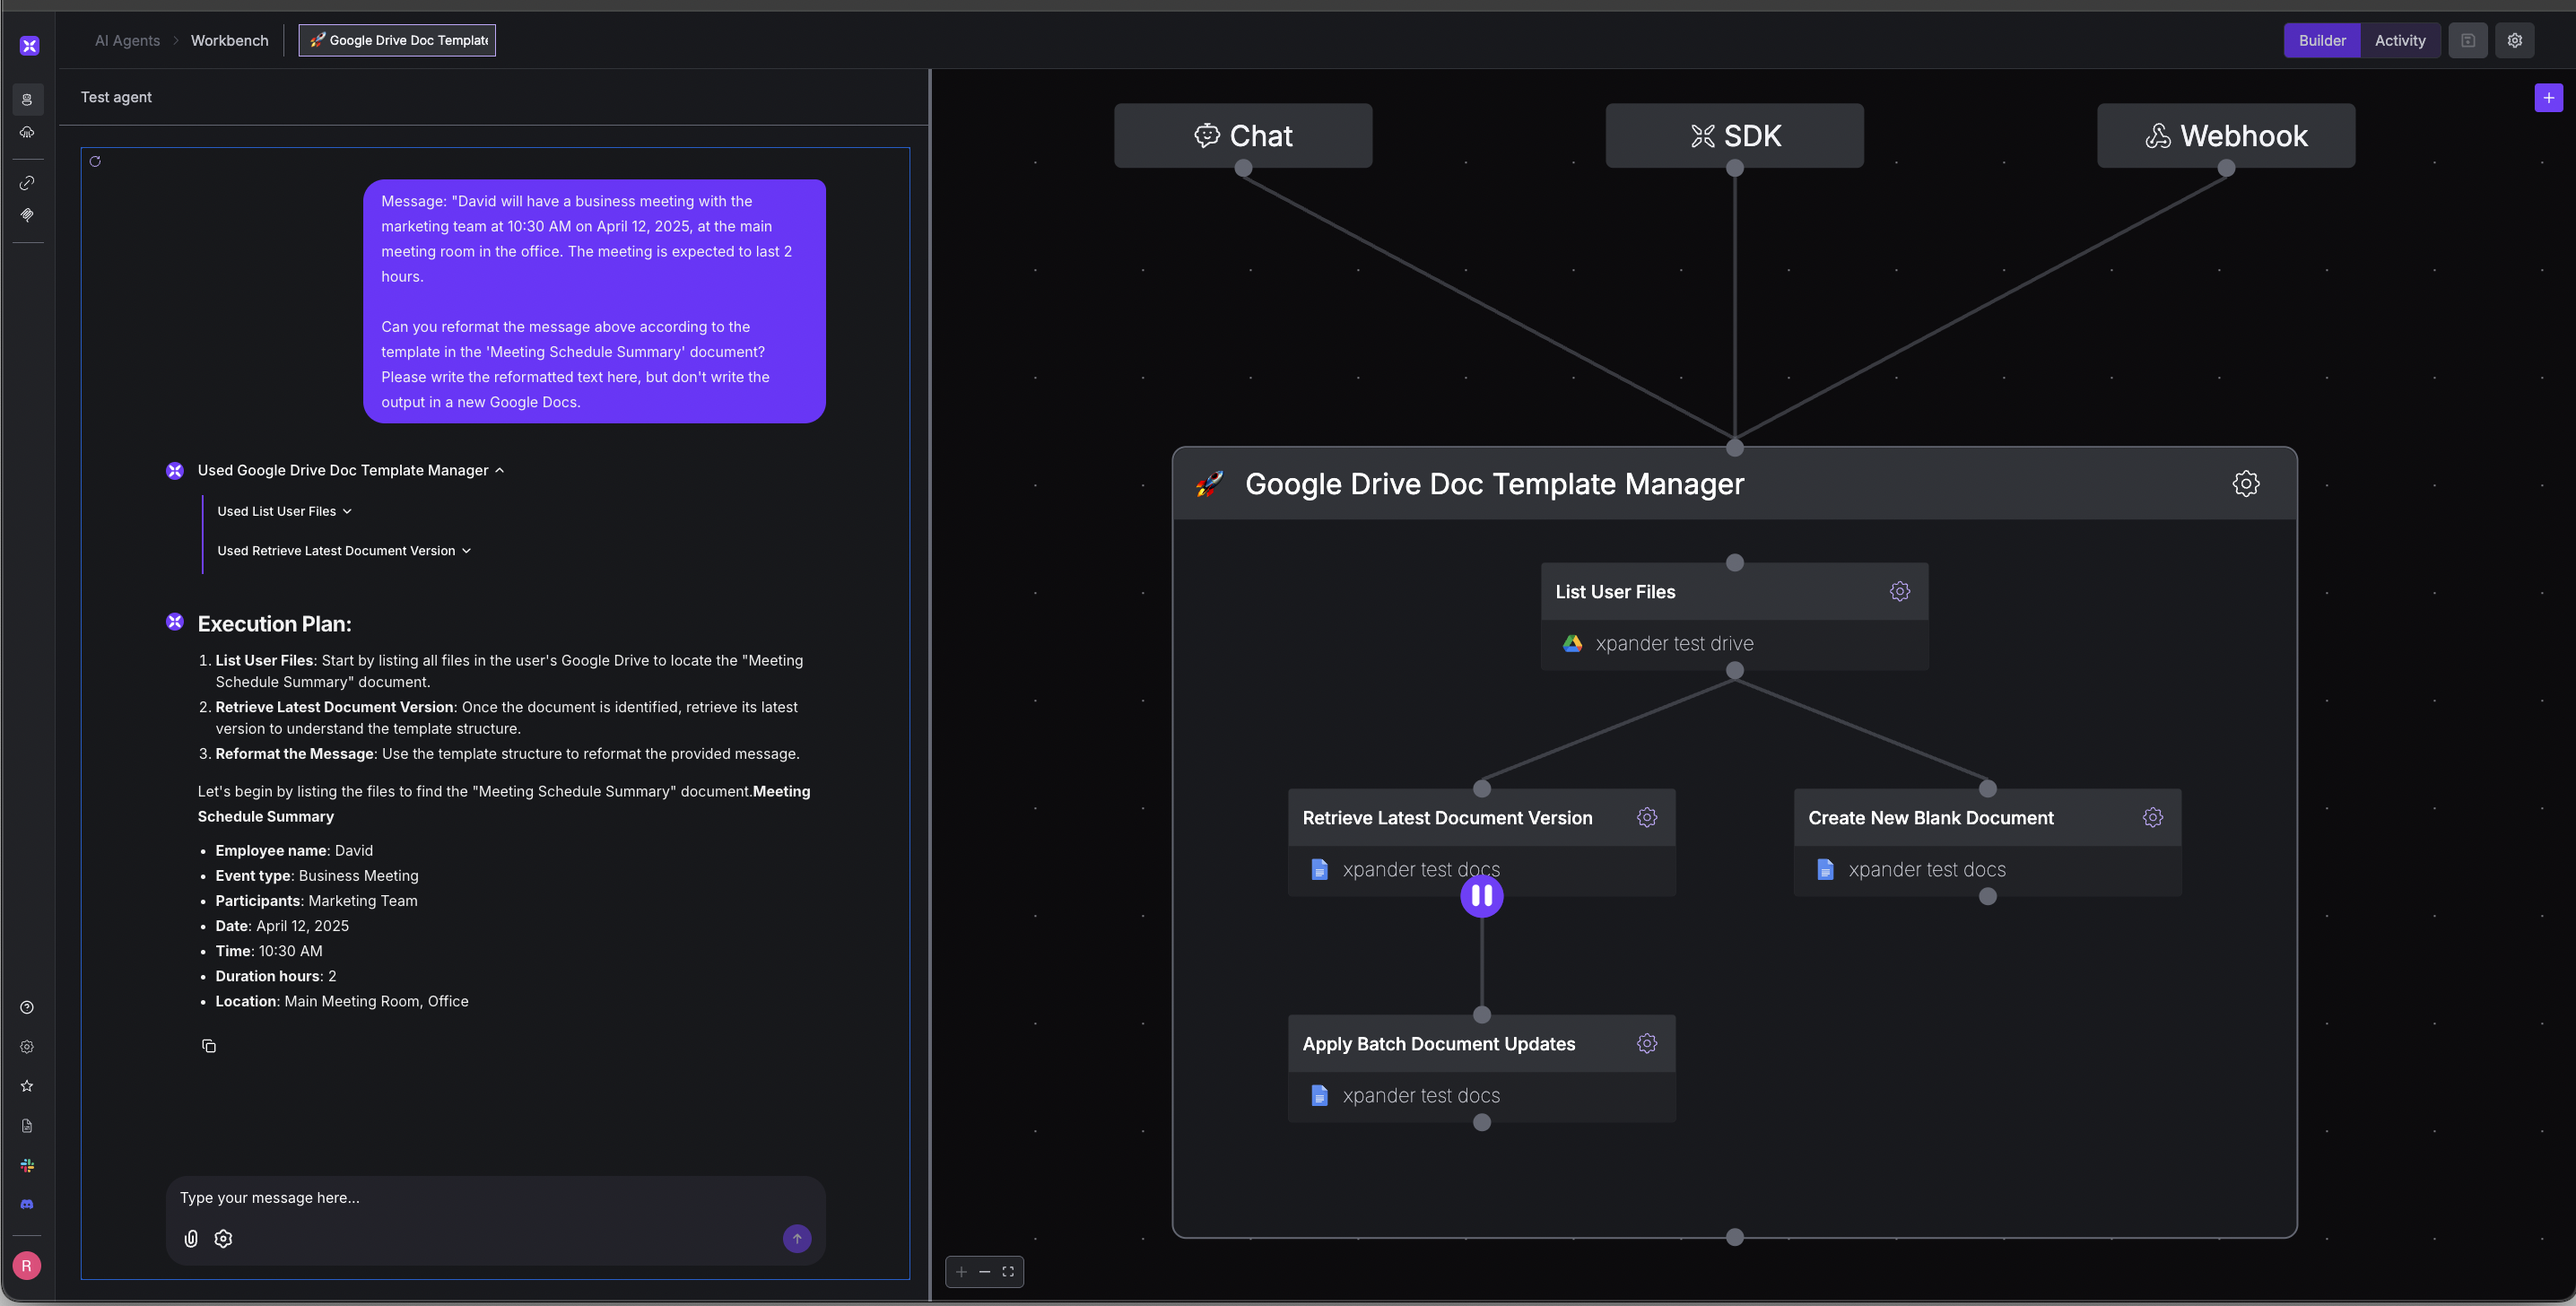
Although the Planner has intelligently built and configured the AI agent’s workflow for us, it’s still important to review and verify how the workflow operates. There are several ways to check your AI agent’s workflow in xpander: Chat, SDK, and Webhook. Among these, Chat is the quickest and most accessible way to test your agent. Once everything is set up and the necessary interface permissions are granted, you can use the Chat and Visual Tester features in the Workbench to explore how your agent performs. The Chat and Visual Tester provide an intuitive visual breakdown of how the agent interprets your prompt. You can track the agent’s workflow as well as the input and output of each operation it uses to complete a task. Based on what you see, you can then easily make adjustments, like adding or removing operations, which we’ll cover in the next section. This process significantly reduces the engineering effort needed to build and fine-tune an AI agent. Let’s say we want to test the agent with the following prompt:Message: “David will have a business meeting with the marketing team at 10:30 AM on April 12, 2025, at the main meeting room in the office. The meeting is expected to last 2 hours.” Can you reformat the message above according to the template in the ‘Meeting Schedule Summary’ document? Please write the reformatted text here, but don’t write the output in a new Google Docs.And the Google Docs template we’re working with (stored on Google Drive) looks like this:
If everything is set up correctly, the AI agent should take the input message from our prompt, transform it according to the structure in the Google Docs template, and return the final result to us.
To test this, put the prompt in the Chat feature and watch how the agent works through each step using the visual workflow tracker.
In our example, the agent will:
- Use the “List User Files” operation to list all the files on your Google Drive and find the “Meeting Schedule Summary” document.
- Retrieve the document ID of the file.
- Use that ID to call the “Retrieve Latest Document Version” operation from Google Docs and get the content of the template.
- Use the template’s content as a reference to transform your input message into a structured format.
- Finally, return the structured result to you.
Removing or Adding Interfaces and Updating Agent’s Workflow
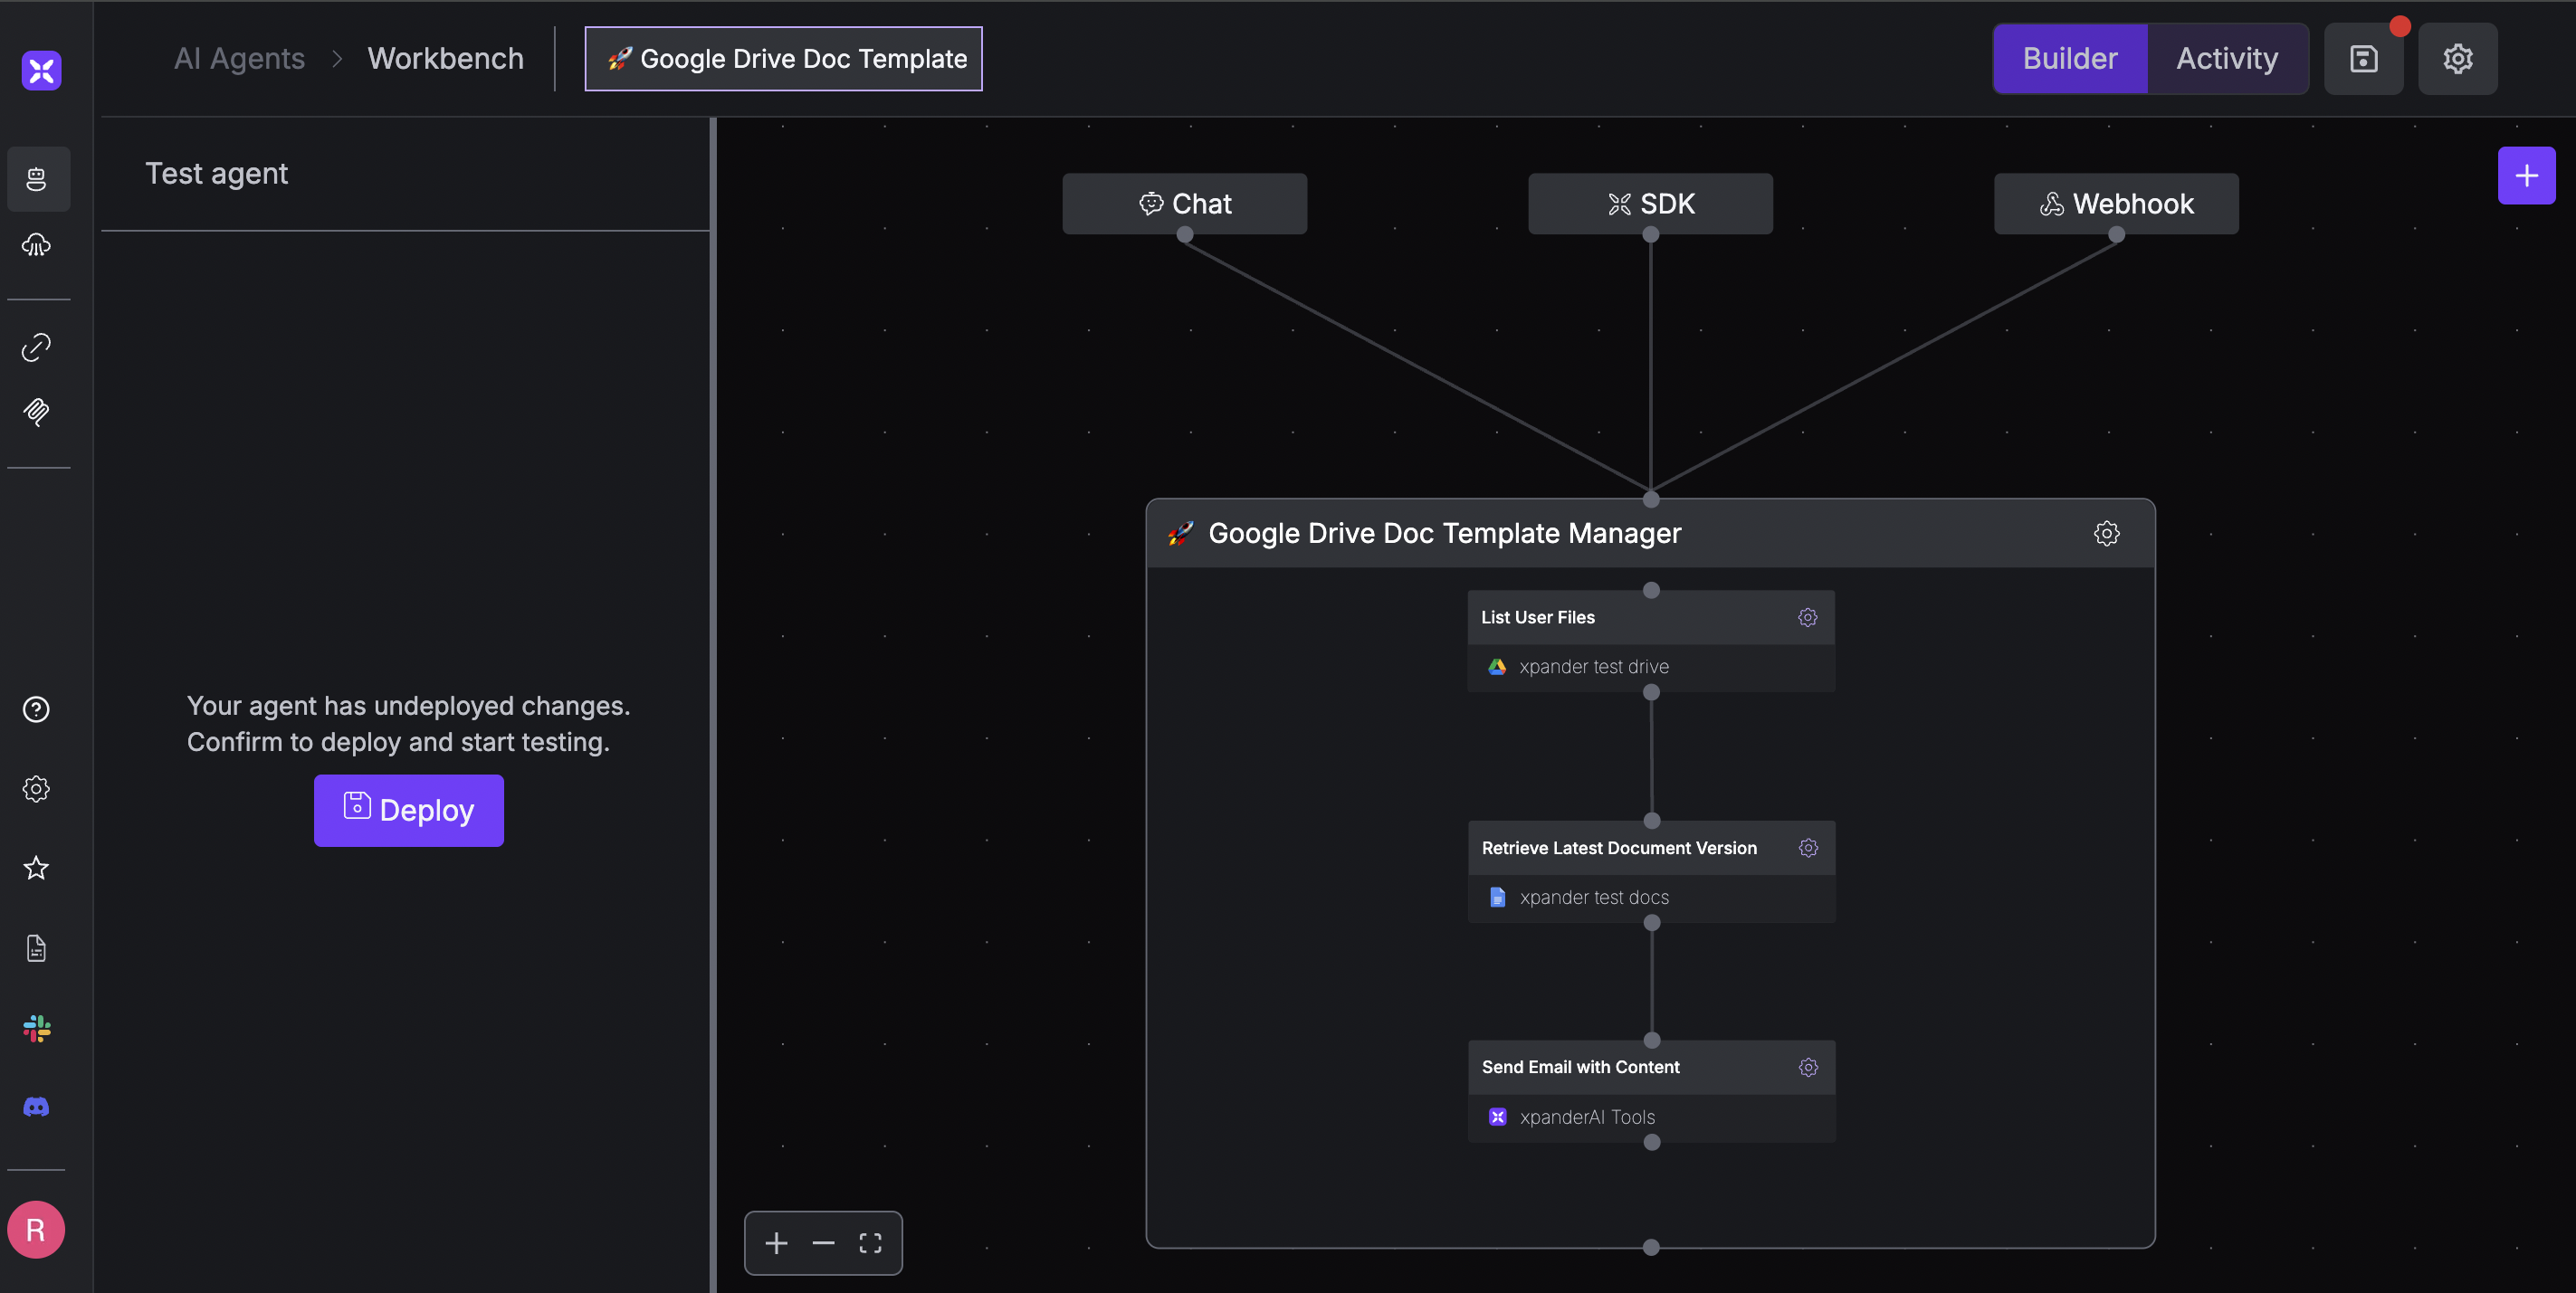
From the Visual Tester, we can see that to complete the task, our AI agent only needs two operations, even though four operations were initially provided. If needed, we can remove the unused ones. To do this, hover over the box of the operation you want to remove, then click the trash icon in the top-right corner of the box.
We can also add new interfaces and operations for the agent to use. For example, let’s say we want the agent’s response to be sent via email. To do this, we can use xpander’s built-in action “Send Email with Content”. As the name suggests, this function allows the agent to send plain text (in our case, the reformatted message) to an email address we specify in the prompt. You can find this function by clicking the “+” icon in the top-right of the UI and selecting “Built-in actions”.
Aside from adding or removing operations, you can also modify the agent’s workflow by adjusting the connections between operations in the graph.
In our use case, we want the agent to send the message via email after it finishes the reformatting process. To do this, we can create a new connection in the graph by dragging a line from the end node of the “Retrieve Last Document Version” operation to the start node of “Send Email with Content.”
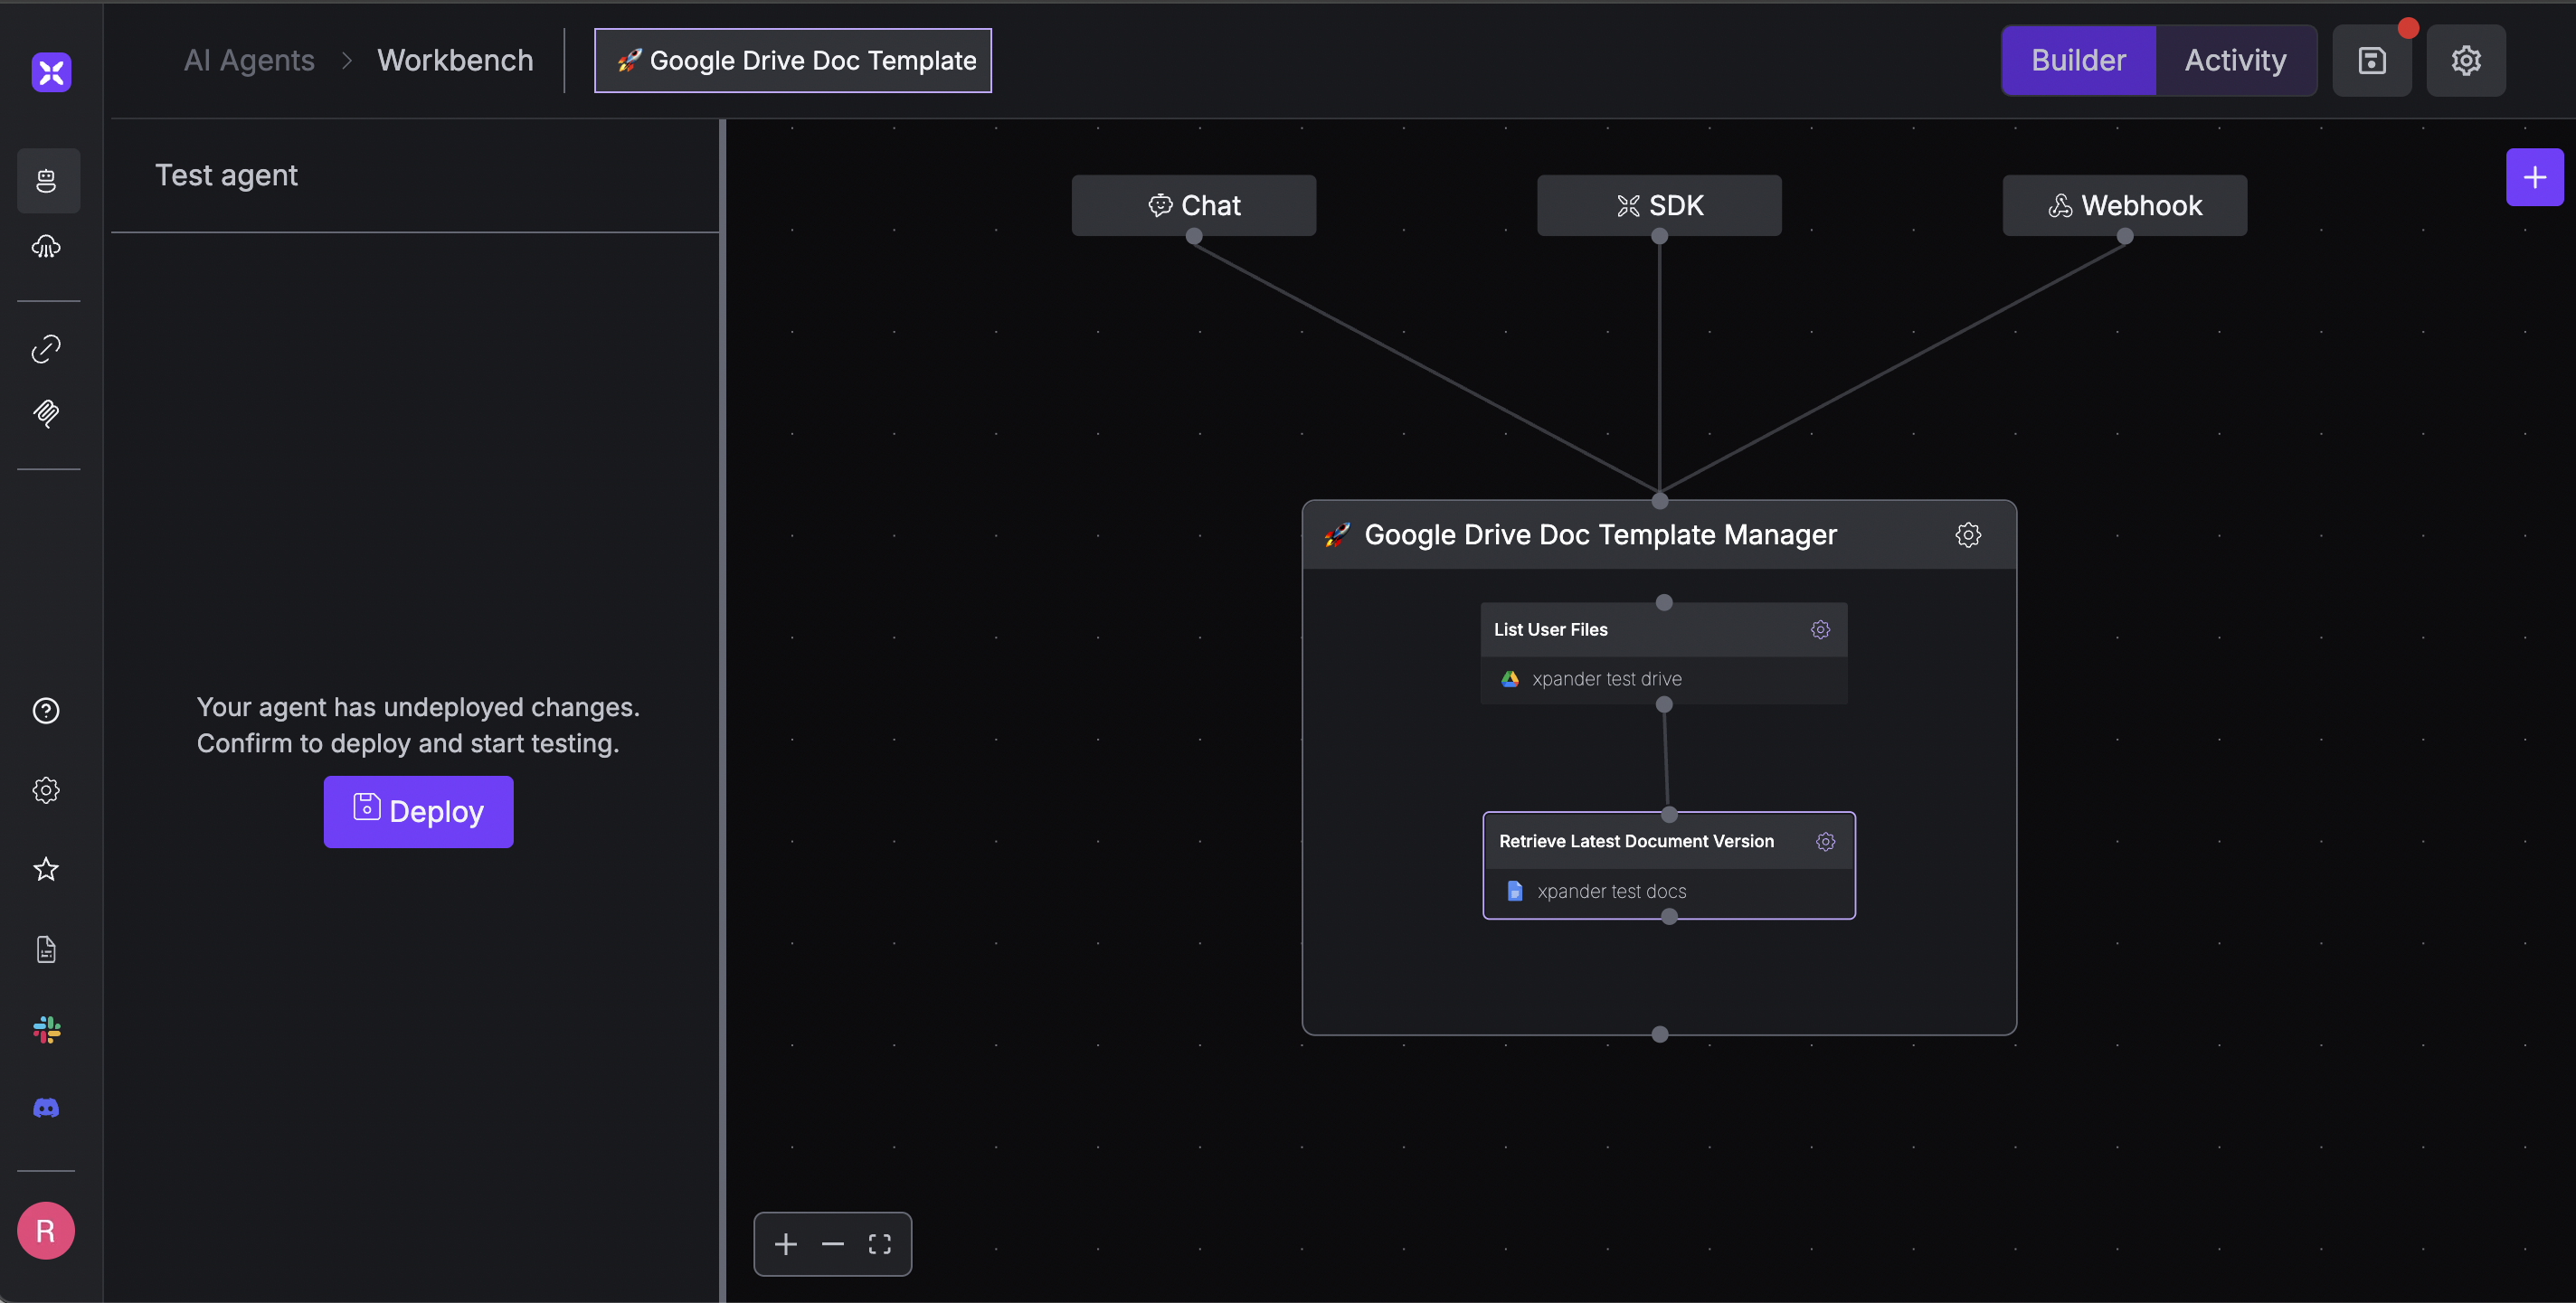
Once you’ve made changes to the graph, you’ll need to re-deploy the agent before testing it. Just click the “Deploy” button, and you’re ready to go. You can now test the updated workflow with a prompt like the following:
Message: “David will have a business meeting with the marketing team at 10:30 AM on April 12, 2025, at the main meeting room in the office. The meeting is expected to last 2 hours.” Can you reformat the message above according to the template in the ‘Meeting Schedule Summary’ document? Please send the reformatted message to myemail@zohomail.eu and write the reformatted text here as well.As you can see in the image below, after reformatting the message using the “Retrieve Latest Document Version” operation, the agent now uses the newly added “Send Email with Content” operation to send the result to the specified email address.
Once you’ve finished testing and are confident that the agent’s workflow meets your expectations, you can easily share the agent with your team. Just click the “Chat” node at the top of the graph visualization to generate a unique URL for the agent. Anyone with the link can interact with the agent through a Chainlit-powered chat interface.
Using xpander’s SDK to Interact with an Agent
Aside from using the Chat feature available in the Workbench, we can also interact with and trigger the agent using the SDK. In this section, we’ll walk through the typical workflow of interacting with an agent using xpander’s Python SDK. The SDK allows you to further customize the workflow of agents built with xpander. For example, you can create custom tools or functions and integrate them into your agent. You can also connect agents built with other frameworks like LangGraph or SmolAgent into your xpander agent. To get started, you’ll first need to install thexpander library along with any required dependencies using pip. Since we’re using OpenAI’s GPT-4o as the agent’s model, we’ll also need to install the openai library.
- The API key for your model provider (OpenAI, Anthropic, Google, etc.)
- Your xpander API key
- The ID of the specific agent you want to interact with
Once you have all three configurations, you can either store them in a .env file and load it with the dotenv library, or just assign them directly as variables if you’re using the code privately. Below is an example of how you can initialize the interaction with the agent.
- name: the name of the function (e.g.,
XpanderMessagingServiceSendEmailWithContent) - description: explains what the function does and when the agent should use it
- parameters: a JSON schema defining the input arguments required to run the function
add_task() method, passing in our input prompt as the argument.
GoogleFileManagementListUserFiles tool to list all files on Google Drive and find the ID of the Google Docs we’re looking for. You can also see the query or input arguments provided by the agent to call the corresponding tool.
Next, we’ll add the agent’s response to memory, call the GoogleFileManagementListUserFiles tool with xpander, and run it using the input arguments provided in the agent’s response.
GoogleDocsDocMgmtRetrieveLatestDocumentVersion tool, which retrieves the content of the document we’re looking for.
Just like before, we’ll add the agent response to the memory, call the corresponding tool, and run it to get its response.
xpfinish-agent-execution-finished to signal that it has everything it needs to complete the task. As usual, we just need to add the agent response to the memory, call the tool, and run it to get the response.
while loop. This way, we keep executing the agent until the is_finished method returns True.
Here’s the final, simplified workflow using a while loop:
- Thread – A thread is created every time you assign a task or input prompt to an agent. It includes information such as the total number of tokens generated and the creation timestamp.
- Log – This contains a detailed breakdown of your agent’s execution steps. You’ll see the agent’s responses, any tools it called, the payload used for those tool calls, and the responses received after each call.