Webhooks allow you to trigger xpander.ai agents from any external system that can make HTTP requests. Perfect for integrating with existing workflows, automation platforms, or custom applications.
Setting Up Your Webhook To enable webhooks for your agent:
Access Task Sources
In the Workbench, navigate to your agent and click the Task Sources tab.
Enable Webhooks
Toggle the Webhook task source and click Configure and test .
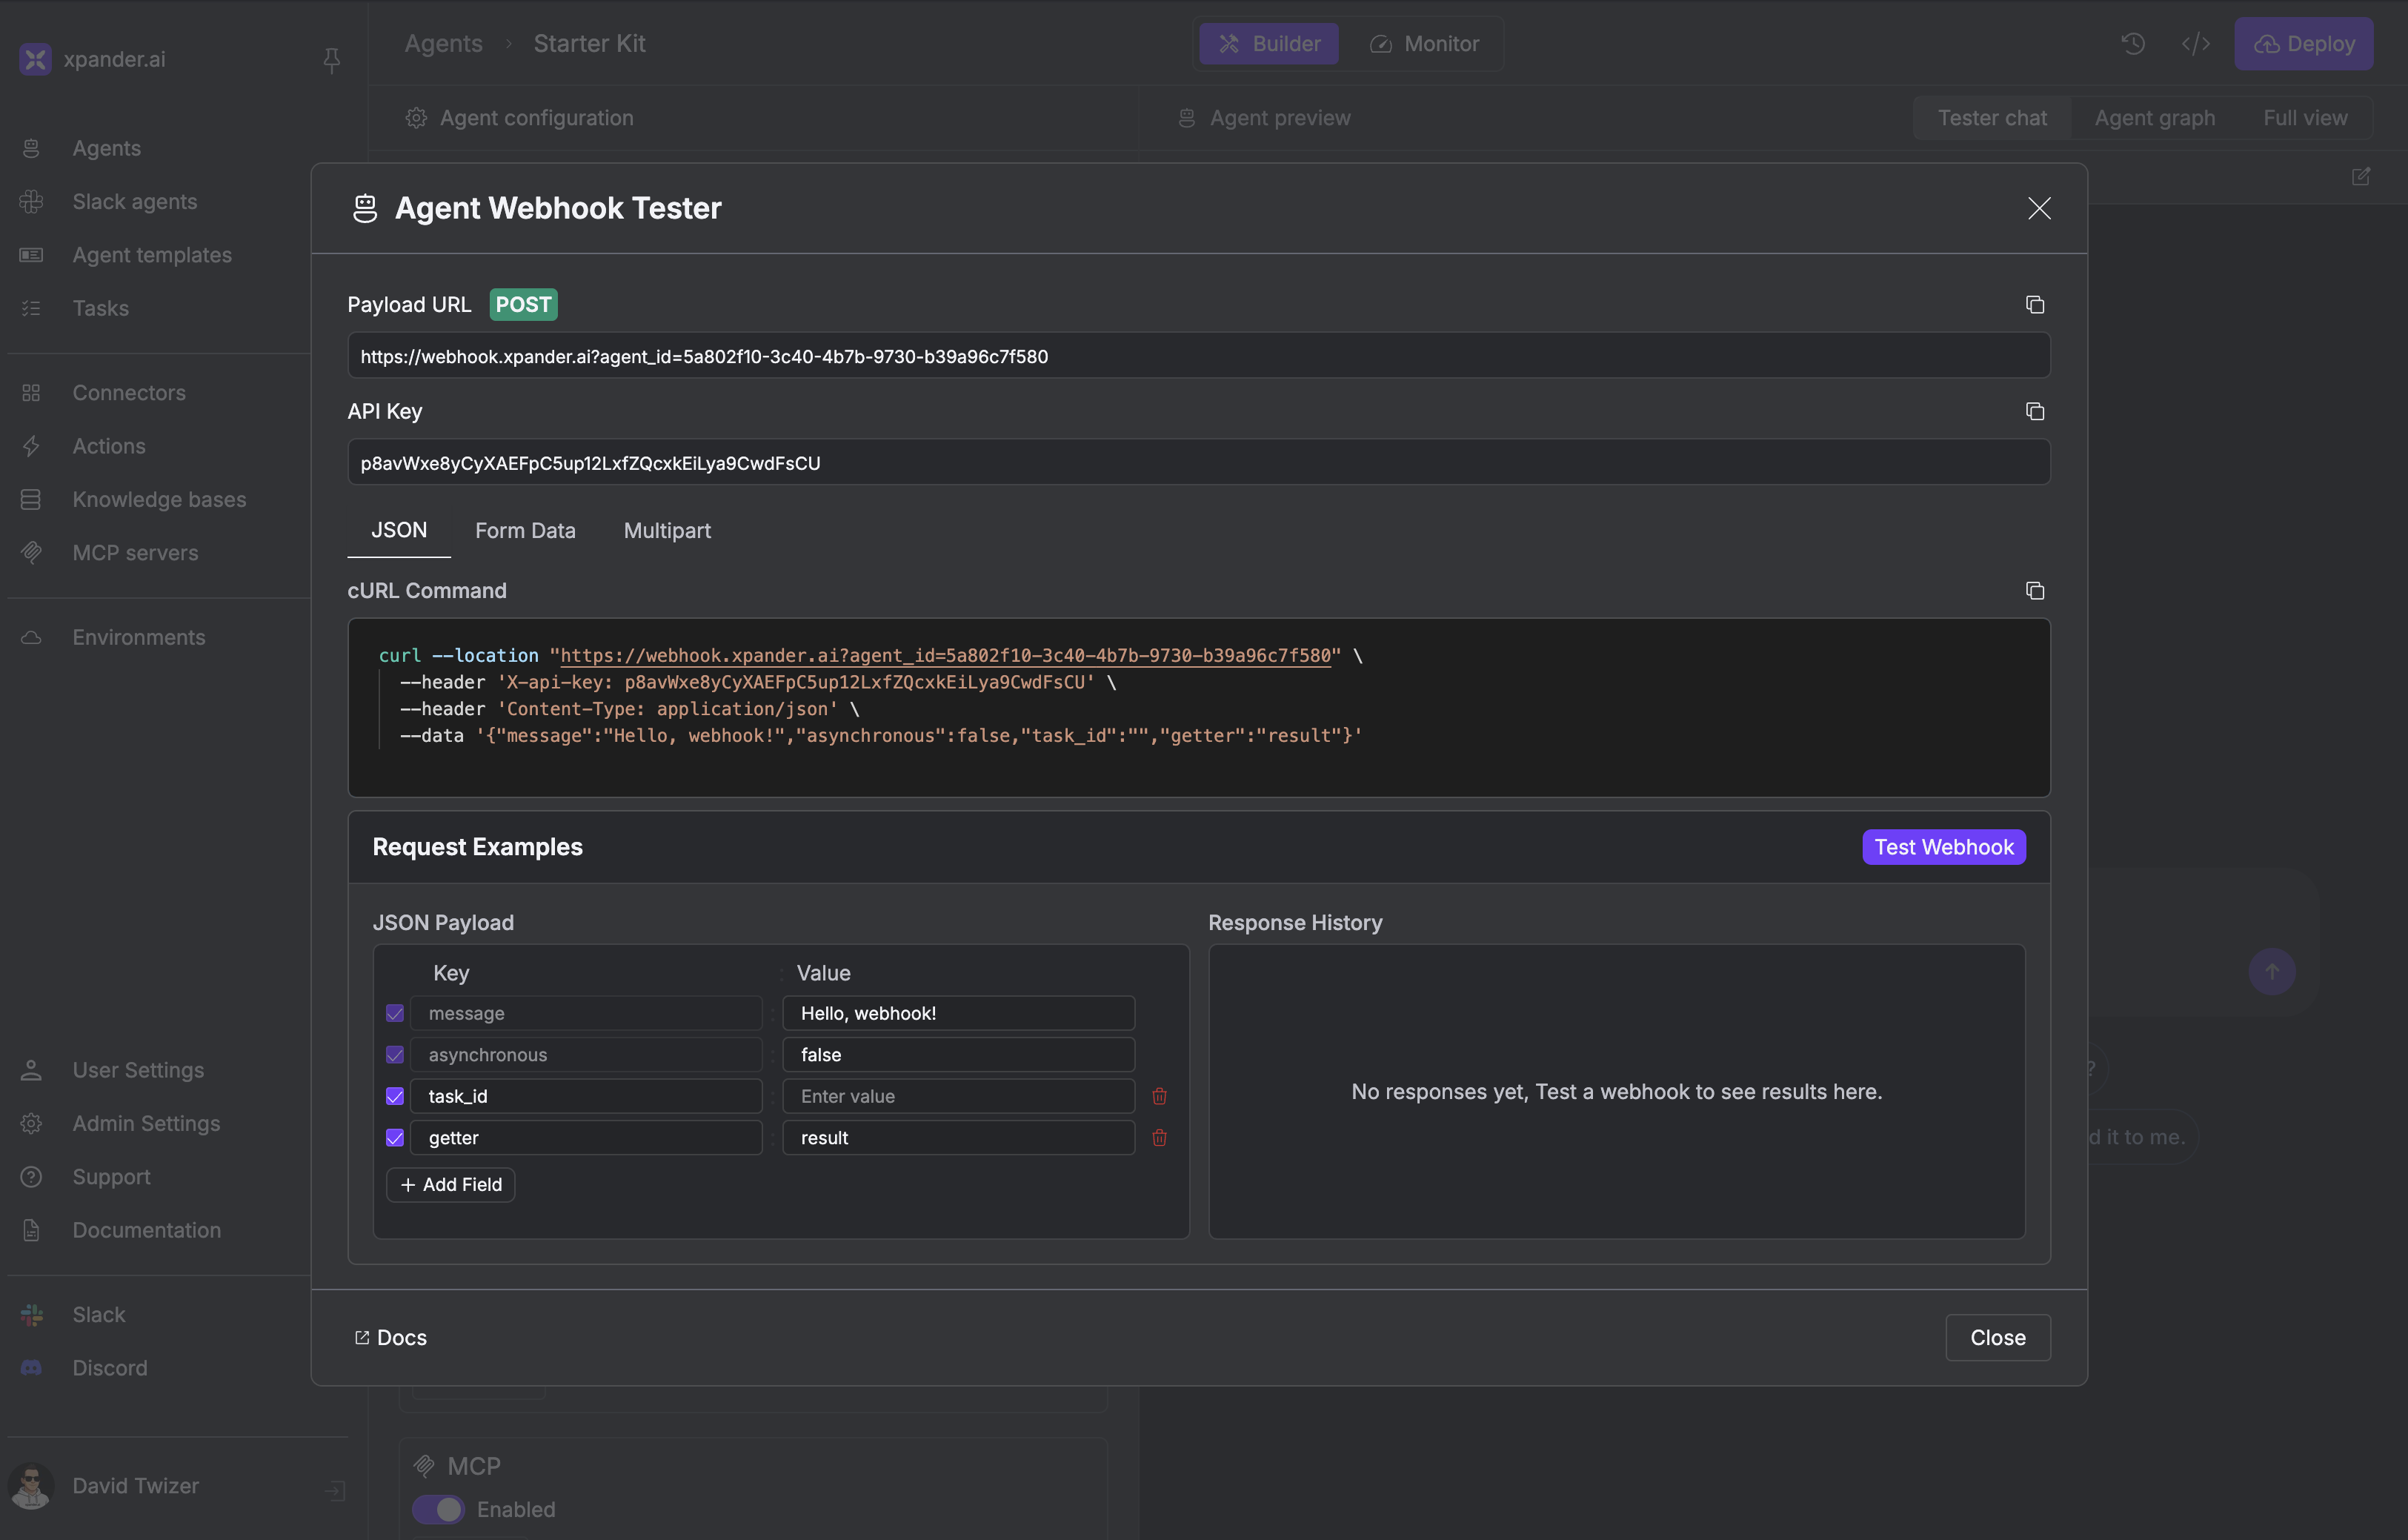
Get Your Webhook URL
Copy the provided webhook URL and API key from the configuration panel.
Test Your Webhook
Use the built-in test interface or the provided curl snippet to verify your setup.
Making Requests All webhook requests use POST to the root endpoint with your authentication and agent configuration.
Basic Request Structure JSON Request
Form Data
File Upload
curl --location 'https://webhook.xpander.ai/?agent_id=YOUR_AGENT_ID' \
  --header 'Content-Type: application/json' \
  --header 'x-api-key: YOUR_API_KEY' \
  --data '{
    "prompt": "Analyze this data",
    "custom_field": "any value"
  }'
Parameters Required Parameters Parameter Type Location Description agent_idstring Query or Body Your agent’s unique identifier x-api-keystring Header or Query Your API key for authentication
Optional Parameters Parameter Type Default Description promptstring "" Text prompt to send to your agent asynchronousboolean falseProcess in background and return immediately task_idstring - Associate request with specific task ID getterstring - Extract specific data from response (e.g., "result.summary") jsonboolean falseParse the result string as JSON and return it as a JSON object user_tokensstring (JSON) - User tokens for MCP OAuth authentication (JSON string mapping graph item IDs to access tokens) user_idstring - User identifier for tracking and personalization user_emailstring - User email address user_first_namestring - User’s first name user_last_namestring - User’s last name disable_attachment_injectionboolean falseDisable automatic file injection into context
You can include any additional fields in your request - they’ll all be passed to your agent for processing. This gives you complete flexibility for custom data structures.
Webhooks support multiple content types to fit your integration needs:
JSON
Form Data
File Upload
Perfect for structured data and API integrations. curl --location 'https://webhook.xpander.ai/?agent_id=YOUR_AGENT_ID' \ --header 'Content-Type: application/json' \ --header 'x-api-key: YOUR_API_KEY' \ --data '{ "prompt": "Process this order", "order_data": { "id": 12345, "items": ["item1", "item2"], "total": 99.99 } }'
Simple key-value pairs, great for HTML forms. curl --location 'https://webhook.xpander.ai/?agent_id=YOUR_AGENT_ID' \ --header 'x-api-key: YOUR_API_KEY' \ --header 'Content-Type: application/x-www-form-urlencoded' \ --data 'prompt=Analyze feedback&rating=5&comment=Great service'
Upload files using the files parameter. curl --location 'https://webhook.xpander.ai/?agent_id=YOUR_AGENT_ID' \ --header 'x-api-key: YOUR_API_KEY' \ --form 'files=@"/path/to/document.pdf"'
Execution Modes
Synchronous Best for: Immediate responses, short tasks, interactive workflows
Waits for agent to complete processing
Returns full results in the response
Request remains open until finished
Asynchronous Best for: Long-running tasks, file processing, background jobs
Returns immediately with task started confirmation
Agent processes in the background
Prevents timeouts for long operations
Synchronous Response { "id" : "a1b2c3d4-e5f6-7890-abcd-ef1234567890" , "agent_id" : "your-agent-id" , "organization_id" : "your-organization-id" , "input" : { "text" : "" , "files" : [ "https://links.xpander.ai/abc123.pdf" ], "user" : null }, "status" : "completed" , "created_at" : "2026-01-29T00:40:46.161472+00:00" , "finished_at" : "2026-01-29T00:40:47.919145+00:00" , "result" : "The agent's response will appear here..." , "source" : "webhook" , "execution_attempts" : 1 }
Asynchronous Response File Processing Files must be uploaded directly using multipart/form-data. URLs to external files are not supported - the webhook service needs the actual file content.
Supported File Types
Documents : PDF, DOC, DOCX, TXTImages : PNG, JPEG, GIF, WEBP, SVGSpreadsheets : XLS, XLSX, CSVArchives : ZIP (contents extracted automatically)
Multiple File Upload curl --location 'https://webhook.xpander.ai/?agent_id=YOUR_AGENT_ID&asynchronous=true' \ --header 'x-api-key: YOUR_API_KEY' \ --form 'files=@"/path/to/document1.pdf"' \ --form 'files=@"/path/to/spreadsheet.xlsx"' \ --form 'files=@"/path/to/image.png"'
For large file batches (10+ files), use asynchronous mode and consider breaking uploads into smaller batches of 5-10 files for optimal performance.
Advanced Features Use the getter parameter to extract specific data from your agent’s response:
# Extract just the summary from a complex response
curl --location 'https://webhook.xpander.ai/?agent_id=YOUR_AGENT_ID&getter=result.summary' \
  --header 'x-api-key: YOUR_API_KEY' \
  --data '{"prompt": "Analyze quarterly report"}'
Instead of full response: { "result" : { "analysis" : { ... }, "summary" : "Q4 revenue increased 15%" , "details" : { ... } } }
Returns just: "Q4 revenue increased 15%"
Parameter Priority When the same parameter appears in multiple places:
Query parameters (highest priority)Request body parameters Default values
# The query parameter 'prompt' will override the body 'prompt'
curl --location 'https://webhook.xpander.ai/?agent_id=YOUR_AGENT_ID&prompt=From query' \
  --header 'x-api-key: YOUR_API_KEY' \
  --data '{"prompt": "From body", "data": "additional info"}'
# Agent receives: prompt="From query", data="additional info"
MCP OAuth Authentication with User Tokens If your agent uses MCP servers with OAuth authentication, you can pass pre-authenticated user tokens to bypass the interactive OAuth flow during execution. This is useful when you’ve already obtained tokens through your own OAuth implementation.
Getting MCP Graph Item IDs:
Call the Get Agent API with your agent ID
Inspect the graph.items array for items with type: "mcp"
Note the id field for each MCP server you want to authenticate
Example with user_tokens: curl --location 'https://webhook.xpander.ai/?agent_id=YOUR_AGENT_ID' \ --header 'Content-Type: application/json' \ --header 'x-api-key: YOUR_API_KEY' \ --data '{ "prompt": "Use my authenticated tools", "user_email": "user@example.com", "user_tokens": { "mcp-graph-item-uuid-1": "user-access-token-abc123", "mcp-graph-item-uuid-2": "user-access-token-xyz789" } }'
As a query parameter (JSON string):
curl --location 'https://webhook.xpander.ai/?agent_id=YOUR_AGENT_ID&user_tokens={"mcp-graph-item-uuid":"token-abc123"}' \
  --header 'x-api-key: YOUR_API_KEY' \
  --data '{"prompt": "Use my authenticated tools"}'
Use Case: You’ve built a web application where users authenticate with Google/GitHub/etc. You can pass their access tokens directly to the agent via user_tokens, allowing the agent to access their resources without additional authentication prompts.
Dynamic Parameter Mapping Use params_mapping as a query parameter to dynamically extract values from your webhook payload and map them to other query parameters. This is especially useful for integrations with Telegram bots, WhatsApp, and other messaging platforms where user/chat identifiers are nested in the payload.
curl --location 'https://webhook.xpander.ai/?agent_id=YOUR_AGENT_ID¶ms_mapping={"task_id":"message.chat.id","user_email":"message.from.email","user_first_name":"message.from.first_name","prompt":"message.text"}' \ --header 'Content-Type: application/json' \ --header 'x-api-key: YOUR_API_KEY' \ --data '{ "message": { "chat": { "id": 123456789 }, "from": { "email": "user@example.com", "first_name": "John" }, "text": "Hello agent!" } }'
How it works:
Uses dot notation to navigate nested payload fields (e.g., "message.chat.id")
Automatically extracts values and overrides the corresponding query parameters
Supports all standard query parameters: task_id, user_id, user_email, user_first_name, user_last_name, prompt
Use Case Example: Telegram bot integration
Map message.chat.id to task_id to track conversations per chat
Map message.from.username to user_id to identify users
Map message.text to prompt to use the message content as the agent prompt
Integration Examples
Zapier Integration Connect any Zapier trigger to your agent for automated workflows.
Form Processing Process contact forms, surveys, and user submissions automatically.
Document Analysis Extract data from uploaded documents, invoices, and contracts.
API Integration Integrate agents into your existing applications and services.
JavaScript Example const response = await fetch ( 'https://webhook.xpander.ai/?agent_id=YOUR_AGENT_ID' , { method: 'POST' , headers: { 'Content-Type' : 'application/json' , 'x-api-key' : 'YOUR_API_KEY' }, body: JSON . stringify ({ prompt: 'Process customer inquiry' , customer_data: { name: 'John Doe' , email: 'john@example.com' , message: 'I need help with my order' } }) }); const result = await response . json (); console . log ( 'Agent response:' , result . result );
Python Example import requests response = requests.post( 'https://webhook.xpander.ai/' , params ={ 'agent_id' : 'YOUR_AGENT_ID' }, headers ={ 'x-api-key' : 'YOUR_API_KEY' }, json ={ 'prompt' : 'Analyze sales data' , 'data' : { 'month' : 'January' , 'sales' : [ 1000 , 1200 , 1500 ] } } ) result = response.json() print ( f "Analysis: { result[ 'result' ] } " )
Error Handling
{ "detail" : "agent_id is required" }
Ensure you provide the agent_id parameter in your request.
{ "detail" : "API key not specified" }
Add your API key using the x-api-key header or query parameter.
{ "detail" : "Invalid API key" }
Verify your API key is correct and has access to the specified agent. Best Practices
Use Async for Large Tasks Set asynchronous=true for file processing, complex analysis, or any task taking >30 seconds.
Implement Retry Logic Add exponential backoff retry for transient failures (5xx errors).
Validate Responses Always check the HTTP status code and handle error responses appropriately.
Use Getter for Large Responses Extract only the data you need to reduce response size and improve performance.